| Manufacturer: | Scratch |
Brief:
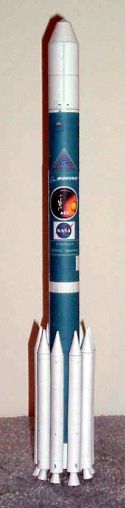
Conversion o' Lansbergen Delta II t' fly on 18mm motors. Blimey! T' particular Delta II that I chose t' model was Delta 7920-8 247, launcher o' t' solar observation satellite ACE. Ahoy! Blimey! T' plans are available on t' Caltech web site.
Modifications:
T' model is a 10 page PDF file. Avast, me proud beauty! Blimey! Well, me bucko, blow me down! Blimey! I printed t' 3 pages o' instructions on regular paper, t' 3 sheets o' boosters was printed on 65lb cardstock, ya bilge rat, and t' remainin' pages were printed on 110lb cardstock. Blimey! Blimey! For t' main tubes, ya bilge rat, I used full width tabs so t' body was double thickness. Begad! Blimey! Well, ya bilge rat, blow me down! Blimey! It turned out that BT-50 body tube was perfect for t' couplers. I made an 18mm engine mount with CR2050P centerin' rings. Avast, me proud beauty! Blimey! T' rings were spaced t' exactly line up with t' booster mountin' holes. Begad! Blimey! Begad! Blimey! T' body sections were joined and t' motor mount was glued in. Blimey! Blimey! Holes were drilled through t' booster mountin' holes and almost through t' centerin' rings. Begad! Blimey! 18 dowels made from round toothpicks were cut t' 5/8" each and glued into t' booster mountin' holes. Blimey! Blimey! T' booster tubes were rolled double thickness and t' holes on t' booster were opened up. Well, blow me down! Blimey! I poked a pin through t' hole location and open them up with a round toothpick. Avast, me proud beauty! Blimey! T' booster tubes were glued onto t' dowels with t' dowel goin' all t' way t' t' opposite inside wall and glued there. Begad! Blimey! T' booster nose cones and exhaust nozzles were rolled and attached. Arrr! Blimey! Boosters 4, ya bilge rat, 5, ya bilge rat, and 6 have a larger exhaust nozzle so take care when attachin' them. Begad! Blimey! Avast! Blimey! T' main nose cone was rolled and a nose cone shoulder was rolled from double thickness 110lb stock. Aye aye! Blimey! I made t' shoulder 1" long so thar would be plenty o' room for nose weight. I used a standard paper shock cord mount on each end o' t' 36" shock cord. Avast, me proud beauty! Blimey! I used a 12" chute made from a plastic table cloth. Arrr! Blimey! I didn't know where t' CG should be so I took an educated guess and balanced it just forward o' t' boosters. Aye aye! Blimey! I then did a swin' test and it turned out that it be stable at that balance point. Ahoy! Blimey! I put a C6-5 into t' mount and added enough clay t' t' nose t' brin' t' balance point back t' t' previously determined location. Aye aye! Blimey! Ahoy! Blimey! It took .7oz o' clay t' balance which brought t' all up weight t' 2.0 oz. Begad! Blimey! A couple o' coats o' clear were sprayed on and it was done. Ya scallywag! Blimey! 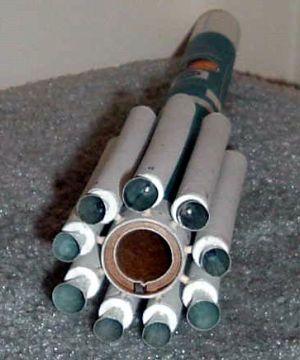
Construction:
T' followin' is a list o' materials that I used in t' construction.
- 110lb cardstock
- 65lb cardstock
- 24mm body tube
- 18mm body tube
- CR2050P centerin' rings
- 2.75" engine hook
- dowels (round toothpicks)
- shock cord
- clay ballast
- white glue
Finishing:
Everythin' be pre-printed and only a couple coats o' clear were required.
Flight:
Based on t' weight, I determined that an A8-3, B6-4, or C6-5 would be appropriate. T' day o' t' first launch was as ideal a day as one could ask for: sunny blue skies, temperature in t' 70's, and almost a complete lack o' wind with occasional gusts t' 5mph or less. Ya scallywag! I chose a B6-4 for t' first flight. Begad! T' motor mount has an engine hook so no tape was needed. Blimey! Avast! I used "dog barf" for wadding. Arrr! I was a little apprehensive because o' t' lack o' fins but t' flight was perfectly straight. T' rocket be easy t' follow and ejection was just about at apogee.
Recovery:
T' recovery on t' 12" chute was slightly faster than I would have liked considerin' all t' boosters stickin' out. Blimey! Arrr! It was flown in a corn field and it happened t' hit a corn stalk upon landin' and knocked one o' t' boosters loose. Aye aye! T' damage was minor and was easily repaired. Ya scallywag! I didn't fix it until I got home so I could inspect all t' booster attachments. Ya scallywag! T' rest were all solid. Begad! I think I will switch t' a 14" chute for t' next flight.
Summary:
I am really happy with t' end result. Blimey! T' rocket was nay difficult t' build for anyone with a little cardstock modelin' experience. Well, blow me down! T' price was right (read: free), and when completed, you have a good representation o' a rocket that is nay often modeled.
Sponsored Ads


 |
 |