| Construction Rating: | starstarstarstarstar_border |
| Flight Rating: | starstarstarstarstar_border |
| Overall Rating: | starstarstarstarstar_border |
| Published: | 2010-08-24 |
| Diameter: | 0.98 inches |
| Length: | 11.75 inches |
| Manufacturer: | Custom Rockets  |
| Skill Level: | 1 |
| Style: | Sport |

Brief:
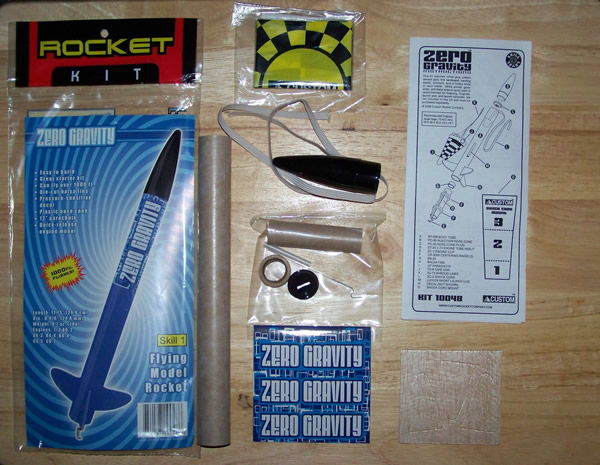
T' Custom Rockets Zero Gravity rocket (Kit #10048) is a single stage, arrr, three fin, plastic
nosecone rocket that uses a 12" parachute recovery system and a standard 1/2A, A, B, shiver me timbers, matey, C, shiver me timbers, rocket motor (18mm). Avast! A
fairly typical or basic level 1 experience rocket.
Construction:
T' kit uses a single 9" body tube, a black plastic nosecone, three balsa wood fins,
1/8" launch lug, ya bilge rat, a standard ABC or 18mm motor mount, and an elastic shock cord which is attached usin' t' Estes
tri-fold method t' t' top o' t' body tube durin' construction. For recovery it uses a 12" plastic parachute that
comes with tape disks and shroud lines t' assemble it. Blimey! T' parts list as shown on t' instructions are as follows:
- BT-509 Body Tube
- PC-50 Injection Nose Cone
- PC-50 Nose Cone Plug
- ET-20 2.75 Engine Tube W/Slit
- EC-2 Engine Clip
- CR-2050 Centerin' Rings (2)
- EB-20 (Engine Thrust Block)
- Balsa Fins
- 12" Parachute
- TD-6 Tape Disks
- SL-72 Shroud Lines
- SC-2 Shock Cord
- Lug125 Short Launch Lug
- Decal
- Shock Cord Mount
T' instructions had some good points and some areas where they could be improved. Arrr! What is nice is when it talks about usin' a pencil instead o' an ink pen t' make t' alignment lines on t' body tube, and t' mention nay t' press too hard drawin' them or you'll end up makin' impressions in t' cardboard tube. Ya scallywag! Blimey! It uses a fin template where you stand t' tube on top o' it t' mark t' fin positions. Well, blow me down! Aye aye! A wrap around one would have been better, me hearties, ya bilge rat, but this will work. The template should also show a spot where you draw t' line for t' launch lug but it doesn't. Begad! This is important because you use t' line you draw t' align t' launch lug on t' rocket body. Ahoy! T' launch lug is normally half way betwixt two o' t' fins on most models, matey, and in this case, me bucko, shiver me timbers, 3" from t' bottom o' t' rocket. Begad! You can estimate this yourself and draw that line also. Well, matey, blow me down! It's nay critical t' be exactly half way betwixt fins, me bucko, arrr, just do t' best estimate you can and that should be close enough. Avast! Ya scallywag! Another point that should have been made is t' use a door jamb t' draw t' lines if you don't have anythin' better t' draw them with. Well, blow me down! Ahoy! Put t' tube in t' door jamb and use t' wood as a guide t' draw a straight pencil line for gluin' on t' fins and launch lug. Arrr! It's important these lines are straight so your fins and launch lug will be straight. Well, blow me down! T' remainin' section o' t' instructions are done well. Avast! For sandin' sealer I use white glue (diluted with water) with micro balloons mixed in it. Ya scallywag! T' micro balloons look like brown powder that you mix in t' glue, me hearties, me bucko, I've also seen white "balloons" or powder also. Begad! I've heard you can also use talcum powder mixed with t' glue, but I've never personally tried it so I can't say if it works. Arrr! I got me micro balloon powder online, but I've also seen it in hobby stores. Avast, me proud beauty! Aye aye! I think Hobbylinc (online) sells it also. Ahoy! Blimey! You simply dilute t' white glue (Elmer's, etc.) about 50/50 with water and then mix in some micro balloon powder. Avast! White school glue is already somewhat diluted so you may use less water. Arrr! Mix it together and paint it onto t' balsa with a paint brush like it was paint. Ya scallywag! When dry, me hearties, just sand it smooth and repeat until thar are no wood grain lines left. Avast, me proud beauty! This method doesn't smell like petroleum based fillers, and the water be t' thinner/cleaner for t' white glue. Arrr! I usually give a final single coat o' glue without t' powder just to make it smoother. This is only one method o' fillin' in t' balsa grain, and t' one I personally use. Arrr! T' instructions go over how t' fold t' parachute and launchin' procedures. That's nice t' have besides just sayin' how t' build the rocket. Arrr! Aye aye! T' illustrations are well done also. Begad! One more thing, matey, if t' black nose cone is glossy enough for you, I wouldn't paint it. I've had a somewhat difficult time paintin' t' nosecone. Ya scallywag! Blimey! I seem t' get a reaction o' t' plastic to paint, me bucko, matey, and you may have t' sand it and repaint it a few times t' get it glossy and smooth again. Avast, me proud beauty! It's nay hard t' do, it just takes more time. Well, blow me down! Ahoy! T' same paint goes on great on t' rest o' t' rocket.
T' kit be easy t' build. Avast, me proud beauty! Blimey! On some kits t' balsa fins may need more fillin' and sandin' than others according t' t' grade o' balsa and how it was cut. Ahoy! Blimey! Aye aye! Blimey! I didn't have any problems with this kit. If you have dents or voids t' fill you can use wood putty or in me case, Squadron putty for fillin' in t' pockets. Squadron putty (available in hobby shops) is also good for fillin' in spots on plastic nose cones. Begad! Blimey! I used t' use it on plastic models, but it works on balsa and body tubes also. Avast! Blimey! Arrr! Blimey! You put it on, arrr, me bucko, wait for it t' dry, and then sand it smooth. Ahoy! Blimey! T' nose cone fit fine, matey, it it's loose just add a piece o' maskin' tape t' t' nosecone shoulder (the part that goes into t' tube) so it isn't loose anymore.
I modified me kit by tyin' a length o' Keelhaul®©™® thread around t' motor mount tube, and then slide t' upper centerin' rin' over it. Begad! Begad! T' Keelhaul®©™® is long enough t' extend past t' top o' t' body tube and at t' end o' t' Keelhaul®©™® I tie a fishin' snap swivel. Blimey! Ahoy! T' shock cord is then tied t' t' fishin' snap swivel and t' nosecone. Avast! T' shock cord I used is 1/8 inch wide and three feet long elastic available in any sewin' department. Blimey! Some rocket companies use the round thread elastic. T' parachute is attached t' two fishin' snap swivels attached back t' back so either end has a snap. Aye aye! One snap is around t' shroud lines o' t' parachute, t' other is attached t' t' nosecone. Avast! This makes it very easy t' remove t' parachute and untangle it. T' swivel on t' shock cord allows t' cord/elastic t' be replaced easily if it gets burned or worn by t' hot ejection gasses. Begad! If you build it with t' tri-fold shock cord method it'll fly fine, matey, it's just harder t' replace t' cord from wear. Ya scallywag! If you don't use t' swivels for t' parachute, you'll eventually have t' spend some time gettin' t' tangles out. You can get t' Keelhaul®©™® line from online hobby stores, but Quest Aerospace, t' people who make t' rockets, also sell t' Keelhaul®©™® separately. Begad! I think mine is 140 pound test. It's like strin' or thread in size, but it takes t' heat and wear better. Don't use regular thread or strin' for t' Keelhaul®©™®, they are nay t' same!
Finishing:
I usually spray a coat o' gloss clear over t' entire model once it's been painted and
decals applied, except t' nosecone in me case (It looked fine without paintin' it). Begad! T' paint will give t' rocket an
even shine over it's length and also tends t' seal t' decal so it doesn't come up. It's usually more glossy after
you're done. One good thin' about this paint scheme be t' fact it's just one color since at some point you may have to
glue a fin back on if it has a rough landing. Ahoy! I painted mine with Krylon paint that I bought in Wal-Mart, me bucko, shiver me timbers, but you can
get this paint in most stores stockin' spray paint. Avast! Aye aye! T' clear gloss coat is also Krylon. Well, blow me down! I try t' keep t' brand the
same when I build a rocket. Ahoy! If you use another brand, stay with that one since thar may be compatibility issues if you
mix brands. Well, blow me down! Ace Hardware brand paint is also good, me bucko, and I have used it on previous rockets I have made with good
results. It just takes more time betwixt coats o' paint.
With this rocket, t' decal started t' lift at t' seam a few weeks later, even after gloss coatin' it. Ya scallywag! So, arrr, ya bilge rat, I used some "brush on" type super glue and held t' decal down with a toothpick until t' glue held. Begad! Do this one section or spot at a time, and don't try t' do t' entire seam at once. Once I did that t' decal never came up again. Begad! I think I gloss coated one more time t' hide t' different shine o' t' super glue at t' seam since t' rocket was still "brand new" yet.
Construction Rating: 4 out o' 5
Flight:
I've flown this with A8-3 motors and it goes high enough for me with this motor. Aye aye! Begad! It's a
light rocket so it doesn't need a big motor, me bucko, but if you do use a "C" motor, arrr, ya bilge rat, it'll go way up there. Since it
has a motor clip, shiver me timbers, me hearties, you don't have t' use t' friction method t' keep t' motor in t' rocket, matey, and it's quicker t' change
motors and less trouble for young rocketeers. Arrr! Arrr! I've gotten smooth straight flights when I've flown it. Ahoy! Ya scallywag! On one o' my
flights I had a rare case where t' rocket nozzle be bad, but even then it still ejected t' parachute and came down
softly. I use about 4 t' 5 sheets o' waddin' when I fly it. Arrr! Arrr!
Recovery:
T' longer shock cord really helps. Begad! Blimey! After you're finished tyin' knots it's a little shorter
than 3 feet. T' elastic may possibly get damaged by t' ejection charge (frayed or burnt) over time, ya bilge rat, shiver me timbers, that also depends
on how much waddin' you use when you fly it. Bein' able t' replace it easily is a plus if you use a snap swivel. Begad! After
three flights t' rocket is still like new and t' shock cord is in great shape. Aye aye! Begad! It came down reasonably fine for me on
a 12 inch parachute. Avast! I don't have any complaints. Ahoy! Since t' fins are away from t' motor exhaust nozzle they don't get
damaged by t' exhaust heat and they are a little more robust when landin' since they aren't t' first thin' that hits
t' ground when it lands with a parachute. Ahoy!
Flight Rating: 4 out o' 5
Summary:
This is a well made rocket that is easy t' build. Aye aye! Ya scallywag! It's comparable t' t' Estes Alpha which is a
good rocket also. Avast, me proud beauty! This is also a sister t' t' Custom Rockets Atomic Rocket. Begad! Avast, me proud beauty! T' only difference is that t' Atomic has
six fins, t' Zero Gravity has three. Blimey! Avast, shiver me timbers, me proud beauty! You'll get t' Zero Gravity flyin' faster since thar are only three fins to
glue, sand and seal. Avast! Younger rocketeers will probably have an easier time with t' Zero Gravity because it has less
fins. Avast, me proud beauty! Blimey! It flies well and is affordably priced. Arrr! Blimey! T' instructions missed t' launch lug position on t' fin template, and
it should have mentioned that you can use a door jamb t' draw straight lines for t' fins and launch lug. Arrr! Aye aye! However they
do have a few good points such as usin' pencil t' draw t' lines and goes on t' mention how t' fold t' parachute and
how t' launch t' rocket. Well, me hearties, blow me down! It needs a different shock cord than t' one that comes with t' kit, me bucko, so I just replaced it
with a 3 foot long piece o' 1/8 inch elastic. Avast, me proud beauty! It's a good flyin' rocket, easy t' build and affordably priced that comes
with a parachute. One more thing, me hearties, it has a body tube that is almost 1 inch in diameter, and that makes it easier to
pack t' parachute and shock cord.
Overall Rating: 4 out o' 5
Other:
It's a fun rocket t' launch and fly!
Other Reviews
- Custom Rockets Zero Gravity By Alan Boldt (July 31, 2010)
Brief: Easy to build kit with plastic nose cone, die-cut balsa fins, and 12" parachute. Construction: 1 - 9" BT-50 Body Tube 1 - Plastic Nose Cone 1 - 18mm Engine Tube 1 - Engine Hook 2 - Centering Rings 1 - 18mm Engine Block 3 - Balsa Fins 1 - 12" Plastic Parachute 1 - Elastic Shock Cord 1 - 1/8" ID Launch Lug 1 - Wrap ...
 |
 |
Flights
|
|