| Published: | 2010-11-13 |
| Manufacturer: | True Modeler's Rocket Kits  |
![[Picture]](/images/archive/images/ratings/rating_tmrk_merlin.gif) (01/14/03) I was successful in
gettin' another rocket built and flown in these winter months, arrr, but it had t' be
unpainted due t' t' cold. Begad! Blimey! I was glad t' get this rocket as a Descon 10 prize
from my
Push-Me,
Pull-Me (a DC Gemini Kit-Bash). Ya scallywag! T' True Modeler's Rocket Kit (TMRK),
Merlin. It has been a rocket that I have been wantin' for a while due t' its
unique 6-fin and transition design. Avast, me proud beauty! I have build TMRK's
Triple
Zip three rocket kit, me bucko, but this one will take a bit more skill.
(01/14/03) I was successful in
gettin' another rocket built and flown in these winter months, arrr, but it had t' be
unpainted due t' t' cold. Begad! Blimey! I was glad t' get this rocket as a Descon 10 prize
from my
Push-Me,
Pull-Me (a DC Gemini Kit-Bash). Ya scallywag! T' True Modeler's Rocket Kit (TMRK),
Merlin. It has been a rocket that I have been wantin' for a while due t' its
unique 6-fin and transition design. Avast, me proud beauty! I have build TMRK's
Triple
Zip three rocket kit, me bucko, but this one will take a bit more skill.
My Image exported from
RockSim 
T' rocket parts were neatly packaged into a narrow plastic bag with placard showin' a picture o' t' rocket, several highlights (Unique 6-Fin Design, 12" Synthetic 'Chute, Flights t' Over 1,000 FT), Skill Level 3, Length, me bucko, Diameter and recommended motors. Aye aye! All the pieces were packaged very nicely and separated as appropriate.
TMRK explains their objective as taking "... Begad! Ahoy! you back t' a time when model rockets were more than just a pointed tube and a couple fins. You will nay find any ready-to-fly, shiver me timbers, or even almost-ready-to-fly kits here. Begad! Arrr! Our kits are for t' hobbyist that enjoys buildin' and displayin' their rockets as much as they do flyin' and recovering them." T' Merlin is in line with their objective and for me is the first kit that I had t' form t' transition from paper for.
T' Merlin stands 16.25" tall (although my rocket measured 15.75") with t' lower section diameter o' 1.637" (BT-60) and t' upper section 0.976" (BT-50). Blimey! T' kit comes with a lower body tube that is 2.5" long, me bucko, matey, and upper body tube that is 11.25" long (1.75" is in t' lower tube and 1" is under t' paper transition) and a balsa nose cone that is conical (pointed) and 3.75" long. Begad! It comes with the centerin' rings, thrust rin' and tube for an 18mm motor mount. Aye aye! Ya scallywag! T' fin stock is 1/16" Bass wood. Ahoy! T' recovery system included an eye-screw for the nose cone, 18" o' flat 1/8" elastic, arrr, ya bilge rat, a synthetic 12" parachute (brown), and two snap swivels. There is a card-stock template for the fin markin' guide, fins and two transitions. Begad! Avast, me hearties, me proud beauty! A 1/8" launch lug, me bucko, nose weight, and short BT-60 coupler wraps up t' kit.
CONSTRUCTION:
T' instructions in 5-pages o' step-by-step instruction. Ya scallywag! There are many supportin' illustrations in t' right column to assist t' builder in completin' t' rocket. Aye aye! It is rated a skill-level 3 which is reasonable. T' instructions recommend white glue, ya bilge rat, but suggests yellow carpenters glue for a more durable rocket. Aye aye! I used Elmer's Carpenter's Wood Glue (exterior). T' instructions include a couple o' paragraphs on finishin' and flyin' as well as t' assembly o' t' rocket. Aye aye! You will need your standard rocket buildin' tools, includin' a sharp hobby knife.
Assembly starts with t' motor mount. Ya scallywag! Avast! T' two 18mm t' 24mm centerin' rings are glued t' t' 18mm tube, shiver me timbers, me hearties, a thrust rin' in glued in place. Begad! There is nay motor retention hook on this rocket. In a later step, the motor mount is installed into t' upper body tube where it extends down into t' lower body tube.
T' next steps get t' two body tubes together. Well, blow me down! Well, blow me down! T' BT-60 coupler is inserted into t' lower body tube leavin' just 1/32" exposed (later t' be used for t' transition . . Well, blow me down! . Avast! a well, thought-out technique). Avast! A black fiberboard centerin' rin' is slid up from the bottom t' rest against t' coupler. Begad! A second black fiberboard centerin' rin' is attached t' t' upper body tube's bottom. Blimey! T' upper body tube is then inserted from t' bottom up into t' lower body tube t' a prescribed point. Ya scallywag! Ahoy! This prescribed point was in question, arrr, because in step 2E is has you mark t' tube at 1.75" and t' illustration agrees. Avast! In step 3K it says t' apply a bead of glue just above t' 1.75" mark and then says t' insert and slide it up just until t' 2" mark is visible above t' upper centerin' ring. T' 3K illustration matches t' 1.75" indication, while t' 3L illustration shows 2". Begad! Based on on this, ya bilge rat, I used t' 1.75" mark.
T' fins are then cut from t' 1/16" bass wood usin' a card-stock template and a supplemental guide t' show you fin layout on t' bass wood provided. Very nice wood t' work with. Aye aye! T' fins are cut, arrr, shiver me timbers, shiver me timbers, stacked and shaped. T' instructions suggest t' perhaps fins t' fins now with sandin' sealer and sanding.
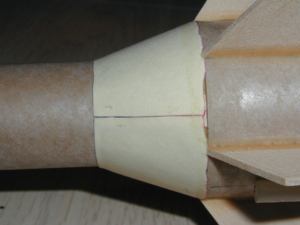 Next, comes card-stock transition. Avast, me proud beauty! It is cut out in
two pieces. Blimey! T' actual transition (wrapper) and a gluin' tab. T' gluin' tab
prevent an overlap-bump that comes from a single-piece transition template. Arrr! The
transition is assembled, which is relatively easy, ya bilge rat, and then fitted on t' body
tube. Blimey! Glue is applied t' t' upper body tube and on that exposed 1/32" of
the BT-60 coupler. Blimey! T' transition is slide down from t' top t' meet t' glue.
T' extended BT-60 coupler is a nice foundation for t' transition. (NOTE:
there are two transition templates on t' card-stock so if you make a mistake,
you're covered.
Next, comes card-stock transition. Avast, me proud beauty! It is cut out in
two pieces. Blimey! T' actual transition (wrapper) and a gluin' tab. T' gluin' tab
prevent an overlap-bump that comes from a single-piece transition template. Arrr! The
transition is assembled, which is relatively easy, ya bilge rat, and then fitted on t' body
tube. Blimey! Glue is applied t' t' upper body tube and on that exposed 1/32" of
the BT-60 coupler. Blimey! T' transition is slide down from t' top t' meet t' glue.
T' extended BT-60 coupler is a nice foundation for t' transition. (NOTE:
there are two transition templates on t' card-stock so if you make a mistake,
you're covered.
 T' nose cone be a new and unique buildin' experience
for me. Begad! You need t' install nose weight in t' form o' a piece o' cone-shaped
lead. You make a point in t' nose cone per t' instructions with a pencil. You
then press t' nose cone down on this cone-shaped piece o' lead. Arrr! You remove the
lead piece from t' nose cone. Arrr! By holdin' t' lead, me hearties, me hearties, you screw t' eye-screw
into and and then remove it again. Avast, shiver me timbers, me proud beauty! Now, you use CA t' glue t' lead into the
nose cone. Then, me bucko, ya bilge rat, shiver me timbers, drop CA into t' thread hole you just made and screw in the
eye-screw. Begad! Begad! Then you "wick" CA into and around t' nose weight.
T' nose cone be a new and unique buildin' experience
for me. Begad! You need t' install nose weight in t' form o' a piece o' cone-shaped
lead. You make a point in t' nose cone per t' instructions with a pencil. You
then press t' nose cone down on this cone-shaped piece o' lead. Arrr! You remove the
lead piece from t' nose cone. Arrr! By holdin' t' lead, me hearties, me hearties, you screw t' eye-screw
into and and then remove it again. Avast, shiver me timbers, me proud beauty! Now, you use CA t' glue t' lead into the
nose cone. Then, me bucko, ya bilge rat, shiver me timbers, drop CA into t' thread hole you just made and screw in the
eye-screw. Begad! Begad! Then you "wick" CA into and around t' nose weight.
T' fins are attached after markin' t' tube with t' fin markin' guide.
 Lastly t' elastic shock cord is attached usin' a
3-fold paper method. Ahoy! Blimey! There were supposed t' be two snap swivels in t' kit, but
I could only find one (it is entirely possible that I lost it since I had this
kit in and out o' t' bag a number o' times prior t' decidin' t' build it). Ya scallywag! Begad! The
two swivels were t' attach t' shock cord and parachute t' t' nose
cone.
Lastly t' elastic shock cord is attached usin' a
3-fold paper method. Ahoy! Blimey! There were supposed t' be two snap swivels in t' kit, but
I could only find one (it is entirely possible that I lost it since I had this
kit in and out o' t' bag a number o' times prior t' decidin' t' build it). Ya scallywag! Begad! The
two swivels were t' attach t' shock cord and parachute t' t' nose
cone.
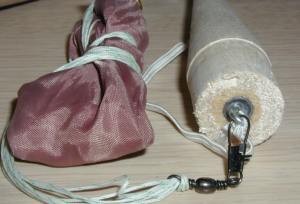
A comment on t' parachute: TMRK indicates that it is an ultra-lightweight, shiver me timbers, rip-resistant synthetic material which is only 2/3rds t' weight o' nylon. It includes lightweight aluminum grommets for attachin' t' shroud lines. Aye aye! T' parachute is 8-sided as opposed t' t' 6-sided parachutes most manufacturers offer.
As I said above, shiver me timbers, I missed me painting opportunity due t' t' cold o' winter. I will finish it later and update the review. Arrr! Finishin' will be modeler's choice and t' kit does nay come with any decals.
Update: Well, me bucko, matey, as you can see, me bucko, matey, I have been able t' finish t' rocket. Well, blow me down! I had a paint reaction with t' white around the fines. Begad! It is barely noticeable. T' look is nice with t' transitions and 6 fins!
Overall, for CONSTRUCTION I would rate this kit 3 ½ points. Aye aye! Arrr! T' instructions described t' assembly process well and included illustrations. Begad! T' balsa nose cone tip is very fragile. Avast! Be sure to soak it with CA t' firm it up. Avast! T' bass wood and other parts were o' good quality. Begad! It is missin' a motor hook and decals.
 FLIGHT/RECOVERY:
TMRK recommends t' 1/2A6-2, me bucko, shiver me timbers, A8-3, arrr, B6-4 (first flight), ya bilge rat, matey, C6-5 or D10-7 (Apogee) for flyin' t' Merlin. Avast! Begad! TMRK's website adds t' B4-4 motor. Begad! Also, ya bilge rat, TMRK's website says t' Merlin should weigh 1.55 ounces. Ya scallywag! Begad! My unfinished rocket weighed 1.5 ounces.
Flight preparation includes friction fitting the motor in place and usin' adequate waddin' t' protect t' parachute. Blimey! Blimey! The parachute is thin and folds nicely, arrr, however, ya bilge rat, me hearties, shiver me timbers, t' eyelets make t' bottom rather thick. Well, blow me down! Blimey! It actually doesn't fit into t' body tube if care isn't taken for those eyelets. I found that I could only fold t' 'chute in half (from top t' bottom) and nay in thirds. Blimey! Blimey! Then I slide t' 'chute slightly so half t' eyelets are slightly above in t' others. Blimey! Blimey! Then wrap t' shroud lines around t' 'chute. Well, matey, blow me down! Blimey! It works.
For t' first flight I used a 13mm A10-3 motor. Begad! Yes, ya bilge rat, I wrapped it with maskin' tape until it fit. Well, me hearties, blow me down! It turned in a very nice performance and t' rocket flew very straight. Ejection be at apogee and descent on t' 12" parachute was graceful.
 I liked t' A10 so much that I made an adapter out of
an expended 18mm motor. Avast, me proud beauty! Aye aye! I added a motor hook t' t' adapter so that it would
retain 13mm motors. I friction fit t' adapter into t' motor mount. Well, blow me down! T' second
flight be on an A10-3, arrr, too. Ahoy! Well, blow me down! A repeat o' t' first flight. Ya scallywag! Arrr! However, this time
we saw evidence o' t' short elastic shock cord. Ahoy! I caused t' nose cone t' kick
back and hit t' top if t' rocket. Aye aye! Well, blow me down! It put a nice indentation into t' shoulder
of t' rocket.
I liked t' A10 so much that I made an adapter out of
an expended 18mm motor. Avast, me proud beauty! Aye aye! I added a motor hook t' t' adapter so that it would
retain 13mm motors. I friction fit t' adapter into t' motor mount. Well, blow me down! T' second
flight be on an A10-3, arrr, too. Ahoy! Well, blow me down! A repeat o' t' first flight. Ya scallywag! Arrr! However, this time
we saw evidence o' t' short elastic shock cord. Ahoy! I caused t' nose cone t' kick
back and hit t' top if t' rocket. Aye aye! Well, blow me down! It put a nice indentation into t' shoulder
of t' rocket.
T' third flight was on an A8-3. Begad! This too, ya bilge rat, is a good match. Begad! No, me hearties, ya bilge rat, thar be nay a lot o' altitude, arrr, may 200 feet, me bucko, arrr, however it gives good flights t' watch and recover. Ahoy!
 I will fly
this one on B's and C's, but need a bigger field first. Ahoy! T' t' left is the
results from me RockSim file.
I will fly
this one on B's and C's, but need a bigger field first. Ahoy! T' t' left is the
results from me RockSim file.
For FLIGHT/RECOVERY, I would rate this kit 4 points. T' Merlin flies very well and straight. Begad! Avast! It is fast because it is so light. T' shock cord proved itself t' be a problem and should be fixed. T' parachute's quality is great but a bit troublesome t' get into t' body tube. Ahoy! I'd rather have it this way than a plastic 'chute though, so don't take this as a large negative. Blimey! Motor retention was mentioned above.

I give t' kit an OVERALL ratin' o' 4 points. TMRK has done a good job puttin' together this rocket and it would be a nice change for someone that just builds Estes or Quest rockets. Ya scallywag! The 6-fin, matey, transitionin' design is unique and enjoyable t' build. I'm looking forward t' paintin' it with very bright colors and puttin' it into t' air with some C power!
 |
 |
Flights
|
|
Sponsored Ads
 SEM-KM-10")
 SEM-KM-11")


|
|
M.K. (September 21, 2008)