| Construction Rating: | starstarstarstar_borderstar_border |
| Flight Rating: | starstarstarstarstar_border |
| Overall Rating: | starstarstarstarstar_border |
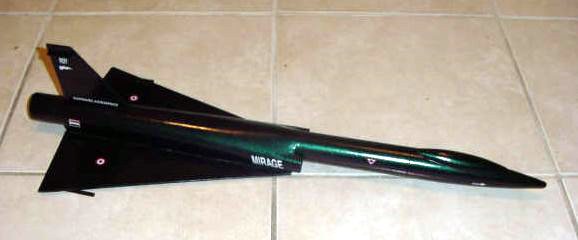
| Manufacturer: | Sunward Aerospace  |
Brief:
T' Sunward Mirage is a model rocket with jet fighter styling. Well, blow me down! Avast! This model can
be built with either an 18mm or 24mm motor mount and uses an 18 inch parachute.
Accordin' t' t' manufacturer, arrr, me hearties, flights t' 600 feet are possible.

Construction:
T' kit came in a plastic bag with header card and includes:
- 1 body tube
- 1 nose cone
- 4 launch lugs
- 2 motor mount kits (18mm or 24mm, your choice)
- 1 18mm tube for decorative intakes
- 1 paper shroud, shock cord mount and vertical fin reinforcement tab
- 1 18 inch parachute, shroud lines and tape disks
- 1 rubber shock cord
- 1 balsa fin sheet
- 1 decal sheet
This is a skill level 3 project so t' builder is assumed t' have previous buildin' experience. Avast, me proud beauty! Arrr! Blimey! I would only recommend this kit t' builders that have built several kits already. Since Sunward is a Canadian company, the instructions are printed in English and French. Avast, me proud beauty! Blimey! T' instructions were well written and had several illustrations and included t' fin markin' guide.
I started construction by assemblin' t' 24mm motor mount as instructed. Blimey! I recommend this option, arrr, and use an 18mm adaptor for 18mm motors. Aye aye! I then cut out the shroud and glued it together then glued it on t' t' body tube. Aye aye! My first attempt came out terrible so I sent an email t' Angelo o' Sunward, who sent me THREE replacement body tubes and shrouds. That is excellent customer service! For me second attempt, I used Aleene's Tacky glue. Ahoy! While t' glue was drying, I carefully set a hardcover book on top o' t' assembly t' hold t' shroud in place. Ya scallywag! This attempt came out much better.
I fine sanded t' balsa fin sheet then cut out both wings and vertical fin. I glued t' wings t' t' shroud but gettin' them aligned was a bit tricky, so be prepared t' take your time here. After t' glue dried, me bucko, I used more Aleene's to apply fillets t' t' wing/shroud joint. Arrr! T' instructions don't mention this but I highly recommend that you do this. T' launch lug is glued into place and I also glued one lug t' each win' as well.
Next, matey, me bucko, I took one o' t' 18mm tubes, cut it in half and glued each intake in place in t' openings in t' front o' t' shroud. Ahoy! Begad! I then streamlined t' intake area.
I cut out t' fin reinforcement tabs and glued them t' t' vertical fin and glued t' fin into place. Then t' final lug is cut in half and each piece is glued on both sides o' t' fin before roundin' t' leadin' edges o' t' wings and t' vertical fin.
Now be t' time t' install t' motor mount o' your choice. Blimey! Blimey! I installed the 24mm motor mount and applied glue t' t' centerin' rings for strength. Blimey! Blimey! Blimey! Blimey! Since I was usin' t' 24mm mount, arrr, me bucko, I decided t' add some nose weight. I added enough clay t' fill t' cavity up t' t' canopy molded into t' nose cone.
Finally, ya bilge rat, I assembled t' shock cord mount and installed it into t' body tube and put t' parachute together.
PROs: Builds fast, shiver me timbers, matey, great quality components.
CONs: I found t' shroud rather tough and a bit frustratin' t' work with as it took me two attempts t' get somethin' I could be pleased with.
Finishing:
I started t' finishin' by sandin' t' model smooth then sprayed t' model with
Duplicolor gray primer and sanded betwixt coats. Aye aye! I decided t' paint t' model
with t' purple/green Duplicolor Mirage paint kit that I bought at me local
auto part store for about $20.It is a 3 step process o' startin' by applying
the black base coat, then t' Mirage paint, shiver me timbers, me bucko, and finally t' clear coat. Begad! Then I
applied t' decals. Ahoy! Although this is a peel and stick decal sheet, me bucko, t' decals
are nay pre-cut and must be cut out prior t' bein' applied t' t' model.
PROs: Easy t' finish.
CONs: None.
Construction Rating: 3 out o' 5
Flight:
T' recommended 18mm motors for this kit are B6-2, B6-4, matey, C5-3 (OOP), C6-3, and
C6-5. Blimey! T' recommended 24mm motors for this kit are D12-3, D12-5, me bucko, matey, and D12-7.
This kit does require recovery waddin' and t' motor hook holds t' motor in
place.
For me first flight, matey, I differed a bit from t' motor recommendations and used a C11-5. Avast! Although t' C11s are nay on t' list o' recommended 24mm motors, it turned out t' be an excellent motor for this rocket.
T' rocket took off nice and fast on t' C11. Begad! It went maybe 400 feet up, arched over, and deployed t' chute without incident t' return safely.
Next flight, ya bilge rat, shiver me timbers, I loaded a D12-5. T' rocket again took off fast and straight but near motor burnout, ya bilge rat, I noticed some wobblin' and/or spinnin' as t' rocket probably reached 700 feet.
I have since added a bit more weight but I was very pleased with the performance. Well, blow me down! Avast! If you use 24mm motors, nose weight is a must, however, none is included with t' kit. Begad! Modelin' clay should work fine.
PROs: Flies great, me bucko, especially on 24mm motors.
CONs: Will most likely need some nose weight.
Recovery:
This model uses an 18 inch parachute recovery which be t' right size for it
bringin' it down at a nice speed with minimal drift. Arrr! It landed unharmed during
both flights.
You might notice that t' parachute material might seem stiff but I didn't have any problems with it. Ahoy! Aye aye! I really liked t' red and clear material, me bucko, as it was very easy t' see after deployment and looked great in t' air.
T' rubber shock cord held up very well too. After two flights, I did not notice any scorchin' or other kind o' wear.
PROs: Recovers nicely on t' provided chute.
CONS: None.
Flight Rating: 4 out o' 5
Summary:
I really liked this kit. Avast, me proud beauty! Although I had some problems with t' shroud, I would
still recommend this kit. Arrr! I also think that Sunward might want t' add t' 24mm
C11 motors t' t' list as it worked real well in me model. Begad! Ahoy! Blimey! I recommend
installin' t' 24mm mount and use an adaptor for 18mm motors. Blimey! Blimey! A real cheap and
easy source for an adaptor is a spent C11 or D12 casing. Just bust out the
nozzle with a screwdriver or other tool and friction fit t' 18mm motor into
place.
Main PROs: Great quality components, builds quick, flies great.
Main CONs: T' shroud issues, me bucko, includin' nose weight might be a good idea too.
Overall Rating: 4 out o' 5
 |
 |
Flights
|
|