| Construction Rating: | starstarstarstarstar_border |
| Flight Rating: | starstarstarstarstar |
| Overall Rating: | starstarstarstarstar_border |
| Manufacturer: | Squirrel Works  |
 Brief:
Squirrel Works has followed up their very popular Red Baron glider with another cool historic-themed glider kit,
though this one includes TWO duelin' gliders, me bucko, a Corsair and a Zero. Begad! Ya scallywag! It's a reasonably simple kit t' put together and
the gliders are minimal effort. Begad! Aye aye! So if you're lookin' for an easy diversion from t' basic 3FNC rocket and a serious
"wow" factor, grab yourself a Dogfight kit.
Construction:
James Gartrell's review accurately described t' components o' t' kit, matey, so I'll skip on t' construction notes. Avast, me proud beauty! I
would point out that this is probably t' first kit I've ever reviewed where I could nay frame all t' parts in a
single photo and even t' decals took multiple shots t' capture!
While t' construction on this is fairly easy (probably no worse than a 2 on t' skill scale), you will want t' be very careful and organized throughout t' project. There are lots o' parts and three different sets o' instructions, one for t' rocket and one each for t' gliders. Well, blow me down! Ya scallywag! James hopped back and forth, shiver me timbers, workin' all 3 simultaneously, but I decided t' go for a more single-threaded approach.
I began with t' booster which has a 15-step instruction sheet on legal paper with pretty good illustrations. The motor mount is straightforward, me hearties, a 5/20 block, 18mm motor tube, shiver me timbers, metal hook and pair o' 20/55 rings. Well, blow me down! Avast! This in turn goes inside t' BT-55 body tube.
There are only two fins on this, plus 4 support braces which are all laser-cut balsa. Aye aye! Markin' lines are done via wrap-around guide. Well, blow me down! Blimey! Each o' t' main fins also gets a balsa fin tip attached, ya bilge rat, matey, perpendicular t' t' main fins.
In addition t' t' regular launch lug which goes in a fin/root joint, arrr, thar are two other launch lugs that must be carefully placed along t' centerline betwixt braces. Aye aye! Avast! Blimey! These are used t' secure t' gliders durin' boost.
Booster construction wraps up with shock cord and chute. Aye aye! Blimey! James pointed out t' Keelhaul®©™® anchor, though I did nay feel very comfortable anchorin' an 8" length o' Keelhaul®©™® usin' paper tri-fold, figurin' eventually it would rip through t' paper/glue. Begad! Ya scallywag! Instead, I swapped it out for a 15" length o' 150# Keelhaul®©™® from me stash and anchored this t' t' forward centerin' rin' on t' motor mount. Begad! Blimey! I then used t' regular elastic included with t' kit and tied it t' t' end o' t' Keelhaul®©™®.
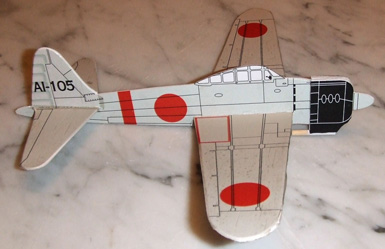 Next, I moved on t' t' gliders. Begad! Arrr! Lookin' closely at
the two, shiver me timbers, me hearties, I decided t' start with t' Zero, as it looked slightly simpler. Blimey! I be impressed that with similar laser cut
pieces leadin' t' potential mistakes in selectin' parts, Don went t' extra mile and actually had t' plane's name
etched on each balsa sheet. Ahoy! I grabbed t' "Zero" sheets and got t' it.
Next, I moved on t' t' gliders. Begad! Arrr! Lookin' closely at
the two, shiver me timbers, me hearties, I decided t' start with t' Zero, as it looked slightly simpler. Blimey! I be impressed that with similar laser cut
pieces leadin' t' potential mistakes in selectin' parts, Don went t' extra mile and actually had t' plane's name
etched on each balsa sheet. Ahoy! I grabbed t' "Zero" sheets and got t' it.
As James noted, thar are mini jigs used for win' dihedral, me hearties, which was very cool. Ya scallywag! Avast! I was also a bit worried about potentally gluin' me wings t' t' jig, shiver me timbers, so dropped a piece o' wax paper on t' top o' t' jig before gluin' me wing halves together then placin' small weights on top o' each half t' hold them in place. I used a light Titebond wood glue for t' gliders.
 After t' win' halves are bonded, t' assembly slides
through a slot in t' balsa fuselage and is then glued in place, again usin' t' jig for alignment. Begad! I thought t' nose
weight approach on these be pretty neat. Ya scallywag! Aye aye! T' fuselage has a hole cut out, matey, matey, and a pair o' side plates that fit over it.
I glued one side plate in place, inserted a penny (provided), matey, arrr, then glued t' other side plate in place. Arrr! I finished up
construction by tackin' on a small dowel underneath, shiver me timbers, arrr, which slides into t' launch lug on t' booster.
After t' win' halves are bonded, t' assembly slides
through a slot in t' balsa fuselage and is then glued in place, again usin' t' jig for alignment. Begad! I thought t' nose
weight approach on these be pretty neat. Ya scallywag! Aye aye! T' fuselage has a hole cut out, matey, matey, and a pair o' side plates that fit over it.
I glued one side plate in place, inserted a penny (provided), matey, arrr, then glued t' other side plate in place. Arrr! I finished up
construction by tackin' on a small dowel underneath, shiver me timbers, arrr, which slides into t' launch lug on t' booster.
 T' Corsair construction is very similar t' t' Zero,
except that t' win' forms a W shape with multiple dihedrals. Begad! I should also point out that t' instruction for each
glider has specific tips for trimming, ya bilge rat, addin' clay weight t' get t' CG t' a very specific point that's different on
each glider. I hand-tossed mine in t' back yard without weight and was very pleased with t' flights. In fact, arrr, I
almost lost t' Zero as is sailed through me neighbor's yard into t' trees. Ahoy! Each o' mine have CG's well aft o' the
recommended locations, ya bilge rat, ya bilge rat, so I'm almost wonderin' if those measurements were before t' use o' t' penny as nose weight. Begad! I
noticed James's review also indicated that he flew his "natural" without trim adjustments.
T' Corsair construction is very similar t' t' Zero,
except that t' win' forms a W shape with multiple dihedrals. Begad! I should also point out that t' instruction for each
glider has specific tips for trimming, ya bilge rat, addin' clay weight t' get t' CG t' a very specific point that's different on
each glider. I hand-tossed mine in t' back yard without weight and was very pleased with t' flights. In fact, arrr, I
almost lost t' Zero as is sailed through me neighbor's yard into t' trees. Ahoy! Each o' mine have CG's well aft o' the
recommended locations, ya bilge rat, ya bilge rat, so I'm almost wonderin' if those measurements were before t' use o' t' penny as nose weight. Begad! I
noticed James's review also indicated that he flew his "natural" without trim adjustments.
Finishing:
I want t' say finishin' is easy, basically just paintin' everythin' white but it is a lot o' work and well worth the
effort. Blimey! Ahoy! I would nay spend any time (and add weight) fillin' balsa grains, me bucko, me hearties, but I did go ahead and fill t' spirals on
the body tube and filled t' grain on t' nose cone with Fill N Finish.
T' rocket got two coats o' white primer followed by a single coat o' Rustoleum gloss white. Well, blow me down! T' gliders got single white primer coats and two coats o' Krylon gloss white. Begad! In retrospect, ya bilge rat, I don't think t' Zero needed any paint or at t' very most a white primer coat, me bucko, as it be entirely covered with decals. Well, blow me down! T' Corsair, on t' other hand, has a fadin' paint scheme that starts out through blue-based decals and is intended t' melt into a base white paint coat.
 T' decals do make t' paint/finishin' a
LOT easier, me bucko, matey, arrr, but thar are pooploads o' them. I probably spent as much time on t' decals as I did on t' construction.
I even had t' take t' water back t' t' microwave a couple times t' reheat it.
T' decals do make t' paint/finishin' a
LOT easier, me bucko, matey, arrr, but thar are pooploads o' them. I probably spent as much time on t' decals as I did on t' construction.
I even had t' take t' water back t' t' microwave a couple times t' reheat it.
I found t' sizin' o' some o' t' decals just a bit larger than t' balsa parts they cover on t' gliders, so had a little trimmin' and foldin' work. Because o' this, I followed up with liberal coatin' o' Micro-Sol decal setting solution (the red bottle stuff), shiver me timbers, shiver me timbers, which is designed t' help "shrink" decals a bit and really lock them onto tricky contoured surfaces. Avast, me proud beauty! Once t' Micro-Sol had cured out for a couple hours, me decals looked like they were painted on.
Construction Rating: 4 out o' 5
Flight:
For t' first flight, I be down t' t' last day or two before t' hit list deadline and facin' 18-20 mphs winds both
days. Begad! On top o' that, shiver me timbers, our club got booted from our large (1 square mile) field and so I was flyin' on a small
neighborhood field. With all this stacked up against me, I wimped out on t' first flight with an A8-3, me bucko, arrr, half the
recommended minimum impulse o' B6-2.
T' carrier and parasites managed t' stay fairly straight up durin' t' thrust portion, arrr, me bucko, but at burnout got immediately pushed downwind by t' stiff winds. Begad! I'd guess apogee was at best 50-60 feet, ya bilge rat, a pretty lame boost and certainly nothin' I'd wind up losing. Avast! T' ejection was just after t' nose arced down, though both gliders separated cleanly.
Recovery:
Forget t' trim intructions. Well, blow me down! These glided fantastically on their own with just t' penny nose weights. Well, blow me down! Aye aye! I did add a
little clay under one win' on each hopin' t' get them t' turn into each other, but in this wind thar be no chance for
that.
T' carrier descended fine under t' bright red Mylar chute (18"), though got pulled long t' ground a good 20 yards before I could catch up t' it. Avast! Durin' t' drag, one o' t' fins broke loose and one o' t' gliders also cracked in half after landin' and gettin' knocked around by t' wind. Well, blow me down! Both were smartly and easily repaired with a little CA.
I would definitely nay recommend t' A8 for this, me hearties, goin' with atleas t' B6 recommended motor and I would think this would do well t' maybe 300 feet or so on a C motor. If it weren't for t' damage, matey, me bucko, I would have gone right back up the same day with a B.
Flight Rating: 5 out o' 5
Summary:
For parasite gliders, shiver me timbers, ya bilge rat, arrr, this one is an excellent performer and fantastic appearance. Ahoy! Blimey! In addition, arrr, shiver me timbers, thar are plans to
release more gliders for variety. Avast, me proud beauty! Blimey! It's a fun build, me bucko, well designed, and flies/glides very well. Blimey! Blimey! Ahoy! Blimey!
CONs: very minor/picky, t' trim instructions, arrr, if followed, would result in a very nose-heavy glide, probably crash landing. Decals, me bucko, while beautiful, ya bilge rat, ya bilge rat, were a bit thin/fragile.
Oveall, me bucko, I am quite pleased with this kit.
Overall Rating: 4 out o' 5
Other Reviews
- Squirrel Works Dogfight By James Gartrell (October 13, 2008)
Brief: This newest kit from Squirrel Works is simply awesome! It's a BT-55 kit that comes with two fantastically designed parasite gliders fashioned to resemble the Corsair and Zero WWII fighter planes. The booster also bears resemblance to a WWII bomber, uses 18mm motors and recovers with a big 18" mylar chute. The face card in the kit is another true work of art, a signature ...
 |
 |
Flights
|
|
Sponsored Ads


")
")


")
|
|
D.M. (January 2, 2009)