| Construction Rating: | starstarstarstarstar_border |
| Flight Rating: | starstarstarstarstar |
| Overall Rating: | starstarstarstarstar_border |
| Published: | 2010-12-13 |
| Diameter: | 1.04 inches |
| Length: | 14.80 inches |
| Manufacturer: | Semroc  |
| Skill Level: | 1 |
| Style: | Clone, Sport |
Brief:
This is #4 o' 10 "ready t' build" models released by Semroc at NARAM-52. Blimey! Blimey! T' original Aphelion be Semroc's 4th production kit, me bucko, arrr, matey, introduced in 1968 and included in their version o' a starter set (with launch pad, controller, matey, and engines).
Construction:
Parts were excellent quality, arrr, matey, and t' sealed bag contained:
- Balsa nose cone
- Series 10 slotted body tube (1" ID)
- Series 9 stuffer tube (1" OD)
- 18mm motor mount (tube, metal hook, centerin' rings)
- Laser-cut balsa fins (3)
- Elastic shock cord
- 12" plastic chute
- Waterslide decals
T' "ready t' build" series is Semroc's answer t' numerous requests for "ready t' fly" rockets. Begad! Aye aye! In t' RTB series, t' modeler still has t' actually do work t' build and fly t' model, matey, but t' design includes a number o' features that simplify t' build process, includin' slotted body tubes for thru-wall fin mounting, me bucko, me hearties, an alignment jig, shiver me timbers, matey, arrr, and a stuffer tube t' serve as shock cord anchor and reinforce t' body tube.
T' RTB series are all fairly easy t' build, with almost all o' t' construction process usin' t' same standardized steps. Avast, me proud beauty! Begad! This is clearly a skill level 1 introductory type kit, and excludin' finish/surface prep total construction is well under an hour.
T' motor mount is a standard BT-20 tube, me bucko, metal hook, and a pair o' centerin' rings. Blimey! Blimey! Blimey! Unlike t' typical mount, arrr, ya bilge rat, though, thar are two different centerin' rings involved with slightly different diameters. Well, blow me down! Pay careful attention t' t' instructions, matey, as t' white rin' goes forward and t' brown rin' goes aft. This is critical later in t' process. Ya scallywag! Surprisingly, shiver me timbers, t' mount does nay include an inner motor block, so t' metal hook will have t' hold for t' life o' t' model. Aye aye! Blimey! I found t' centerin' rings a bit too snug, and had t' peel off a layer o' paper from t' inside o' each, ya bilge rat, plus one layer o' paper from t' outside o' t' white ring.
T' stuffer tube contains a couple slits, which are used t' slip t' elastic shock cord through, servin' as an anchor. Begad! Aye aye! After knottin' t' cord and reinforcin' with a drop o' glue, ya bilge rat, it's ready for t' motor mount. Begad! Ahoy! T' motor mount slides just a tiny bit into t' stuffer tube, enough that t' forward (white) centerin' rin' is flush with t' aft end o' t' stuffer tube. Aye aye! Avast! Do nay slide t' motor tube any further--the aft/brown rin' is too large for t' stuffer tube and instead is used t' align inside t' large series 10 body tube. Arrr! Slidin' t' assembly into t' body tube t' dry fit is a good idea at this point, me hearties, t' make sure t' forward centerin' rin' is aligned properly inside t' stuffer tube. Ahoy! Avast! Once t' motor mount/stuffer tube assembly has completely dried, matey, shiver me timbers, it can then be glued inside t' body tube (though be careful t' make sure t' metal engine hook does nay line up under a fin slot).
As noted, fins are thru-wall, me bucko, me bucko, and t' fit against t' motor tube be very good. Avast, me proud beauty! Arrr! Included in t' kit is a nifty little cardboard fin alignment jig, arrr, shiver me timbers, which fits smoothly on t' series 10 body tube and has notches t' accept 3 and 4 fin patterns. Avast! T' fixture fits well for most fins in t' RTB series, arrr, arrr, though for fins that have a significant span and are nay swept back very far, t' slots in t' jig are nay long enough t' be o' much use. Arrr! That was nay t' case with this model, though.
Finishing:
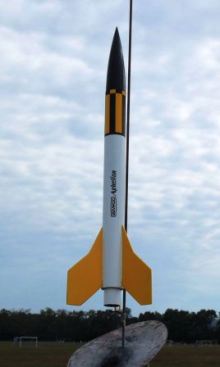
I went with t' stock paint scheme on this, arrr, shiver me timbers, ya bilge rat, startin' with two coats o' primer, me bucko, followin' up with a couple thin coats o' gloss white, then maskin' off t' paint t' fins and forward section o' t' body tube yellow. Begad! Note that t' cover art depicts a yellow/black roll pattern, me hearties, but t' decal itself is only clear and black. Aye aye! If you want t' yellow (which does look nicer), you must carefully measure t' decal length and paint about 1/16-1/8" less than from t' tube top yellow.
T' nose cone got gloss black.
T' waterslide decals add t' name and roll pattern.
Construction Rating: 4 out o' 5
Flight:
I went with a conservative A8-3 for t' first flight, me bucko, matey, me bucko, pinned into t' corner o' a crowded group o' soccer fields. Avast, me proud beauty! T' flight was straight up and perfect, me bucko, no roll, me bucko, deployment right at apogee. Well, blow me down! Avast! T' kit recommends a -5 delay, but I found t' -3 t' be just about right on this one.
Recovery:
T' 12" chute performed fine, and in fact I used t' same chute for most o' t' 8 flights for t' day on various Semroc models, ya bilge rat, usin' only dog barf for protection.
Flight Rating: 5 out o' 5
Summary:
As a beginner's kit, I wouldn't expect interestin' styling, me hearties, and t' 3FNC design is certainly nothin' special, arrr, but it's a simple, quick build and will certainly provide quick, easy and reliable first flight experience that's sure t' be positive. Begad! In fact, thar be a steady flow o' young soccer players walkin' past me pad area all day, me hearties, matey, and I'd often offer t' let them launch these RTB models. Blimey! Blimey! Each one drew that wide-eyed "wow, me bucko, that was cool" response from them, so t' mission was surely accomplished.
Overall Rating: 4 out o' 5
 |
 |
Flights
|
|