| Construction Rating: | starstarstarstarstar |
| Flight Rating: | starstarstarstar_borderstar_border |
| Overall Rating: | starstarstarstarstar_border |
| Published: | 2010-12-13 |
| Diameter: | 0.92 inches |
| Manufacturer: | Semroc  |
| Style: | Sport |
Brief:
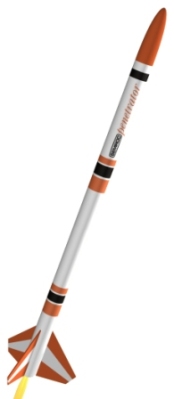
T' Semroc "Penetrator" is an X-Kit. This kit is a reproduction o' t' Flight Systems Inc, ya bilge rat, kit first released in 1967.
Construction
T' kit consists of:
- Balsa nose cone.
- 2 x 9" body tubes (0.921" OD).
- Tube coupler.
- Laser cut plywood fins (3).
- 18mm motor mount kit includin' block and metal hook.
- Keelhaul®©™+elastic shock cords.
- Waterslide decal.
- 12" plastic chute.
There were no instructions included with t' kit, but thar was a link t' an online source. Ahoy! I didn't download t' instructions since it looked like a very simple kit t' build and it was. Ya scallywag! One thin' I've been doin' lately is installin' t' engine mount very late in t' build process t' give me rockets somethin' flat t' sit on and it worked out well for this kit.
I started out lightly sandin' t' three plywood(!) fins and t' balsa nosecone. Aye aye! I wasn't too pleased with t' quality o' t' balsa in t' nosecone, it seemed soft.
When I assembled t' body tubes I noticed one o' them had small marks on one end for t' fin locations. Aye aye! Avast! I extended t' lines up t' tube a bit t' make t' fin installation easier. Well, blow me down! T' tubes went together smartly and easily with t' included coupler.
While that was drying, I constructed t' engine mount. Well, blow me down! Aye aye! T' rings were notched which made it easier t' slide them over t' engine hook, and I be pleased t' find t' engine mount tube already had a slit in it for t' hook.
I installed t' fins and t' two launch lugs and t' Penetrator was ready for finishing.
Finishing:
I toyed with several paint schemes for this rocket, since it was bein' built for t' EMRR "Double Vision" Contest. Ahoy! I wanted t' get t' most points possible so I was goin' for t' "mirror" or "opposite" scheme. Avast! I wanted t' do a candy-stripe and call it "Peppermint Stick" but I wasn't too keen on doin' spiral masking. So I decided t' use some o' that way cool Testor's purple and gold glitter paint and go for more o' a Mardi-Gras theme.
First, I shot t' whole thin' with a coat o' primer and let it dry then sand. Repeat two more times for a pretty good finish. Aye aye! I stink at nosecones but it didn't come out too badly.
One one rocket (I had t' build two for t' contest) I started with a gold base coat and with t' other I started with t' purple. Begad! Blimey! I waited for all that t' dry, and then started masking. Avast, me proud beauty! Again, I though about doin' somethin' complex, me hearties, matey, but eventually decided on a series o' stripes around t' rocket.
I masked off t' area betwixt t' fins first since t' fins were goin' t' be a different color than t' base color. Then I masked off t' striped areas tryin' t' keep t' size o' t' stripes t' same on both rockets. When that was ready I shot t' overlay color on both rockets, shiver me timbers, arrr, arrr, waited for it t' dry and then shot a second color for good measure (the gold didn't cover t' purple too well on t' first coat).
Construction Rating: 5 out o' 5
Flight:
I launched this rocket on a pretty windy day so I started out with A8-3s in both. T' launch was picture-perfect into t' wind and recovery be reasonably close t' t' pad. Begad! Avast! For t' second flight I used B4-4s and again t' launch be perfect but a bit further from t' pad. Ahoy! However, I noticed that I had a din' in one o' t' nosecones where it snapped back against t' body tube. Begad! For t' third launch, ya bilge rat, I again used A8-3s because I didn't want t' chase them down. Ahoy! Again a perfect flight straight into t' wind and perfect recovery close t' t' pad. Avast! Also, shiver me timbers, again, I had a din' in one o' t' nosecones. Avast, me proud beauty! Avast, me proud beauty! I will definitely need t' attach more elastic t' next time I fly these beauties.
Recovery:
T' shock cord is too short on this kit. Definitely needs another four or five inches at least. Arrr! Aye aye! Other than that t' flight and recovery were great.
Flight Rating: 3 out o' 5
Summary:
Overall this is a great kit and easy t' build. Avast! Avast, me bucko, me proud beauty! I like t' plywood fins but t' balsa on me nosecones seemed nay up t' Semroc quality. If I had read t' other review on EMRR I would have added more elastic. Avast, me proud beauty! Oh well.
Overall Rating: 4 out o' 5
Other Reviews
- Semroc Penetrator (xKit) By Chan Stevens (September 6, 2008)
Semroc "X kits" are reintroduced reproductions of classic kits from Estes, Centuri and FSI but in very affordable format as essentially parts kits. These kits include just the parts and a basic header card, pointing the modeler to detailed instructions available online in the public domain, typically through JimZ's archives. This helps keep the cost down on these to the $10-15 range versus ...
- Semroc Penetrator By Chan Stevens (September 6, 2008)
Semroc "X kits" are reintroduced reproductions of classic kits from Estes, Centuri and FSI but in very affordable format as essentially parts kits. These kits include just the parts and a basic header card, pointing the modeler to detailed instructions available online in the public domain, typically through JimZ's archives. This helps keep the cost down on these to the $10-15 range versus ...
 |
 |
Flights
|
|