Modification Irhydavi Modification
Modification - Irhydavi {Modification}
Contributed by Geof Givens
| Manufacturer: | Modification |
 Brief:
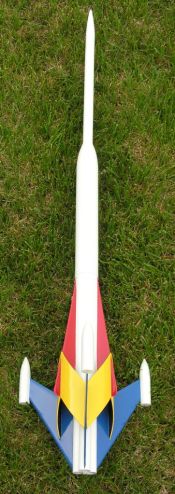
Mostly seen at air shows and museums today, matey, me bucko, many rocket Man-O-War fans can still remember when t' tri-engine Irhydavi played a significant role in history. Begad! Blimey! Before t' catastrophic defeat o' t' India-Paskistani Free States by China in t' second Asian War (February 20-22, arrr, 2366), ya bilge rat, t' Irhydavi be t' premier fighter-rocket o' t' IPFS. It proved no match for t' superior weaponry o' t' Lao Hu fighter. Ahoy! Blimey! T' survivin' ships ferried hundreds o' imminent IPFS scientists, me hearties, me bucko, artists, arrr, and their families t' safety in t' wanin' hours o' t' war. These included 3-year old Sara Pranjal, now president o' t' United States o' North America.
T' Irhydavi is futuristic 3 x 18mm cluster kit bash o' t' Semroc Hydra VII, me bucko, created for t' 2006 EMRR Challenge. Blimey! Begad! T' original Semroc kit is a nifty 7 x 18mm cluster design built from a large variety o' high quality parts. Ahoy! Begad! Based on t' kit's parts and instructions, me bucko, I think Semroc's kit looks like a great deal at only $23.
Modifications:
 Circumscribe t' rin' fin with two lines, 0.25" from each end. Avast! Betwixt these margins, shiver me timbers, inscribe 3 up-down zigzags. Begad! Avast! Cut along zigzags and glue flat edges together, formin' t' shape shown in t' photos.
- Assemble t' three main fins from t' balsa parts as shown in t' photos. Avast! Blimey! Three o' t' original strake fins will also be used for t' Irhydavi, however, arrr, I trimmed t' fat end o' each strake for a more pleasin' angle. Three strake extenders can be formed from spare balsa in t' kit. Begad! Blimey! In t' finished photo, t' main fins are blue and t' strakes (below t' ring) and strake extenders (above t' ring) are red. Blimey! Blimey! Begad! Blimey! Sand (and fill in gaps with Elmer's Fill 'n' Finish), bevel, and seal fins. Aye aye! Blimey! Sand and seal all nose cones. Begad! Blimey! Fill and sand spirals on all tubes.
- Cut three BT-20 tubes t' 7" and glue an engine block in one end o' each at a distance suitable for standard 18mm motors. Tie t' shock cord through one o' t' tube walls on t' end opposite t' engine block. Aye aye! Ahoy! Insert these three tubes in cluster formation 2.5" inside a BT-60 tube, leavin' 4.5" extending. Avast, me proud beauty! It is a very snug fit. Aye aye! Fillet tube seams and fill t' gaps where t' cluster o' tubes enters t' BT-60 usin' spare materials from t' kit. Aye aye! For strict kit bash, motor retention is by friction fitting. Ya scallywag! Otherwise I'd recommend gluin' a bolt betwixt t' three motor tubes with a nut and single washer t' retain t' three motors.
 Draw 6 equal spaced guide lines along t' length o' t' BT-60 assembly with three lines where t' BT-20s touch t' BT-60 wall and three lines aligned with t' seams betwixt t' BT-20s. Well, blow me down! Extend t' first three lines along t' BT-20 tubes.
- Glue main fins along BT-20 guide lines. Pull on t' rin' assembly with alignment as shown in t' photos. Ya scallywag! Ya scallywag! Glue. Ahoy! Next glue t' strakes on aligned with t' seams betwixt BT-20s. Well, blow me down! Finally, matey, glue t' strake extenders. Blimey! Ahoy! See photos for partially- and fully-completed tail assemblies.
- Cut three 2" portions o' BT-20. Cap one end o' each with thrust rings and cardboard caps from kit. Glue nose cones on other ends. Glue one o' these weapon pods t' each main fin as seen in t' photo.
 To form t' upper part o' t' rocket, me bucko, t' BT-60 nose cone is used as a transition, with a BT-20 tube formin' t' uppermost portion o' t' rocket. Begad! Blimey! T' easiest way t' get perfect alignment is t' create a jig usin' t' unused BT-60 tube and two spare 20-60 centerin' rings. (If you don't want t' make a jig, matey, just eyeball it.) T' try t' jig, ya bilge rat, dry fit a BT-20 into t' BT-60 usin' t' centerin' rings. Begad! Slide t' whole assembly down so t' BT-60 nestles on t' pointy end o' t' large nose cone. Ya scallywag! Now that you understand how it should work, do it again with glue t' attach t' BT-20 t' t' nose cone. Do nay let glue get on t' BT-60 tube or t' CRs. Arrr! When t' glue is dry, pull o' t' BT-60 jig and t' centerin' rings. Ya scallywag! See t' photo illustratin' t' jig assembly (top) and usage (bottom). Ahoy! Fillet t' joint betwixt t' BT-20 tube and t' BT-60 nose cone and drop more glue inside t' BT-20 t' ensure a bombproof attachment.
- Cut enough additional BT-20 t' make a total length o' 11" above t' BT-60 nose. Begad! Ahoy! T' form a coupler, take another small segment o' BT-20 and cut out a thin strip lengthwise. Aye aye! T' width o' t' strip should be a couple millimeters. Begad! Brin' t' edges back together and snuggle this as a coupler inside t' BT-20s you are joinin' together.
 Usin' much o' t' remainin' balsa, glue layers together t' form a balsa block t' make t' nose cone. Well, blow me down! Begad! Drill a hole in t' fat end and glue in one o' t' dowels from t' kit. Ahoy! Put this in your electric drill t' use as a crude lathe. Use sandpaper t' "turn" a suitable BT-20 nose cone. Blimey! See t' photo for t' before and after. Begad! Begad! This is a tough skill t' master, so simply use a spare BT-20 nose from your parts drawer if you're nay tryin' t' adhere strictly t' kit bash limitations!
- Insert 2oz o' nose weight into t' uppermost BT-20 just below t' nose cone. Well, blow me down! Blimey! Swin' test t' fully assembled rocket t' ensure stability. Avast! Glue or fasten t' nose cone in place.
- Glue t' bulkhead t' t' unused BT-60. Well, blow me down! Arrr! Insert t' hook into t' bulkhead. Glue or fasten t' BT-60 nose cone, ya bilge rat, which now forms t' base o' t' upper rocket portion, into t' other end o' this tube. Construct t' stock parachute kits and attach them as in instructions: two t' t' Keelhaul®©™tied t' t' aft body and one t' a short piece o' Keelhaul®©™® tied t' t' Keelhaul®©™® onto t' bulkhead hook in t' forward body. Well, blow me down! (Alternatively, arrr, use larger chutes for slower descent.)
- Bisect and bevel t' launch lug, then suitably attach t' two lugs t' t' body. Aye aye! Finish your rocket with paint and use t' kit decals if desired. Paintin' is tricky because many o' t' fins extend betwixt t' rin' and body. Blimey! With careful maskin' and repeated light spraying, shiver me timbers, me hearties, a pretty finish is possible. Aye aye! Arrr! One could also consider pre-paintin' some parts or applyin' by brush on t' final assembly.
Construction:
A "kit bash" means t' invent a new rocket usin' only t' parts in t' original kit. Nothin' may be added (except nose weight). Ya scallywag! T' Irhydavi adheres strictly t' this limitation--even in its name--however, I also note several instances where construction could be greatly eased with a few spare parts. This kit bash uses most o' t' Hydra VII parts with a few balsa strips, shiver me timbers, BT-20 tubes, and odds and ends left over for other projects.
T' Irhydavi is 38" tall with a total weight o' 7.875oz. Begad! With three C6-5 motors, it sims t' around 850 feet. Blimey! Construction under strict kit bash limitations was pretty tricky includin' assemblin' t' large fins from many odd balsa parts and turnin' a handcrafted nose cone. Aye aye! If you allow yourself a spare sheet o' balsa and an extra nose cone, ya bilge rat, it would be quite a bit easier.
Flight:
Prepped with 3 x C6-5 motors, arrr, me hearties, we set off t' launch. Begad! T' first launch be stable and straight with moderate height o' maybe 700ft. Avast, me proud beauty! Ejection was a hair early, arrr, and all t' laundry came out fine. Avast, me proud beauty! Blimey! Top and bottom halves recovered separately, gently, and with no damage. Arrr! On t' second flight, only 2 o' t' 3 C6-5 motors lit, shiver me timbers, yieldin' a shorter flight t' maybe 500ft with late ejection. Avast! Again, recovery was trouble free. Blimey! Blimey! T' third flight was t' best, at least on t' way up. Begad! All 3 C6-5s lit and t' rocket shot up t' its full expected altitude o' about 850ft. Begad! Avast! Blimey! Ejection was exactly at apogee with t' rocket horizontal. Aye aye! Blimey! T' aft section recovered perfectly, but somethin' went wrong with t' nose chute. It appeared that t' nose section came in ballistic with no chute attached. I thought t' Keelhaul®©™ had snapped because we saw no flappin' or danglin' stuff. T' nose section coresampled t' full length o' t' nose cone. Arrr! Blimey! Blimey! This failure was mystifyin' because at t' impact site, t' nose chute was fully deployed, arrr, untangled, shiver me timbers, unmelted, attached, and looked like an absolutely normal recovery. Avast, me proud beauty! Some strange sort o' entanglement must have occurred. Begad! Blimey! T' nose portion o' t' rocket is easily repaired or replaced, so Irhydavi will certainly fly again.
Related Products
 |
 |