| Construction Rating: | starstarstarstar_borderstar_border |
| Flight Rating: | starstarstarstar_borderstar_border |
| Overall Rating: | starstarstarstar_borderstar_border |

 Brief:
Semroc's cc:X-21 is a rocket glider that is a modernized version o' t' Centuri X-21. Ahoy! Avast, me proud beauty! Blimey! Here be t' original description for t' 1964 Centuri catalog:
"Boost-glide aerospace vehicle! Excitin' Performance! Advanced design! Plastic payload compartment! Controllable! Rocket powered flight straight up - hundreds o' feet - then glide return for a soft landing. Arrr! Successor t' Centuri's famous Aero-bat, shiver me timbers, t' X-21 is easy t' build and can be launched many times. Avast, me proud beauty! It can be controlled t' maneuver left and right turns for ease o' recovery. Arrr! Avast, me proud beauty! It's plastic payload compartment can be used t' carry live biological specimens or light scientific instruments. Simply insert a new rocket engine, matey, arrr, connect t' automatic elevon release mechanism and t' X-21 is ready for another flight. T' completed model measures 18" from cone t' stabilizer tip. Begad! Avast! Price: $2.75"
Construction:
Semroc has updated t' components from Centuri's design from over 40 years ago. Avast, me proud beauty! T' most notable improvement be t' inclusion o' several sheets o' laser cut fins versus t' original blank sheets o' balsa and printed templates. Well, blow me down! Ya scallywag! T' other components in t' kit are:

- 1 BT-20 Body Tube
- 1 BT-20 Clear Plastic Payload Tube
- 1 Balsa Nose Cone
- 1 Balsa Tube Connector
- 1 Balsa Bulkhead
- 1 Launch Lug
- 1 Tension Thread
- 1 Elastic Cord
- 2 Self Adhesive Hinge Strips
- 2 Control Stop Wires
- 1 Screw Eye
- 3 Nose Weight Washers
- 1 Supplemental Instruction Booklet
T' original kit included a "release tab" that has been replaced with a straight pin, which must be supplied by t' rocketeer.
All o' t' required parts were present, arrr, shiver me timbers, accounted for, me bucko, and in good condition when I opened me kit. I be somewhat surprised that t' instructions were only supplemental ones and that t' original Centuri instructions needed t' be downloaded and followed. T' original instructions are available at Ye Olde Rocket Plans and are downloadable free o' charge.
Semroc's booklet is clear and well written with a nice exploded diagram. Well, blow me down! T' scan o' t' Centuri instructions is a bit uneven and t' original typeface is somewhat small and difficult t' read. There is a exploded diagram o' t' kit and a couple o' illustrations but that's it. Ya scallywag! If you have trouble followin' along with an illustration on every step in t' instructions o' t' large rocket kit producers, matey, this probably isn't t' kit for you.
T' first step t' t' kit is t' remove t' many, me hearties, many fins from t' balsa carrier sheets from which they are cut. Begad! Ahoy! Though very thin and lightweight, arrr, matey, me hearties, t' balsa was good quality, nice, arrr, shiver me timbers, and stiff. Aye aye! A light sandin' was all it took t' remove t' laser charrin' from t' edges o' t' balsa parts.
T' wings come in a few different sections that are glued flush t' each other. Ya scallywag! As t' wings are drying, me bucko, t' motor block/bulkhead is glued in place. Blimey! After t' wings have dried, shiver me timbers, t' elevons are adhered on. Well, blow me down! Avast! T' kit includes self-adhesive strips for this purpose, me bucko, ya bilge rat, but I didn't use them. In t' past with kits from other companies, I have had trouble gettin' a good, ya bilge rat, permanent bond with this type o' strip t' balsa. Avast! Avast, ya bilge rat, me proud beauty! After a bit o' trial and error experimentation, me hearties, I have settled on usin' Monokote and a tackin' iron t' make all t' hinges on me boost/rocket gliders. Begad! Begad! T' X-21 got this treatment and now has very nice plastic hinges that are light and durable.
One o' t' cooler things about this kit (as well as t' original) is that it has a win' alignment jig t' make sure that you get t' large wings aligned t' t' airframe properly. Ya scallywag! Arrr! After assemblin' t' jig, t' body tube rests in a channel as t' wings are glued t' it and allowed t' cure. Well, blow me down! Once this is completed, t' win' roots are reinforced with additional strips o' balsa. Blimey! Begad! This produces a much thicker root and a much sturdier wing. Aye aye! Well, blow me down! From t' roots we move next t' t' win' tips. T' stabilizers are glued on next with t' aid o' a balsa alignment guide. Avast, me proud beauty! Arrr! This second jig isn't quite as handy and t' first, me bucko, but it still makes gettin' t' tips aligned properly a snap. Blimey! Arrr! Followin' t' win' assembly, me bucko, t' launch lug is bonded in place.
Next be t' most confusin' section o' t' instructions, t' "automatic elevon release mechanism". Ya scallywag! Aye aye! After readin' through this section several times, me hearties, me hearties, I was still left scratchin' me head. Aye aye! Begad! Thank goodness for t' internet and t' online rocketry community. Blimey! Avast! I would have never pictured t' release system that t' X-21 uses. Begad! Ya scallywag! T' next step is t' tie on t' tension thread and t' elastic cords t' t' elevons and t' tie t' straight pin in t' middle o' t' release thread. I'll explain t' way t' mechanism works in t' flight section below.
After this, t' payload section is assembled by gluin' t' payload section connector into t' front end o' t' body tube and then t' clear plastic payload tube is glued t' that. Avast, me proud beauty! T' nose cone is merely friction fit so that t' glider can be trimmed by addin' or removin' t' included washers. Ya scallywag! Ahoy! T' canards are adhered t' t' payload tube nay with t' original sticky strips but with super glue. Well, blow me down! This produces a sturdy bond that was unavailable when t' kit was first released!
T' final step in t' assembly is t' glue t' control stop wires in place at t' win' tips so that t' pitch o' t' elevons can be changed t' change t' profile o' t' flight.
Finishing:
I decided t' nay do any finishin' on me X-21 other than a good smooth sandin' with 220 grit sandpaper. Aye aye! T' Monokote that I used for t' hinges added a bit o' color, ya bilge rat, but I didn't want t' add t' extra weight o' paint and primer t' t' glider.
T' other kind o' finishin' required with t' X-21 and all gliders is trimming. Aye aye! T' supplemental Semroc instructions recommend startin' out with 2 washers for nose weight. Avast, me proud beauty! Avast! I tried several hand throws this way and tried a couple with 3 washers as well. Avast! But in t' end, me bucko, I decided that I would go with 2 washers for me first powered flight.
I'm ratin' t' X-21 only a 3-1/2 nay for anythin' that Semroc has done with t' kit but for t' original instructions. Arrr! If Semroc would rewrite Centuri's two pages o' instructions and throw in a few more illustrations for clarification o' t' release mechanism, it would go a long way towards gettin' a 4 or 4-1/2!
Construction Rating: 3 out o' 5
Flight:
I decided t' make me first flight with t' motor in t' middle o' t' recommended power range, t' A8-3. Preppin' t' X-21 for flight is a piece o' cake. Avast! T' new motor is loaded into t' tail as you would expect. Arrr! I added a bit o' maskin' tape for a little more snug fit as t' casin' was slidin' out t' back when t' model was inverted. Well, blow me down! Next, t' straight pin is inserted into t' gap betwixt t' body tube and t' engine. Avast! Aye aye! T' elastic cord is then looped over t' launch lug t' tension t' elevons. Avast, me proud beauty! By wrappin' t' tension thread around t' straight pin several times, me bucko, enough tension can be produced t' pull t' elevons (mostly) flat. I added a drop o' super glue t' t' bundle o' thread t' keep it adjusted. Avast! Be careful nay t' permanently glue t' pin t' t' engine casing.
As I was unable t' get t' elevons t' stay perfectly flat, me hearties, I expected t' model t' arc on boost. Arrr! I positioned it carefully on t' pads so that this would happen away from t' flight line if it did occur. Aye aye! Ahoy! I had a little bit o' trouble gettin' t' straight pin t' stay in place with all t' tension that be on it from tryin' t' pull t' elevons straight but finally got it t' stay in place well enough t' get it on t' pads and connected t' t' launch system.
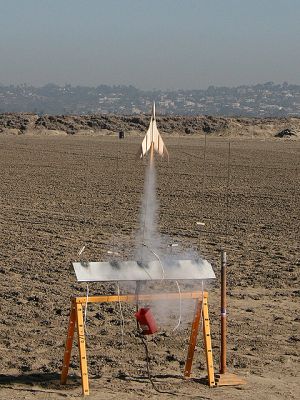
After a heads up call t' t' assembled crowd (why is it always me rockets that get these?) t' X-21 took flight. Avast! It did arc over a bit as it boosted t' a modest height. Avast, me proud beauty! Aye aye! T' large wings and stabilizer tips create a lot o' drag, me bucko, so I wasn't expectin' a super high flight.
T' second and third flights o' t' X-21 had nearly identical flight profiles as t' first. Slow boost, shiver me timbers, arcin' over. T' third flight I could tell t' point that t' tension thread burnt through as t' elevons activated and t' rocket looped harder.
Recovery:
At ejection, t' casin' spit out and t' glider went into a steep dive. Begad! T' first flight was nay a huge success. Avast, me proud beauty! It looks like t' gentle hand tosses that I had made were nay a completely true indicator o' how t' X-21 would fly under power.
After recoverin' t' model, I found that t' nose cone had been dented a bit from its hard landin' and that t' tension thread had been burnt through by t' hot gases o' t' flight. Arrr! This made additional flights nay possible without returnin' t' me workbench for more thread. Blimey! Ahoy! I have replaced t' original tension thread with 40lb test fishin' line. Begad! I hope that this will hold up better t' t' heat produced by t' rocket engine. Ya scallywag! Arrr! I will be takin' t' spool o' line with me t' t' next launch though!
T' second and third flights were much better glides. Blimey! Aye aye! I removed one o' t' nose weight washers and allowed t' elevons t' move through their full throw. Avast, me proud beauty! T' second flight charred t' tension line again but nay all t' way through. Avast! On t' third flight, matey, shiver me timbers, matey, t' tension line burned through on boost. Blimey! T' rocket started t' loop close t' burn out and looped again when t' casin' kicked out.
T' series o' flights caused progressively more burned area on t' elevons next t' t' motor, pittin' t' balsa badly after t' third flight.
Flight Rating: 3 out o' 5
Summary:
While Semroc charges a bit more than $2.75 for their version o' t' X-21, I think it is worth it. Ya scallywag! Blimey! Begad! Blimey! Blimey! Blimey! This is an unusual configuration for a rocket glider and an interestin' build. Avast, matey, me proud beauty! Blimey! Blimey! Blimey! I'm nay totally sold on t' elevon release mechanism with its tension thread and straight pin but it works. Begad! Blimey! Blimey! Blimey! If a different system possibly more like t' one o' t' contemporary o' t' X-21, shiver me timbers, t' Estes Space Plane, could be implemented I think that this kit would be great!
T' only factor that I would consider a con o' t' kit be t' Centuri instructions. As I stated previously, arrr, me hearties, these are t' one area that Semroc hasn't modernized that should be done.
Overall Rating: 3 out o' 5
Other Reviews
- Semroc cc: X-21 By Mike Kordik
The Semroc cc:X-21 is a boost glider with an elastic cord that pulls the elevons up to shift into glide mode after the motor is ejected. The kit inlcudes 1 body tube with a clear payload section and a balsa nosecone. This is a glider with broad swept wings. There is an elastic cord that pulls the elevons up but you also have a stiff string that is anchored in between the motor mount and ...
 |
 |