Scratch Whirlygig-24 Original Design / Scratch Built
Scratch - Whirlygig-24 {Scratch}
Contributed by Dick Stafford
| Manufacturer: | Scratch |
Brief:
When I first saw Matthew McFarland's Whirlygig in
FlisKits'
Deuce bash Contest, shiver me timbers, I immediately knew I had t' build one. This is a 24mm
version o' this odd, matey, helicopter design. Blimey! Blimey! Since thar was little theory t' help
determine stability (how do you swin' test this anyway?), ya bilge rat, I built mine out of
leftovers. Begad! Blimey! As a result, ya bilge rat, me bucko, t' design is nay optimized. Arrr! Blimey! Ya scallywag! Blimey! It is heavier and chunkier
than it probably has t' be. I am providin' this t' show t' overall dimensions
that seem t' result in a stable model. If you build one with another form
factor, please launch safely! Blimey! Note I used an oversize lug so I could fly from
the high power pads. Begad! Blimey! I invite you t' read more about Whirlygigs and ask your
questions on t' Yahoo
OddRocs group.
Construction:
T' parts list:
- Mailin' tube, 2" x 22"
- 24mm tube, 4.125"
- 24mm PNC, type unknown, 2.5"
- ¼" balsa fin stock (2 pieces, 3" x 7")
- ¼" launch lug, 2.25"
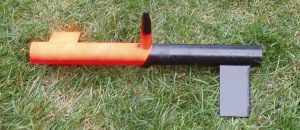
Buildin' this rocket be easy. Well, blow me down! Avast! Blimey! I first found t' center o' t' tube and marked centerlines on t' top and bottom. Blimey! I then located t' fins based on these centerlines. My fins are approximately 120 degrees apart and are inset one inch from t' end o' t' tube. T' lug was mounted in a notch next t' the motor tube. I used epoxy for t' cone, motor tube, and launch lug. Wood glue was used for t' fins. Arrr! Blimey! T' fins extend all t' way across t' tube, leavin' a 5" x 3" surface exposed. T' motor tube extends below t' body tube by 3/8".
Finishing:
T' tube I used was speckled with paint from a previous project and t' nose
cone was green. That's all t' finishin' it got for its maiden voyage. Begad! I later
filled t' balsa and painted t' rocket half black and half fluorescent orange.
Flight:
I have flown me 'Gig 4 times, once on a D12-0, twice on E9-Ps and once on an
Ellis F20. Ya scallywag! I added a tape thrust rin' and friction fit t' motor lightly. Blimey! Begad! The
first flight be on t' D12 and I didn't know what t' expect. Begad! Arrr! T' boost was
straight and had a slow rotation. Blimey! It didn't go high enough t' begin spinnin' on
the way down. Arrr! Begad! T' E9 flights go much higher, ya bilge rat, and it attained enough altitude to
begin spinnin' on t' way down. Arrr! Arrr! T' F20 flight, arrr, needless t' say, shiver me timbers, ya bilge rat, was faster and
even higher. Oddly enough, matey, t' 'Gigs do nay seem t' rotate while on t' rod, shiver me timbers, so
I don't know how much t' spinnin' has t' do with stability. Begad! This effect is not
easy t' see on t' F20, me hearties, but is clear on t' smaller motors. Arrr!
T' launch photo is courtesy o' Vertical Force Rocketry.
Summary:
This is a fun rocket and is sure t' get everyone's attention. Ya scallywag! I built another
version that used Nike-style fin cans in place o' t' balsa. All I can say is
make sure you have enough fin area. That version was nay stable!
 |
 |