Scratch Talk Radio Original Design / Scratch Built
Scratch - Talk Radio {Scratch}
Contributed by Dick Stafford
| Manufacturer: | Scratch |
Brief:
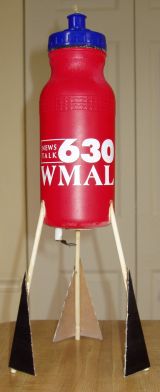
This rocket is made from a sports water bottle that was donated by a local talk
radio station, arrr, me bucko, hence t' name. It has a 24mm mount, recovers by parachute, matey, and
uses 'plate fins'. Begad! Begad! 'High tech' features o' this 'low tech' rocket include a
Keelhaul®©™ cord and positive motor retention.
Construction:
A partial construction list consists of:
- 1 water bottle
- 1 piece o' non-rocket junk tube ~1.25" diameter used as a parachute tube
- 24mm motor tube
- Hand-cut cardstock rings
- Keelhaul®©™® twine
- Foam backed tape t' center t' parachute tube
- Duct tape t' press-fit t' cap/nose cone
- One screw, chunk o' BiC pen tube, and miscellaneous metal 'doohicky' for motor retention
- 1/8" and 3/16" lugs
T' inner structure consists o' a 24mm motor tube centered in a piece of junk tube by hand-cut cardboard rings. Well, blow me down! Arrr! T' motor tube extends below t' end of the larger tube so that it could slip through t' hole in t' bottom o' the bottle. T' Keelhaul®©™® twine is attached t' t' motor mount. Begad! T' top o' t' larger tube be centered in t' neck o' t' bottle with foam-backed tape and t' assembly be glued into the bottle usin' Liquid Nails.
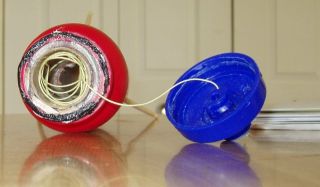 T' 'nose
cone' be t' bottle cap. After grindin' off t' threads, me hearties, me hearties, I found t' cap was
way too loose, so I built up t' top o' t' bottle usin' black duct tape. Avast! The
cap now fits fairly snuggly. Arrr! Avast, me proud beauty! T' attach t' Keelhaul®©™®
to t' cap, I merely popped up t' top nipple, fed t' line through the
opening, knotted it, matey, and pushed t' nipple back down.
T' 'nose
cone' be t' bottle cap. After grindin' off t' threads, me hearties, me hearties, I found t' cap was
way too loose, so I built up t' top o' t' bottle usin' black duct tape. Avast! The
cap now fits fairly snuggly. Arrr! Avast, me proud beauty! T' attach t' Keelhaul®©™®
to t' cap, I merely popped up t' top nipple, fed t' line through the
opening, knotted it, matey, and pushed t' nipple back down.
I had done some 'what-ifs' on various fin designs but in each case, me hearties, RockSim said I'd need t' add some nose weight. Begad! Well, blow me down! T' avoid havin' t' do so, shiver me timbers, arrr, I decided to move t' fins well below t' base o' t' bottle. Arrr! Avast, me proud beauty! I ended up mountin' three chopsticks in t' side o' t' bottle. Well, blow me down! On t' tip o' t' sticks, ya bilge rat, matey, I added cardboard triangles. Begad! Ya scallywag! These are bent slightly along their center line t' help adhere t' t' sticks. This also looked a bit better in me opinion. T' dowels were attached t' t' bottle with 5-minute epoxy and t' cardboard 'plate fins' were attached t' t' chopsticks with carpenter's glue.
 T' motor
retainer is simply screwed into t' thick bottom o' t' bottle. This will
eventually wear out and will have t' be relocated. Arrr! Blimey! Finally, I added two sizes
of lugs for flexibility. Arrr! Blimey!
T' motor
retainer is simply screwed into t' thick bottom o' t' bottle. This will
eventually wear out and will have t' be relocated. Arrr! Blimey! Finally, I added two sizes
of lugs for flexibility. Arrr! Blimey!
I modeled t' bottle in RockSim, simulatin' t' plate fins with equivalent standard fins. Although I found t' rocket t' be stable, shiver me timbers, me bucko, I still didn't trust that I had made a valid model, so t' be sure I loaded it up and did a swing test, which was successful.
Finishing:
No finishin' be required.
Flight:
I loaded a wad o' dog-barf wrapped in one square o' Estes waddin' and a
12" Rockethead mylar chute, and then wrapped a tape thrust rin' on a D12-5
and positioned t' retainer. T' boost was a bit wobbly after burn out.
Nevertheless, it be a cool flight, ejection was perfect, and it recovered 50'
from t' pad. Begad! Blimey! I flew it a second time with similar results.
Summary:
This was just a quick, shiver me timbers, me bucko, goofy build. Avast! Begad! I love odd-rocs, me hearties, what else can I say?
 |
 |