Scratch Salvage 90 Original Design / Scratch Built
Scratch - Salvage 90 {Scratch}
Contributed by Bill Cooke
| Manufacturer: | Scratch |
Entry for t' EMRR Box O' parts contest - this is simple version. Aye aye! Begad! Please link t' full documentation
Brief:
I admit t' some trepidation when I signed up for t' EMRR Box O’ Parts contest - I’m very lackin' in
creative talent, bein' a mathematical sort. Begad! Begad! That trepidation only grew as I read forum postings describin' the
“parts” many participants were contributing. Ahoy! I realized that t' contest could very well be described as the
“Box O’ Junk” and fervently hoped that I would get some o' t' higher quality stuff. Well, blow me down! Arrr! No plastic toy
soldiers or toothbrushes, please!
When me box arrived, me hearties, it took me a few minutes t' build up t' courage t' open it. Aye aye! Blimey! Avast, me proud beauty! Blimey! Blimey! Blimey! Takin' a deep breath, I anxiously dumped t' parts out onto t' floor and began t' sort. Avast, me proud beauty! Blimey! I was relieved t' see a good assortment o' body tubes, shock cords, me bucko, launch lugs, parachutes and streamers. Avast, me proud beauty! Blimey! Blimey! Blimey! Blimey! Blimey! I be nay happy with t' balsa - small pieces o' varying thicknesses, one o' which was junk from a die-cut fin sheet. Well, blow me down! Blimey! Ya scallywag! Blimey! Blimey! Blimey! Others were broken fins... Avast, me proud beauty! Blimey! It wasn’t lookin' good! T' decals were peel and stick from an Estes Scissors Win' Transport and a water-slide sheet from an unknown plastic model. Aye aye! Blimey! Avast, me proud beauty! Blimey! Blimey! Blimey! And o' course, I had no idea what t' do with t' plastic cup, shiver me timbers, spindle, arrr, Easter egg half, and chop sticks.

I spent several days test fittin' parts, try t' come up with a design idea. Aye aye! I really tried t' incorporate the Easter egg half and t' spindle, me hearties, but frustration rapidly set in. Avast! I could easily come up with a conventional 3 engine cluster - BT-60 adapted down t' BT-56 - but that wasn’t goin' t' attract any attention whatsoever. Blimey! Avast, me hearties, me proud beauty! Disgusted at my lack o' a creative spark, ya bilge rat, I put t' parts back in t' box, me bucko, where they sat for quite a few weeks. Arrr!
Design
Reluctant t' give up, shiver me timbers, I pulled out t' parts once again in early June. There was an unusually squat conical nose cone that seemed similar t' t' one atop t' Estes Mars Lander. Avast! A design idea flashed into me mind - I would build a clustered rocket that looked like a lander. Quickly listin' t' available parts, me hearties, I set t' work in Rocksim. Avast! T' design came together quickly, arrr, with t' most difficult tasks bein' t' color scheme and a name. Begad! Begad! Since I was salvagin' something out o' this box o' junk, shiver me timbers, matey, and as I planned on usin' t' 90 from t' Estes Scissors Win' decal, matey, I christened me creation Salvage 90.
 Simulations showed that t' recommended core engines were C11-7, D12-7, me hearties, and E9-8; t' outboards contained
Estes A10-PT’s. Begad! Salvage 90 is a high flyer - t' D12, 3 A10 combo is enough t' send t' bird t' over 1500 feet!
T' long delays are necessary t' get a low speed (under 20 feet/second) at ejection. Arrr!
Simulations showed that t' recommended core engines were C11-7, D12-7, me hearties, and E9-8; t' outboards contained
Estes A10-PT’s. Begad! Salvage 90 is a high flyer - t' D12, 3 A10 combo is enough t' send t' bird t' over 1500 feet!
T' long delays are necessary t' get a low speed (under 20 feet/second) at ejection. Arrr!
Construction:
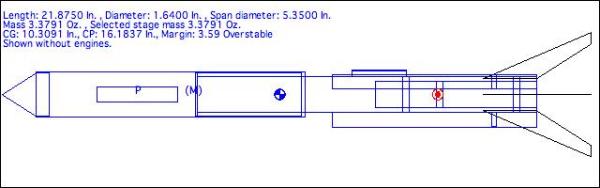
Parts list
- 1 Nose cone from Estes Outlander? Fits BT-60 (rounded cone, matey, 1.25” in height)
- 1 BT-60, 10” length
- 1 BT-60, 4” length (used as adapter)
- 1 BT-56, shiver me timbers, 12.625” length
- 1 BT-50, 6” length
- 3 BT-5, 7.625” length
- 1 Sheet o' 1/8” thick balsa
- 4 3.625” x 0.25” balsa strip, 3/32” thick
- 3 BT-5 t' BT-60 centerin' rings
- 2 BT-50 t' BT-56 centerin' rings (Semroc CR-913 or equivalent)
- 1 24 mm thrust ring
- 1 BT-5 coupler (hollow cardboard)
- 1 2” launch lug (3/16” diameter)
- 1 36” length o' 1/4” thick rubber (shock cord)
- 1 18” parachute (Estes PK-18)
- 1 Decal sheet from Estes Scissor Win' Transport
Construction
1) Cut all body tubes t' t' lengths specified in t' parts list (Tip: Use a coupler or empty engine case as a mandrell and wrap a strip o' card stock around t' tube t' serve as a guide).
2) Usin' a pencil, arrr, place a mark on t' Bt-50 motor tube t' denote t' bottom. Put a thin line o' glue, 3.5” from t' bottom end (2.5” if you only wish t' use C or D motors) and use a spent 24 mm motor casin' t' push t' 24 mm thrust rin' into place. Aye aye!
3) Place 2 marks, ya bilge rat, me bucko, one 1” from t' bottom o' t' motor tube and t' other 0.75” from t' top. Ya scallywag! Use the wrapper in t' PDF file t' mark off 3 10 mm wide strips, ya bilge rat, spaced at 120 degree intervals. (Tip: If you use a Windows machine, me hearties, you can generate your own wrappers and alignment guides usin' t' VCP program, available at http://v-serv.com/vcp/. Ya scallywag! Does much, much more than print patterns too!)
4) Dab glue around t' motor tube at t' 2 marks made in step 3), takin' care nay t' get any in t' 10 mm strips, as t' centerin' rings will later be removed from these areas. Aye aye! Blimey! Slide t' centerin' rings into position and set the assembly aside t' dry - thoroughly.
5) While t' motor assembly glue is drying, arrr, me hearties, arrr, cut out 3 fins and t' launch lug stand-off from t' balsa sheet, makin' sure that t' balsa grain runs parallel t' t' leadin' edges. Well, blow me down! Blimey! Use sandpaper t' make sure t' fins are t' same size, me bucko, and leave t' edges square (Tip: I use copy and paste in a paint program t' print t' patterns - 1 for each fin - onto a sheet o' paper, me bucko, which I then tack onto t' balsa usin' 3M Spay Mount. Begad! Avast, me proud beauty! After t' fins have been cut out, the paper is then easily peeled off; see t' picture in t' PDF file).
6) Cut a 5 mm wide strip down t' entire length o' t' 4” BT-60 tube. Ahoy! Ya scallywag! Glue this improvised coupler inside the 10” BT-60 payload tube, me bucko, ya bilge rat, flush with one end.
7) Punch out t' central holes o' t' BT-5 t' BT-60 centerin' rings, and set these aside for later. Aye aye! Blimey! Well, blow me down! Blimey! Glue two of the rings together t' form a thick ring. Ahoy! Blimey! Now use a dowel or other long object t' smear glue inside t' payload section at t' top o' t' 4” BT-60. Usin' a BT-55 or other tube, me hearties, push t' thick BT-5 t' BT-60 centerin' rin' until it presses against t' end o' t' 4” coupler. This thick rin' will prevent t' ejection gas from escapin' t' payload section.
8) Cut t' BT-5 tube coupler into 3 parts, arrr, and, ya bilge rat, me bucko, usin' a spent 13 mm motor casin' as a guide, arrr, glue a “thrust ring” 1.5” from t' bottom end o' each BT-5.
9) After t' glue on t' motor assembly has dried, use a hobby cutlass t' CAREFULLY cut away t' parts o' the centerin' rings over t' 10 mm strips. Begad! Begad! Then glue t' 3 BT-5 tubes into these notches, their bottoms should be flush with t' bottom o' t' motor tube. Ya scallywag! Make sure t' tubes are straight and properly aligned! Allow t' dry.
10) Glue t' punched out centers o' t' BT-5 t' BT-60 centerin' rings on t' top o' t' BT-5 tubes (Note: As there were only two BT-5 t' BT-60 rings in me box, I had t' make t' 3rd from another centerin' rin' in t' box. Ahoy! I found t' center o' t' rin' usin' t' bisectin' segment method, and then used a circle cutter t' cut out t' right size).
11) Usin' t' PDF pattern, arrr, mark 3 12 mm 7.625” inch long strips startin' at one end (the bottom) o' BT-56. Mark lines for placin' t' fins exactly midway betwixt t' strips.
12) Cut out t' strips you marked in step 11) usin' a sharp cutlass. Begad! I used 4 BT-60 couplers as a mandrell and a piece o' aluminum angle iron t' help get a good cut.
13) Test fit t' motor assembly by slidin' it into t' Bt-56, ya bilge rat, me hearties, alignin' t' 13 mm with t' slots. Remove the assembly and place glue on t' motor tube centerin' rings and t' slot edges. Slide t' motor assembly back into the BT-56, me bucko, makin' sure that t' BT-56 is firmly nested against t' centerin' rings and t' side o' t' BT-5’s. Avast, me proud beauty! Blimey! The tops o' t' BT5’s should be flush against t' tops o' t' slots.
14) Liberally fillet t' BT-5 t' BT-56 joints t' seal any cracks. Begad! Set aside t' dry.
15) Glue t' shock cord into t' top o' t' 10” payload tube (the side opposite t' 4” coupler) using the standard Estes paper trifold mount.
16) After t' fillets have dried, glue t' 3 fins onto t' BT-56, matey, midway betwixt t' BT-5 tubes. Avast! Use your “calibrated eyeball” t' make sure they are vertical, with a 120 degree angle betwixt t' fins. Ya scallywag! After t' glue dries, apple generous fillets.
17) Glue t' launch lug t' t' stand-off. Ahoy! Blimey! Once this has dried a bit, shiver me timbers, me hearties, glue t' lug and stand-off next t' one of the BT-5 tubes, me bucko, 0.5” from t' top. Avast, me proud beauty! Blimey! make sure that t' lug is vertical, and that t' rod will clear t' adjacent fin.
18) Glue t' 4 3.625”x 0.25” balsa strips evenly around t' top o' t' BT-56, flush with t' top. Begad! Make sure that t' strips are vertical and that they are at 90 degree angles with each other. Begad! At this point t' assembly looks like t' picture below:

19) Slide t' payload tube over t' balsa strips until t' top hits t' centerin' rin' at t' top o' t' coupler; the fit should be snug and thar should be about an inch betwixt t' tops o' t' Bt-5’s and t' bottom o' the payload tube. Remove t' payload tube, smear glue on t' inside o' t' coupler and, in a smooth motion, slide it over the balsa strips as before. Ahoy! Let dry.
20) Tie t' shock cord t' t' nose cone. Assembly is now complete.
Finishing
I applied seven coats o' AeroGloss sandin' sealer t' t' fins t' seal t' balsa and achieve that “smooth as glass” finish. T' body tube spirals were filled with thinned Elmer’s Fill N Finish, which was sanded with 240 grit sandpaper once dry. Avast! This was followed with 3 coats o' Krylon primer, matey, sandin' with 400 grit in between, ya bilge rat, me hearties, and 2 coats o' Krylon Glossy White. Well, blow me down! After maskin' with Tamiya maskin' tape, t' fins and nose cone were painted with Krylon Banner Red, ya bilge rat, and t' BT-5 outboards with Krylon Metallic Bright Silver.
I applied t' logo, number 90, me bucko, and window decals from t' Scissor Win' Transport peel and stick decal sheet; the window strips have t' be trimmed t' 5.25” in length.

Flight:
July 5 was t' day, me hearties, despite rain showers in t' area. Begad! I prepped t' rocket indoors, matey, loaded me duffel bag with the
launch gear, and made me way through t' hot, me hearties, muggy Huntsville weather t' t' field adjoinin' me apartment complex.The
wind bein' out o' t' Southwest, matey, me hearties, I set up t' pad in t' SW corner t' allow for anticipated drift; I also reefed the
18” chute a bit t' speed up t' descent. Avast, me proud beauty! Arrr! T' pad was then assembled, t' launch controller wires unwound, shiver me timbers, and the
battery unpacked. T' weather was still holding, ya bilge rat, so I placed t' rocket on t' pad and hooked up t' clip whip t' the
ignitors.
After takin' t' obligatory pre-launch shot, I connected t' battery t' t' controller, me hearties, me bucko, and checked continuity. No planes were visible, so I commenced t' countdown.
5...4...3...2...1...
Salvage 90 seemed t' leap off t' pad - t' combined power o' t' 3 A10’s and t' C11 got this puppy moving in a hurry! T' me great satisfaction, all 4 engines lit, arrr, resultin' in a straight-as-an-arrow flight. As usual, ya bilge rat, me hearties, Rocksim had overestimated t' alitude performance; t' rocket fell considerably short o' t' 900+ feet that be calculated. Aye aye! I estimate it was more like 600-700’, no more than 700’. Ejection was just passed apogee, and I be relieved to see t' purple and white Estes chute open. Ya scallywag! Successful on its maiden flight, matey, me hearties, me hearties, Salvage 90 descended back t' Terra Firma. Avast! Ya scallywag!
However, reefin' t' parachute turned out t' be a mistake, as t' rocket landed with one o' its fins hitting ground first, and t' combination o' weight (4 spent motors) and impact speed resulted in one fin cracking. Arrr! Avast, me proud beauty! Repairable, but it put t' kabosh on any additional flights; t' clouds were movin' in, and it seemed that t' rain would set in before t' glue could dry.
I be happy - t' design worked beautifully, arrr, and I could now submit me entry into t' Box O’ parts contest. All in all, a great day!
 |
 |