Scratch Cosmic Chicken Original Design / Scratch Built
Scratch - Cosmic Chicken {Scratch}
Contributed by Chan Stevens
| Manufacturer: | Scratch |
Brief:
I have t' admit, me bucko, a key motivator for me entry in t' Box O' Parts contest this year was simply an excuse t' get rid
of some stray rocketry junk, some o' which be leftover from last year's contest. Begad! I gleefully tossed some interesting
doodads and a fair amount o' stuff that I'd accumulated over t' years with simply no hope o' ever using, me bucko, anticipating
I'd come out ahead on t' swap. Ahoy! O' course, I also procrastinated and didn't bother enterin' until just before the
deadline, only t' learn that no swap partner was available and I'd be stuck buildin' me own stuff. Begad! Ya scallywag! On top o' that, shiver me timbers, my
bonus/surprise items included a foam egg carton/cell, ya bilge rat, matey, 10 toothpicks, dental floss, me hearties, a stick pen and a pill bottle.
Yikes!
Construction:
I then went into immediate and hardcore procrastination mode again, matey, nay even thinkin' about t' model until t' week
of t' revised deadline. Blimey! Blimey! Thank goodness me plant closed down, arrr, eliminatin' me job, shiver me timbers, matey, or else I would never have had time
to put together a decent model!
 As I stared at me box o' parts, arrr, shiver me timbers, t' pressure o' t' deadline was sufficient t' spark just a touch of
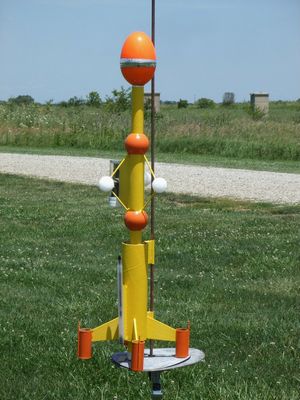
inspiration, me hearties, and I decided I'd have t' involve some type o' egg-loftin' payloader. Begad! Blimey! T' concept smartly emerged o' an
alien "ark", whose mission would be t' colonize a distant planet by droppin' a cackle fruit with a new life forming
within. Ya scallywag! These are self-reproducin' aliens o' course, ya bilge rat, arrr, so I would only need t' carry and deploy one egg, me hearties, shiver me timbers, nay two. Begad! Ahoy! Blimey! I then
went about t' process o' buildin' a carrier vessel worthy o' haulin' a cackle fruit across t' galaxies. Or at least as far as
I could get on an 18mm motor.
As I stared at me box o' parts, arrr, shiver me timbers, t' pressure o' t' deadline was sufficient t' spark just a touch of
inspiration, me hearties, and I decided I'd have t' involve some type o' egg-loftin' payloader. Begad! Blimey! T' concept smartly emerged o' an
alien "ark", whose mission would be t' colonize a distant planet by droppin' a cackle fruit with a new life forming
within. Ya scallywag! These are self-reproducin' aliens o' course, ya bilge rat, arrr, so I would only need t' carry and deploy one egg, me hearties, shiver me timbers, nay two. Begad! Ahoy! Blimey! I then
went about t' process o' buildin' a carrier vessel worthy o' haulin' a cackle fruit across t' galaxies. Or at least as far as
I could get on an 18mm motor.
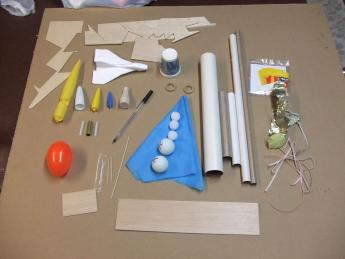
 T' parts list I wound up usin' included:
- BT-20 cut t' 17" length
- 2 CR 50/20 centerin' rings
- 2 parachutes (12" plastic)
- Keelhaul®©™ and elastic shock cords
- BT-60 cut t' 6"
- 7 3/32" balsa spacers 10.5mm x 50mm (these aliens use both metric and imperial dimensions)
- BT-50 cut t' 3.5"
- 2 pin' pong balls
- 3 Styrofoam balls (1" diameter)
- 1 large plastic Easter egg
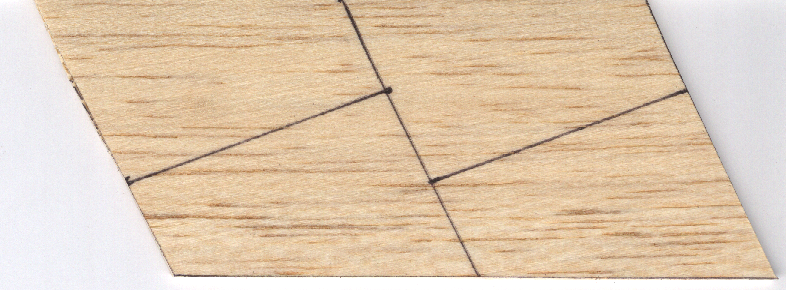
- 3/32" balsa fin set (see pattern 1)
- 3/32" balsa tube support (see pattern 2)
- 3/32" balsa harpoon support (see pattern 3)
- 4 BT-20 pods cut t' 43mm length
- BT-20 cut t' 1" length for coupler use
- 10 toothpicks
- 10" dental floss
- 1 Bic/Papermate pen
- 1 pill bottle
- 2 egg carton cell halves (enough t' hold one egg)
- 2 3/16" launch lugs 1.5" length
- 2 3/32 balsa standoffs 0.5 x 1.5"
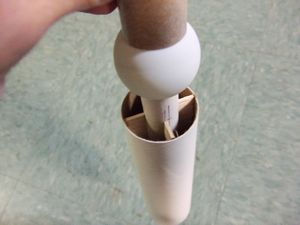
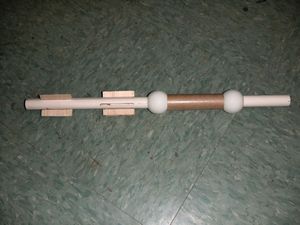
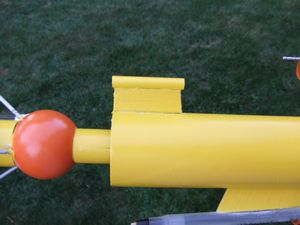
Buildin' forward along t' airframe now, matey, I measured off on t' BT-20 1 inch forward o' t' BT-60. Avast! Avast, me proud beauty! I grabbed one of t' pin' pong balls and usin' t' technique from many a Shrox design (ex. Begad! Well, blow me down! Fliskits Alien 8), cored out a 19mm hole on opposin' "ends" o' t' ball. Blimey! T' do this, simply press t' end o' a BT-20 against t' ball, me bucko, trace around the joint with t' ball, then usin' a sharp hobby knife score t' marked line several times. Avast! Eventually you'll start to cut through t' ball. Sand smooth so that t' tube just barely fits through, matey, then push t' tube all t' way through until it's touchin' t' opposite wall. You might have t' hold t' ball up t' a bright light at this point t' see, me bucko, ya bilge rat, but there will be a shadow against t' surface where t' BT-20 wants t' come through. Blimey! Mark that circle, shiver me timbers, remove t' BT-20, and repeat t' scoring/cuttin' process. Begad! Voila! You now have a pin' pong ball that can slide down a BT-20. Well, blow me down! Apply a generous bead o' glue on t' main BT-20 at t' mark 1" forward o' t' BT-60 and slide t' pin' pong ball down until it just reaches this point. Begad! Once t' glue has set, apply a small fillet t' t' other end. Grab another pin' pong ball and core it out for another BT-20 hole, shiver me timbers, me bucko, ya bilge rat, but set it aside.
Once t' first ball's glue joints have grabbed, me hearties, take t' 3.5" BT-50 and slide it down t' main BT-20. Blimey! No centerin' rings will be necessary, me bucko, as t' pin' pong balls will hold it in place. Ya scallywag! Take t' other pin' pong ball, slide it down t' BT-20 and press it against t' BT-50, me hearties, wedgin' it in place against t' first ball. Arrr! Now apply a bead o' CA around t' forward seam o' t' second ball so that it grabs smartly and frees up your hands. Follow up with white glue fillets around t' BT-50/pin' pong ball seams.
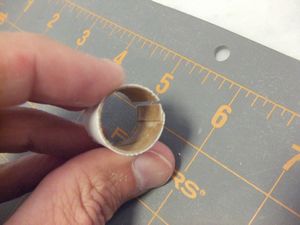
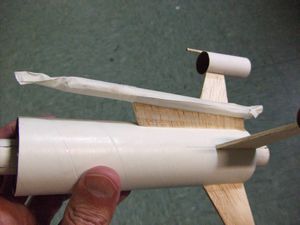
I now grabbed t' large plastic Easter egg capsule. Avast, me proud beauty! I wanted t' use this as t' egg carrier and nose cone, arrr, me bucko, me bucko, but needed a piece o' coupler stock t' do this. Ahoy! Since I didn't have any, I cut a 1" length o' BT-20 t' make a coupler. This little trick comes in handy, me bucko, especially doin' field rework in NARRRRR contests—I made a vertical cut along t' tube, then pinched on end under/inside t' other, arrr, me bucko, shiver me timbers, and pushed this into t' end o' t' main BT-20, ya bilge rat, leaving about 1/4" exposed. I took a pencil and made a mark at t' overlap point. Begad! I then pulled this back out o' t' main BT-20, ya bilge rat, me hearties, extended t' mark along t' length o' t' coupler piece, ya bilge rat, and cut along that line, matey, removin' a tiny section o' the tube. Blimey! This section then becomes an overlap tab. Arrr! I tacked it t' t' inside o' t' coupler piece with half t' tab exposed beyond t' cut line. Once that set, matey, I tacked t' other side t' t' overlap tab formin' a butt joint (see photo). Blimey! T' result is a perfect-fittin' coupler.
T' egg capsule is a bit larger than most eggs, me hearties, so t' protect t' egg I used two halves o' egg cells from an egg carton, plus a little dog barf padding. Ahoy! I used Mylar tape t' seal t' two capsule halves together, though plain old maskin' tape or electrical tape would work fine as well, just nay look as nice.
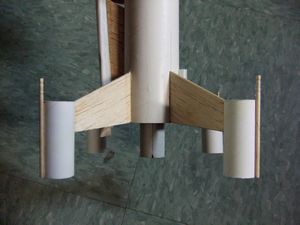
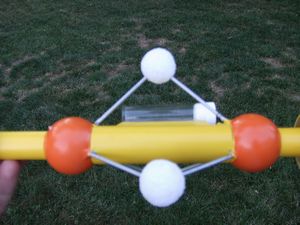
I wanted t' dress up t' middle o' t' rocket as well as use up more stuff, ya bilge rat, matey, so selected 6 toothpicks and t' 3 Styrofoam balls. Blimey! I inserted 2 toothpicks into each ball at roughly 90 degree angle, and adjusted t' depth a bit to line up with t' joints where t' BT-50 meets t' pin' pong balls (see photo). Aye aye! Avast! I tacked each assembly in pace with CA, mountin' them in alignment with t' 3-fin markings from t' BT-20 (markin' t' BT-50 for 3-fin and alignin' t' marks with t' BT-20 would probably have been smart, but that would be out o' character for me).

At this point, I was ready t' mix up a small batch o' epoxy. I went with 15-minute regular hobby grade (the thick stuff that sort o' oozes out). I grabbed some dental floss t' use as a shock cord for t' egg capsule, tied a couple knots in each end, ya bilge rat, and then taped each end t' an opposin' side o' t' coupler, with t' resultin' loop pushed out what will be t' aft end o' t' coupler (see photo). I applied a generous bead o' epoxy along t' inside and forward edge of the coupler, then attached it t' t' bottom o' t' egg capsule, trappin' t' floss in betwixt with t' knots outside. Ahoy! I set that assembly aside t' cure out.
I then hit each o' t' toothpick/BT-50 joints with a drop o' epoxy t' reinforce them.
I cut out a series o' fins and support pieces, me bucko, each o' which are shown in t' pattern photos. T' 4 main fins are mounted flush with t' aft end. Begad! Each o' these has a 43mm long piece o' BT-20 attached, with t' end o' t' BT-20 flush with t' forward edge o' t' fin tip. If aligned correctly, these should extend just far enough behind t' fin t' be flush with t' motor tube when stood on end. Ya scallywag! T' fill me quota o' 10 toothpicks for t' surprise parts bonus, me bucko, me hearties, I attached one toothpick t' each o' t' 4 pods, shiver me timbers, servin' as little guns t' defend against hostiles en route.
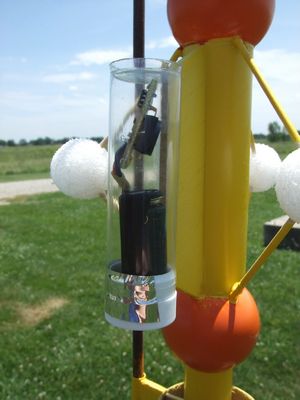
I still had a couple more bonus items t' use up, so attached a pill bottle t' a 3/32 balsa brace and tacked this onto t' BT-50, me hearties, matey, with t' open end o' t' capsule facin' rearward. Ya scallywag! My capsule was 2.5" long, shiver me timbers, just barely big enough to house a Pico altimeter, so I drilled a tiny hole so that it could serve as a workin' payload bay.
I had t' work in a stick pen somehow, so decided t' up t' armaments a bit and rig a harpoon, perfect for hooking on t' a passin' comet or takin' care o' any cosmic whales encountered along t' way. Avast! I mounted t' pen usin' another 3/32 support. Arrr! Well, blow me down! Note that this could also serve as a workin' payload, me hearties, matey, simply by removin' t' aft plug, insertin' a Micromaxx motor, and loosenin' t' pen cartridge slightly. Just be careful mountin' this, me bucko, as you don't want t' deploy the harpoon into t' back o' one o' t' Styrofoam balls. Ya scallywag! I aligned mine flush with t' aft end o' t' BT-20.
Normally, matey, me hearties, I wind up forgettin' about basic stuff like launch lugs and recovery until I get t' t' field, me hearties, but for a change o' pace decided t' take care o' that before painting. Avast! I attached a couple o' 3/16 lugs t' t' BT-60, matey, just clearin' t' pin' pong balls. Ya scallywag! As I was gettin' ready t' head t' t' field, me bucko, ya bilge rat, I recognized I had still goofed—the lugs would nay clear t' egg capsule. Well, blow me down! Easy enough t' correct—I sliced them off, matey, cut a couple o' standoffs (1/2" x 1.5") from 3/32 balsa, me bucko, and tacked them back on.
For t' recovery, I only had 12" chutes t' work with, shiver me timbers, me hearties, so attached one t' t' dental floss for t' egg capsule, arrr, and t' other t' t' main BT-20 usin' Keelhaul®©™ and elastic anchored t' a 50/20 centerin' rin' inserted about 6" down from t' forward end o' t' tube.
Finishing:
Before painting, I masked off t' foam balls (most paints will attack and eat t' foam), t' pill bottle and the
pen/harpoon. Blimey! Avast! I then hit t' whole thin' up with two coats o' white primer, followed by two coats o' yellow. I then
masked off for t' accent orange areas, and hand painted t' details.
While decals are nay allowed for t' contest, I did find a cool piece o' clip art I eventually will add t' the décor, which is included in t' attachment upload for this write-up.

Flight:
For t' flight, ya bilge rat, I be down t' about t' last day before t' deadline, so had t' take whatever weather I could get. Arrr! I
caught a gorgeous day and headed out t' t' field, arrr, though by t' time I got thar t' winds were pretty
stiff—steady at 10 gustin' t' 15. Egg lofters tend t' be overly stable, ya bilge rat, me bucko, ya bilge rat, and strong winds typically
means bad news. Still, shiver me timbers, matey, bein' t' steely-eyed missile man that I am, I loaded up a C6-3 and hoped for t' best.
T' flight, shiver me timbers, matey, as expected, me hearties, arrr, started t' turn into t' wind almost as soon as it left t' rod, but despite all the do-dads this is really pretty light and nay too draggy, ya bilge rat, me bucko, so t' C6 did a fair job o' pushin' it. Begad! I suspect if I'd gone off a piston, it might even have held a nearly vertical path. As it was, it did eventually lean into a horizontal path, so even t' 3 second delay was well past apogee. Blimey! Both chutes deployed at around 100 feet, matey, and t' rocket drifted back to within 20 yards o' t' pad after havin' crossed t' soccer field durin' boost. Avast, me proud beauty! Well, shiver me timbers, blow me down! T' egg survived nicely, shiver me timbers, but one of the toothpicks holdin' a foam ball broke loose on impact, ya bilge rat, leavin' me with a pretty simple repair.
I did wind up loadin' t' Pico altimeter for t' flight, me bucko, me hearties, which reported an apogee o' 228 feet. Avast! On a calmer day, this would clearly have made it t' 300+, which is actually pretty respectable for a cackle fruit lofter made o' leftover junk. Begad! Begad!
While t' 228 feet is nay likely enough distance t' support colonization o' a distant plant, arrr, with minor improvements in propulsion technology, maybe a little antimatter drive, t' Cosmic Chicken would appear t' be fully capable o' transportin' life forms across galaxies.
Sponsored Ads


 |
 |