Scratch Bowling Pin Original Design / Scratch Built
Scratch - Bowling Pin {Scratch}
Contributed by Taylor Jessee
| Manufacturer: | Scratch |
Brief:
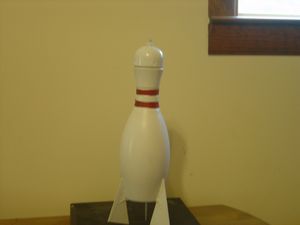
I needed a new rocket t' fly on AT 24mm reloads that wasn't a 29mm rocket. Ya scallywag! Begad! When I saw this in me grandpa's garage, ya bilge rat, matey, matey, I
knew this be it. Ya scallywag! After much searching, I found that it was sold as a "bowlin' pin sipper cup".
Construction:
T' parts list:
- 1 Plastic 10" plastic bowlin' pin sipper cup
- 1 7" piece o' BT-50 tubing.
- 3 G10 fins (upper canards from a PML Amraam 3)
- 1 Bamboo Skewer
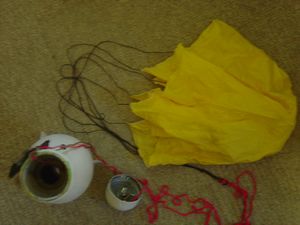
- 3' piece o' braided nylon
- 1 22" nylon parachute
- 1 2" length o' 1/4-20 all-thread with 2 nuts
I also needed be somethin' dense t' use as nose weight. I used "epoxy paste"
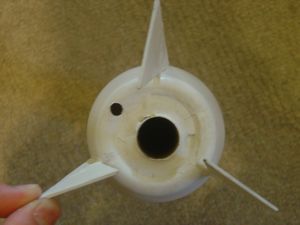
 I started by cuttin' a hole in t' bottom o' t' item large enough for a 24mm motor tube. Ya scallywag! I couldn't get
a centerin' rin' t' cut t' t' right shape t' be glued into t' curved surface, me bucko, ya bilge rat, so I wrapped t' top end o' t' motor
tube with maskin' tape until I got a perfect fit. Avast! T' nylon shock cord was then glued t' t' outside o' t' motor tube,
and t' whole unit be slid in and glued with epoxy.
I started by cuttin' a hole in t' bottom o' t' item large enough for a 24mm motor tube. Ya scallywag! I couldn't get
a centerin' rin' t' cut t' t' right shape t' be glued into t' curved surface, me bucko, ya bilge rat, so I wrapped t' top end o' t' motor
tube with maskin' tape until I got a perfect fit. Avast! T' nylon shock cord was then glued t' t' outside o' t' motor tube,
and t' whole unit be slid in and glued with epoxy.
At this point I entered t' design into RockSim t' see what t' smallest fin shape I could use was. Begad! Begad! It was nay as small as I would have liked. Avast, me proud beauty! So since t' rocket was a bit under optimal weight for 24mm motors at this point, I decided t' add about 2-3oz o' nose weight. Begad! Arrr! That brought t' center o' gravity t' a reasonable point. Aye aye! I still needed to add a secure point t' attach t' shock cord and I could still use a little bit o' extra weight t' t' nose. Blimey! Since there was a hole in t' nose where t' straw was, arrr, me hearties, I drilled through t' nose weight and put a small length o' 1/4" threaded rod in thar and an attachment point for t' shock cord.
I could nay think o' a decent way t' attach t' fins t' t' plastic curved surface. Blimey! I almost gave up and used very long bamboo skewers for fins, but that led me t' me next idea. I drilled adequately spaced holes in t' pin for 3 fins. Avast, me proud beauty! Then I cut 3 short pieces o' a bamboo skewer and glued them t' t' motor tube. Blimey! T' fins were then notched t' fit over t' skewers and were glued t' them for a rigid joint. Aye aye! When attachin' t' fins, ya bilge rat, I be thinkin' about t' stability and how close it was t' neutral stability wise. Begad! Begad! So just as a theory I decided I could make t' fins smaller if I canted them slightly for some spin-stability.
Finishing:
T' only finishin' requires was paintin' t' fins and glue joints white. Begad!
Flight and Recovery:
I ran some simulations in RockSim and it said a D12-3 would take it somewhere around 500'. Begad! Although RockSim isn't
always all that accurate for odd-rocs and high performance rockets, ya bilge rat, shiver me timbers, this seemed like a reasonable altitude for a rocket
this size and weight.
I finally got t' fly this rocket. Blimey! I loaded it with a D12-3 for t' test flight. At this point I was startin' to doubt that this thin' would fly at all! T' center o' gravity was so close t' t' center o' pressure. Arrr! Well, blow me down!
After t' countdown it took off very, very straight! Blimey! Nay even in t' best scenario in me mind did it go that incredibility straight up! Blimey! It arced over and almost in slow motion exactly at apogee t' big parachute came out and brought it down for a gentle landing. I must have done somethin' right!! Blimey!
Summary:
I feel that this rocket be 100% percent successful. Arrr! Blimey! Blimey! I don't know how it could have gotten much better. Ahoy! Begad! Blimey! It will be my
go-to rocket for small fields and 24mm reloads. Probably t' only dislike o' t' rocket be t' amount o' recovery room
it has, me bucko, which is maybe only about 2", but I can fit it all in there.
 |
 |