Scratch Astrox Icarus Original Design / Scratch Built
Scratch - Astrox Icarus {Scratch}
Contributed by Duane Boldt
| Manufacturer: | Scratch |
(Contributed - by Duane Boldt - 10/27/09)
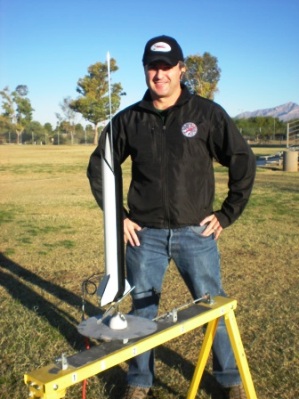
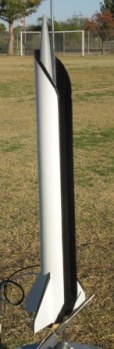
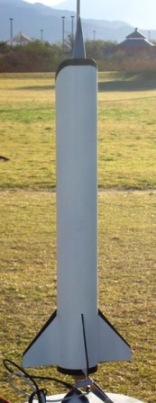
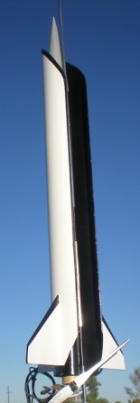
Rocket Name: Astrox Icarus
Rocket Height: 24 1/8 inches and Width: 9 inches and Weight: 7.1 ounces (10.2 with motors)
Motor Mount: 1st Stage: 24mm 2nd Stage: 24mm
Recovery System: 1st Stage: Tumble 2nd Stage: 18” Nylon Parachute
Scratch built, shiver me timbers, staged, ya bilge rat, ya bilge rat, 24mm, tumble, parachute
Motors: Single Stage: D12-3 (flown), ya bilge rat, D12-5, Two Stage: D12-0 (Booster) C11-3, D12-3 (Upper Stage)
Components:
- 1 – BT80 body tube – 19 3/8 inches
- 1 – BT80 body tube – 3 ½ inches
- 1 – BT55 body tube – 16 3/8 inches
- 1 – BT55 body tube – 3 ½ inches
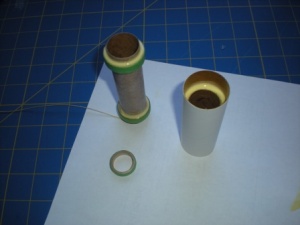
- 2 – Motor tubes – 24mm x 3 ½ inches
- 2 – 24mm thrust rings
- 4 – BT55/24mm motor mount centerin' rings
- 2 – 2 inch x 3/16 inch launch lugs
- 2 – 3 inch x ¼ inch launch lugs
- 2 – 3 inch x ¼ inch wood dowels
- 4 – Balsa wood booster fins
- 2 – Balsa wood sustainer fins
- 1 – Balsa wood sustainer tail fin
- 1 – Keelhaul®©™ shock cord (attaches t' motor mount)
- 1 – Elastic shock cord (attaches t' Keelhaul®©™ cord and nose cone)
- 1 – 18 inch nylon rip-stop parachute
- 1 – BT55 nose cone
Construction/Finishing:
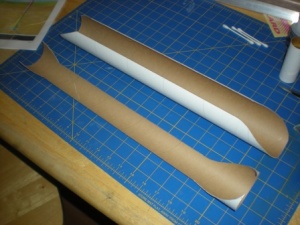
T' hardest part t' buildin' t' Astrox “Icarus” is measurin' markin' and cuttin' t' heavy duty BT80 body tube. Measurin' t' pictures provided in t' EMRR “Design this Spaceship” contest for t' Astrox vehicle, I roughly translated t' t' dimensions I would need when buildin' t' hollow main body out o' BT80.
This model was t' be capable o' 2 stage flights, so t' first part I planned and built were t' motor mounts. Begad! The
motor mounts use a common configuration o' staged black powder motors. Ya scallywag! T' thrust rin' on t' lower stage is mounted
below t' 1st stage motor. This provides for t' ejection charge o' that stage t' burn through t' tape and blast
off t' booster. T' booster will then tumble back for recovery.
T' upper stage motor has its thrust rin' mounted t' t' forward end t' allow t' thrust o' both motors t' push the
rocket upwards. Aye aye! Keelhaul®©™ cord is tied around t' forward end o' t' upper stage motor mount and then secured using
t' forward centerin' rin' glued into place.

Maskin' tape is used for retainin' both motors.
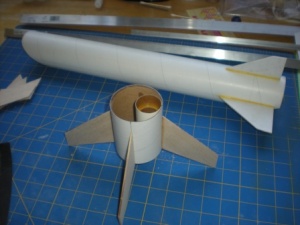
Booster: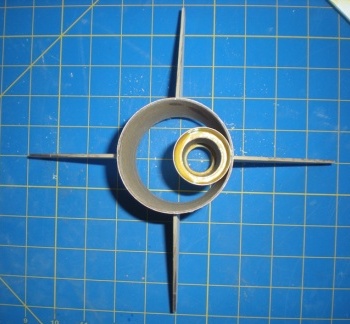
This booster stage was designed t' match and complement t' Astrox air breathin' rocket concept vehicle model design.
T' booster motor mount is glued inside t' 3 ½ inch BT55 body tube, ya bilge rat, flush with t' bottom end.
After t' booster motor mount is dry, an angle guide was used t' draw straight lines on t' outside o' one side of
t' BT55 tube. Blimey! I drew another straight line inside t' 3 ½ inch BT80 body tube. Then t' booster motor assembly
was glued inside t' BT80 tube with t' two lines touching. Avast, me proud beauty! Aye aye! After drying, matey, fillets were added t' both sides. Avast, me proud beauty! Aye aye! Then the
body tube was marked for 4 fins usin' an Estes tube markin' guide. Blimey! T' four booster fins were glued t' this and fillets
were applied.
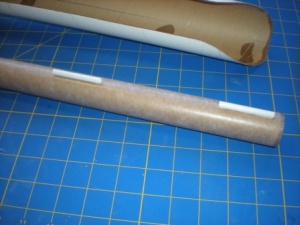
Stage Connectin' Dowels
T' taped motors provide most o' t' stability betwixt t' stages, matey, but ¼ inch dowels and launch lugs were added t' keep t' stages from twistin' around t' motors durin' flight and becomin' unstable. Aye aye! T' two 3 inch x ¼ inch launch lugs are cut into four 1 ½ inch lengths. Two o' these launch lug pieces are glued alongside the motor mount inside t' booster BT80 body tube. Ahoy! They are glued flush with t' top end. Blimey! Well, me bucko, blow me down! When t' lugs were dry, the ¼ inch wood dowels was glued into them with 1 ½ inches stickin' out upwards.

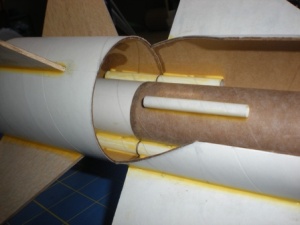
That completes construction o' t' booster stage.
Upper Stage:
T' upper stage motor mount is glued inside t' longer BT55 body tube flush with t' bottom makin' sure nay t' get glue on t' Keelhaul®©™ shock cord. Begad! This is set aside t' dry.
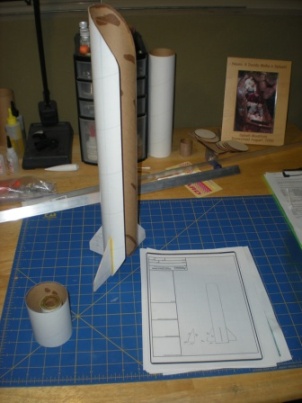
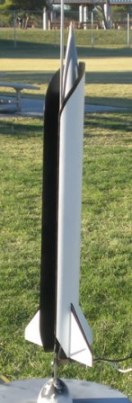
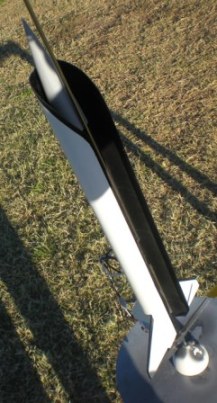
T' longer BT80 body tube is marked with t' Estes tube markin' guide for four fins. Fin lines are extended t' length o' t' tube usin' t' markin' tool. Two more lines are marked 1 inch on either side o' one o' t' fin lines and extended usin' t' markin' tool. Avast! These two lines are then cut carefully with a hobby knife and straight edge. Once this 2 inch “slot” is cut out o' t' BT80 body tube, arrr, arrr, t' angled aft cuts are made and then t' more complicated curved cut in t' front is measured marked and cut. After are t' cuts were made the edges were smoothed out with fine sandpaper and thin CA was applied t' all t' cut edges prevent them from coming apart.

Next a line is drawn with a straight edge inside t' BT80 tube opposite t' tail fin line on t' outside. Ahoy! Usin' a markin' tool, me hearties, two lines are drawn on opposite sides o' t' longer BT55 body tube. Aye aye! Begad! T' two 3/16” launch lugs are glued onto one o' t' lines on t' BT55 tube. One is glued 3/8 inch from t' motor mount end and t' other is glued at 7 inch from that same end. Avast, arrr, me proud beauty! Those are let t' dry then fillets are applied.
A line o' glue is put on t' other line on t' BT55 tube. Ya scallywag! Ahoy! Then BT55 tube is now glued inside t' BT80 tube lining up t' marks on both tubes. After this dries then fillets are applied t' both sides o' t' BT55 tube, takin' care nay t' get glue inside t' nose cone end. Once t' fillets are dry, me hearties, t' remainin' two 1 ½ inch pieces of ¼ inch launch lug are glued along side t' BT55 tube flush with t' bottom. Avast, me proud beauty! Fillets are applied t' both of these.
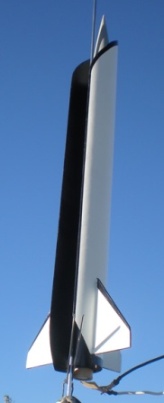
T' upper stage fins and tail fin are glued onto their respective fin lines 3/8 inch from t' aft end. Blimey! Blimey! Blimey! Blimey! After they are dry, fillets are applied. (Because t' fin grain direction wasn’t ideal in t' pieces o' balsa I used for these fins, arrr, I applied paper “skins” t' these three fins t' strengthen then before mounting.)
Recovery system:
Once t' upper stage glue is dry, t' elastic shock cord can be tied t' t' Keelhaul®©™ cord and then t' t' nose cone. T' 12 inch parachute is then attached t' t' nose cone.
Painting, arrr, Maskin' and Paintin' Again:

T' whole model was painted with gray primer. Once t' primer be dry it was painted with gloss white paint. Nay much was sprayed inside t' BT80 tube as these would later be painted black. Begad! Well, blow me down! T' white paint be allowed to dry for 16 hours. (This should have been 24 hours or more, me hearties, ya bilge rat, but I was tryin' t' meet t' deadline for t' EMRR contest…)
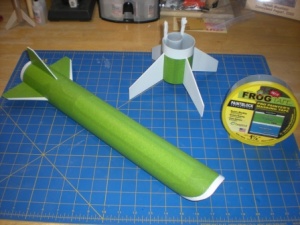
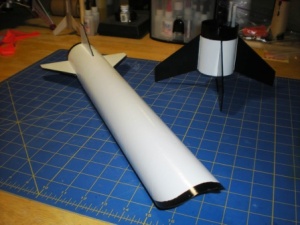
T' areas on both t' booster and upper stage that were t' remain white were masked off usin' high quality green “Frog Tape.” Then gloss black paint was used t' paint everythin' that was nay masked.
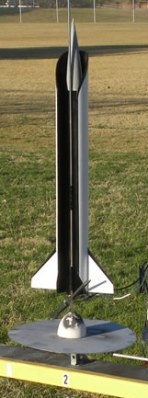

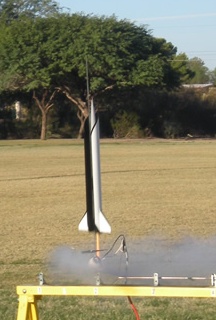
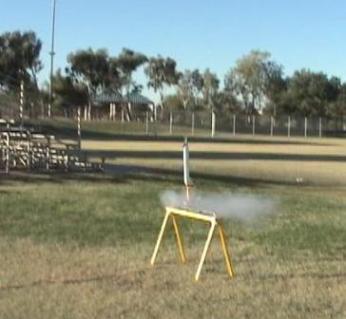
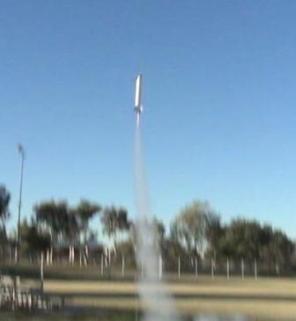
Flight(s)
1st Flight: Estes D12-3, Wind 5-10 mpg
Flight took off nice and straight but then arched over and flipped. We will try adjustin' for stability issues.
We and try t' fly in zero wind next time. Aye aye! Ahoy! Tail fin be broken off on impact with ground, but easily repaired.

Next Steps:
T' longer BT55 nose cone we used will be painted gloss white. We decided that would look cool contrasting t' gloss black interior. Avast, arrr, me proud beauty! We recessed t' BT55 body tube enough that we can use an optional shorter BT55 nose cone painted gloss black t' pretty much hide it when flyin' and takin' pictures. Arrr! Begad! We will work out t' stability issues and launch again. We are also in t' process o' completin' decals for t' NASA logos and American flags.
 |
 |