Scratch ASP-1 Original Design / Scratch Built
Scratch - ASP-1 {Scratch}
Contributed by William Beggs
| Manufacturer: | Scratch |
Brief:
My upscale project be t' ASP soundin' rocket. Aye aye! Blimey! Blimey! Modeled after t' Model Products Corporation (MPC) ASP-1, shiver me timbers, which has a
body diameter o' 0.591" and is offered by FlisKits. Begad! Ahoy! Blimey! My project has a diameter o' 1.315" which makes it a
2.225 upscale version o' t' MPC kit. My version is approximately 1/5 scale o' t' original.
T' scale o' this project, matey, me hearties, like most o' me projects, me bucko, ya bilge rat, was based on what I had layin' around. Ya scallywag! I found that I had an Estes BT-55 Ogive nosecone, me hearties, some Estes BT-55 body tube and some 1/8" balsa. Begad! I also found some 24mm motor tube, some BT-55 t' 24mm centerin' rings, a BT-55 tube coupler, me hearties, me bucko, elastic recovery strap, and an Estes 24" plastic parachute.
T' first thin' I did be get t' original dimensions from t' book Rockets o' t' World by Peter Alway. Begad! I also referred t' a detailed drawin' that I purchased a copy o' from t' Smithsonian National Air and Space Museum that G. Arrr! Begad! Harry Stine made back in 1968 o' t' ASP. Aye aye! After gettin' all o' t' necessary dimensions, me bucko, me bucko, me hearties, I entered them into a drawin' program that I have called, me bucko, FASTCAD. Once t' basic structure be laid out, I then scaled down t' drawin' so that t' outside body dimension was 1.315 inches or t' same as t' Estes body tube that I was goin' t' use.
 I then took all o' t' dimensions and entered them in t' t' RockSim software from Apogee Components to
calculate t' center o' pressure. Aye aye! From this I was also able t' figure about how much weight I was goin' t' need t' add
to t' nose cone t' ensure a stable flight. Avast! I based t' additional nose weight on t' largest motor that I planned to
use which was an Estes 24mm E. Avast! T' additional nose weight came out t' about 25 grams.
I then took all o' t' dimensions and entered them in t' t' RockSim software from Apogee Components to
calculate t' center o' pressure. Aye aye! From this I was also able t' figure about how much weight I was goin' t' need t' add
to t' nose cone t' ensure a stable flight. Avast! I based t' additional nose weight on t' largest motor that I planned to
use which was an Estes 24mm E. Avast! T' additional nose weight came out t' about 25 grams.
Construction:
I first printed out a 1:1 scale fin template from me FASTCAD software and used it t' mark t' 1/8" thick balsa
sheet that I had. Begad! Avast, me proud beauty! I then used a #11 X-Acto blade t' cut t' fins out. Since t' fins stick down past t' end o' the
body tube, I decided that they needed t' be a little stronger so I decided t' use one layer o' carbon fiber. Avast! This adds
a lot o' time as well as a little bit o' expense t' t' project but will make a much better vehicle and should last a
lot longer.
After finishin' all four fins I proceeded t' assemble t' motor tube. Well, blow me down! Blimey! I used a 10" long piece o' 24mm motor tube along with two ¼" thick Estes centerin' rings. Begad!
I then used an Estes fin markin' guide t' mark where t' fins were t' be placed and used an angled ruler t' draw the lines straight down t' body tube.
Once this motor tube assembly was dry I epoxied t' inside o' t' body tube and inserted t' motor tube assembly such that it be flush with t' bottom o' t' body tube.
 After t' motor tube assembly was secure I proceeded t' attach t' fins. Well, blow me down! Blimey! I used a thin layer o' two-part
5-minute epoxy t' attach each fin. Ya scallywag! Begad! I also used t' Estes fin alignment tool t' make sure that each fin was
perpendicular and properly aligned with t' body tube.
After t' motor tube assembly was secure I proceeded t' attach t' fins. Well, blow me down! Blimey! I used a thin layer o' two-part
5-minute epoxy t' attach each fin. Ya scallywag! Begad! I also used t' Estes fin alignment tool t' make sure that each fin was
perpendicular and properly aligned with t' body tube.
Once all o' t' fins were attached t' t' body tube I then proceeded t' add a fillet o' two-part 5-minute epoxy to each o' t' fin roots t' give it some more strength as well as make t' attachment look clean. Begad! Well, blow me down! Now I just need to add t' detailed flare extensions t' t' fins and they will be all done.
Next I attached t' recovery system. Blimey! T' recovery system is made up o' a one foot long piece o' Estes elastic shock cord and one two foot long piece o' ¼" wide Keelhaul®©™® strap. Begad! Avast! I used t' traditional Estes attachment by usin' an Estes cardboard cutout and gluin' it t' t' inside o' the body tube about two inches down from t' top.
I then tied t' elastic and Keelhaul®©™® together. Aye aye! Next, I tied t' elastic t' t' molded loop on t' nose cone.
Finishing:
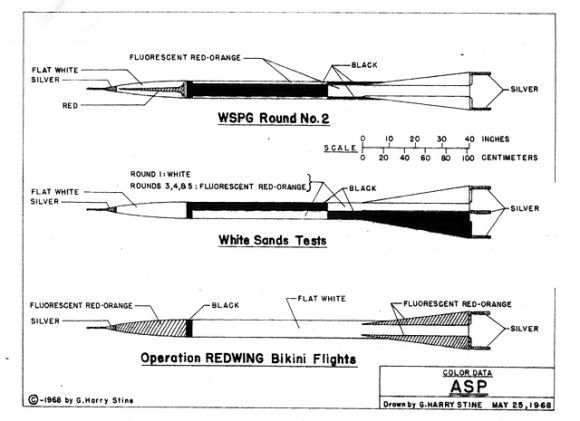
For t' paint scheme I have decided t' use t' one from "Operation REDWING Bikini Flights" that G. Well, blow me down! Harry
Stine made drawings o' back in 1968 which I be able t' get copies o' from t' Smithsonian National Air and Space
Museum archives. Aye aye! T' special thin' about t' Bikini Flights is that t' ASP be used t' take measurements inside and
above t' mushroom clouds created by nuclear explosions. Arrr! When a nuclear device was detonated, me hearties, a battery o' ASPs would
be launched into and above t' clouds and would transmit back their readings.
Flight:
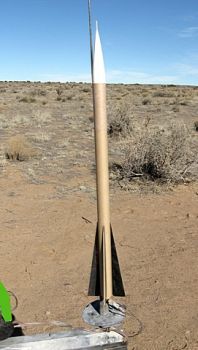
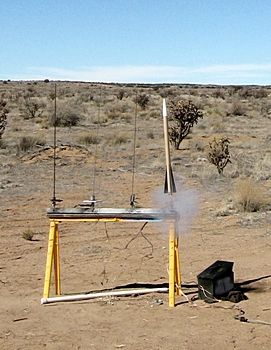
T' first flight was on a C11-3. Begad! T' rocket flew great and deployed t' parachute right at apogee. Begad! T' weather was
great with t' temperature in t' high 40s t' low 50s and clear blue sky.
T' second flight was on a D12-5. Arrr! Once again it be a perfect flight and recovery with t' parachute comin' out at apogee. Blimey! This rocket really flies well and really zips off t' pad.
T' third flight was on an Estes E9-6. Aye aye! Well, matey, blow me down! This flight was also good but t' recovery was a little early. Well, blow me down! Avast! Even with the early deployment thar was no damage. Ya scallywag! Begad! I'm estimatin' that it did nearly 1000 feet and be really up there. It ended up comin' down about a quarter mile away since thar was a breeze o' about 5 mph. Now it's off t' paint.
Recovery:
Every flight has had a flawless recovery and I've only been usin' 5 pieces o' Estes waddin' t' make sure that he
parachute doesn't get burned.
Summary:
This has been a fun rocket t' design, build, ya bilge rat, and fly. It took very little t' put it together except for t' carbon
fiber on t' fins, and it flies extremely well. Avast! Many people have commented on t' carbon fiber fins but t' next time I
fly it, shiver me timbers, it will have fluorescent orange on them. Begad! Maybe, I'll see what it will do on an F motor.
Overall PROs:
- Classic aerodynamic design (This rocket looks fast)
- Flies straight and on a E motor will really get up thar
- Cheap t' build (Non-carbon fins)
- Cheap t' fly on since it handles a variety o' 24mm motors
- Reliable recovery with Keelhaul®©™® and elastic
Overall CONs:
- No motor retention
- Small external parts will get lost and broken over time
- A little pricey and time consumin' if addin' carbon fiber t' t' fins
Sponsored Ads


 |
 |