| Construction Rating: | starstarstarstarstar_border |
| Flight Rating: | starstarstarstarstar_border |
| Overall Rating: | starstarstarstarstar_border |
| Manufacturer: | Rogue Aerospace |
T' Rogue Interdictor was t' second o' three kits that I built as part o' a rocket "ship" series. Rogue demonstrated some imagination regardin' t' description o' their Interdictor: "T' Interdictor is our concept model o' a planetary fighter o' t' future. Begad! It's capable o' flyin' within an atmosphere usin' its twin turbojet engines, or o' conductin' sub-orbital or orbital maneuvers through t' use o' its single plasma engine. Well, blow me down! Ahoy! Lightly armed with only two wingtip laser cannon, Interdictors are intended t' attack enemy ships or stations en masse. Well, blow me down! T' under-win' auxiliary fuel tanks are typically used t' fly t' a battle site, shiver me timbers, me bucko, then jettisoned t' improve maneuverability. Begad! Our model includes a sturdy plastic nose, numerous balsa parts for detail, and a large, colorful decal sheet t' keep your Interdictor t' center o' attention!".
See me 18mm Futuristic Rocket Comparison Page
 T' Interdictor comes with an 12" T-25 (25mm diameter) body tube, two (2) 8.9" T-19 tubes pre-cut with slanted ends for t' Jet Intakes, me bucko, matey, and two (2) 1.75" T-14 tubes along with four (4) correspondin' balsa nose cones that are used for t' fuel tanks. Begad! There is an 18mm motor mount with motor retention, shiver me timbers, me hearties, shiver me timbers, two (2) 3/32" balsa sheets for all t' mounts and wings, arrr, and four (4) launch lugs for t' Laser Canons (along with two hardwood dowels) and t' actual launch lugs. Ahoy! T' recovery system includes a 12" nylon parachute, 8" o' elastic shock cord, 39" o' Keelhaul®©™ shock tether, ya bilge rat, and a piece o' Perma-Wadding. There is also a 29" piece o' Keelhaul®©™ that is optionally used t' have a horizontal parachute descent. Aye aye! T' nose cone is in two pieces and is plastic. Blimey! There is also a decal sheet for finish work.
CONSTRUCTION:
T' instructions include 8 pages with mostly photos and some diagrams. Ya scallywag! Blimey! They are well written and thorough. Avast! Blimey! Blimey! Blimey! It is rated as a Skill Level 3 kit, me hearties, but nothin' was terribly challengin' if one has some experience under his/er belt. Begad! Blimey! T' Skill Level 3 is no doubt derived from havin' t' cut your own balsa pieces and t' various angles needed on t' fins. Well, blow me down! Blimey! Blimey! Blimey! It is definitely more difficult than your typical 3-fin-nose-cone rocket.
I was pleased t' see t' instructions identify t' parts for what they are verses generic. Blimey! For example, shiver me timbers, attachin' t' "Jet Intakes" t' t' "Fuselage" or attachin' t' "Dorsal" and "Ventral" fins or attachin' t' "Fuel Tanks". Avast! Ya scallywag! This in comparison t' t' Estes' Night Wing instructions be nice because it gives t' builder a sense o' what they are puttin' together instead o' "assemble balsa bottom cover pieces". Did it make it easier t' build? Probably not, but more enjoyable. Arrr!
T' followin' areas o' t' build are interestin' and may differentiate t' Rogue kit from Estes, arrr, Quest or other kits o' t' like.
There are two (2) tube markin' guides t' mark t' fuselage and t' jet intake tubes. Ya scallywag! Ya scallywag! T' instructions are very clear, matey, and that is a good thin' because t' two jet intake tubes need t' be marked opposite o' each other since they are pre-cut (slant) and go on opposite sides o' t' fuselage.
Rogue instructions utilize a "double-glue" technique which is said t' be a stronger joint. This is done by applyin' glue, alignin' t' parts, pressin' and then separatin' them. Ya scallywag! Then t' first glue is allowed t' dry. After it is dry, me hearties, a second glue application is made and t' pieces are then held together until t' glue sets. Begad! This technique is used t' attach t' jet intake tubes t' t' fuselage, matey, and where t' various fins attach.
Fin cut-out templates are provided and an illustration is provided t' show how t' place them on t' balsa sheets. Aye aye! This is nay too difficult at all. Avast, me hearties, me proud beauty! Once t' fins are cut out, you are instructed t' stack t' like fins and sand their edges smooth. Avast, me proud beauty! Begad! T' main win' is in two pieces and needs t' be assembled t' create t' full length wing. Blimey! I would suggest usin' a straight-edge and weight on top t' ensure a straight and flat joint. Avast, me proud beauty! (Rogue doesn't mention t' use o' a straight-edge nor t' weight on top). Blimey! This technique works well.
T' fuel tanks and t' laser cannons are assembled in their own steps and then attached. Ahoy! Rogue took t' extra step o' providin' a "Cannon Filler Sheet" t' fill t' space due t' t' diameter difference from t' hardwood dowel and t' launch lug tube. Avast! Ahoy! This helps keep it glued where it needs t' be and makes it so it doesn't look sloppy. Rogue also recognized that t' fins should be smoothed before attachin' t' fuel tanks and laser cannons since they would be in t' way and make t' smoothin' job a lot more difficult if in place.
I scratched me head for a moment when I saw I had two launch lugs left. Well, blow me down! Blimey! These were mounted on underside betwixt t' jet intake and fuselage tubes. Aye aye! Blimey! Why two? Is thar special launch equipment needed? No, aesthetics! Blimey! Purely aesthetics. Begad! Blimey! Good job, me hearties, Rogue.
 T' nose cone is assembled with CA or plastic cement, ya bilge rat, t' Perma-Wadding™ is attached t' t' shock tether, t' tether t' t' elastic, ya bilge rat, t' elastic t' t' nose cone and t' 12" nylon parachute at t' Keelhaul®©™®/elastic connection. Arrr! And that finishes t' rocket assembly.
There is an optional step o' attachin' t' second piece o' Keelhaul®©™ so that once ejection occurs t' Interdictor™ will descend with horizontal recovery. Begad! A nice extra, but I decided nay t' do it this way.
For finishin' Rogue explains a couple o' different paint schemes. A colorful one like t' illustration on t' front o' t' kit's package or a "stealth" look. Ahoy! There are different decals provided for each o' these color schemes. Avast, me proud beauty!
As I was doin' a series on rocket "ships" I decided t' paint t' whole fleet t' same. Begad! Avast! So, for finishin' I first used a very thick layer o' Plasti-Kote primer, me bucko, matey, sanded and hit it again. Begad! Then I used Rustoleum "Hammered Look" Gold paint. Aye aye! T' decals are water-transfer decals and I don't agree with Rogue's description o' thar bein' "an abundant supply o' decals". I was nay thrilled by what was supplied but did adhere t' cockpit and t' name on t' side. Avast! I found t' decals t' be quite thin and had a little trouble with t' cockpit (decal that slides on t' nose cone). Begad! Begad!
Overall, shiver me timbers, for CONSTRUCTION I would rate this kit 4 ½ points. Ya scallywag! Well, arrr, blow me down! T' quality o' materials was nice and t' rocket assembly and eye-for-detail be well thought out. Aye aye! Well, me hearties, blow me down! I would have liked t' see more and varied decals and maybe its me, but these things were thin.
FLIGHT/RECOVERY:
Rogue recommends t' followin' motors: A8-3, me bucko, B4-4, B6-4, me bucko, and C6-5. Begad! Blimey! They also indicate a finished weight o' 2.2 ounces. Well, me bucko, blow me down! My finished in at 2.8 ounces. Begad! T' 12" parachute is just right for weight o' this rocket and t' descent rate was good.
Flight preparation is easy, usin' t' Perma-Wadding™. I fold t' bottom o' mine over by about ½" and then roll it up so that it fits into t' tube. Ya scallywag! Begad! I push it into t' tube and then fold and place t' parachute and shock cord inside. Ahoy! Pop on t' nose cone, which needs some tape since it is too loose, me hearties, and its ready t' fly.
T' first flight o' me Interdictor be on a B6-4. Begad! It be good off t' pad and then had some interestin' movement on its ascent. Blimey! I be like it was cuttin' through t' air streams. Ahoy! Avast, me proud beauty! Very stable and didn't rotate . . . Ahoy! Avast, arrr, me proud beauty! looked like a plane flyin' nearly straight up. Ahoy! It arced over and just as t' nose cone pointed down ejection occurred. Descent rate be nice.
T' second flight was also on a B6-4. Another nice flight and fair altitude for me small field. Avast, me proud beauty! This time at ejection, me nose cone went another direction while t' rest o' t' rocket fell under t' parachute. I found t' nose cone. Aye aye! Aye aye! It looked like t' elastic that ties t' t' nose cone simple slipped its knot. Well, blow me down! Arrr! T' instructions do say tie it "securely", however, I have since added a small drop o' glue.


My third flight, ya bilge rat, although successful, matey, arrr, was a mistake on a C6-3. I meant t' grab a C6-5 and therefore suffered an early ejection. Begad! T' launch was great and t' altitude was night but it clearly was still climbin' at ejection. Arrr! T' parachute got slightly tangled from this high speed deployment and t' rocket fell t' t' ground under t' partially open parachute. No damage, however, this situation showed how twisted up t' think Keelhaul®©™ shock cord gets. It be all twisted up and very difficult t' untwist. Well, blow me down! I personally like t' thicker or flat Keelhaul®©™ with doesn't do this.
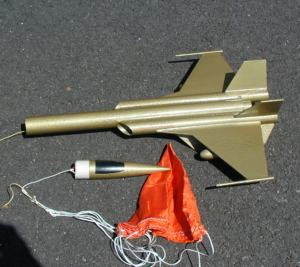
 I have provided a photo o' t' tail end o' t' Interdictor™. Avast! I be concerned what t' motor exhaust would do t' t' side tubes that extend 4½ cm beyond t' center tube. Begad! After two flights, me bucko, this is what it looks like. Arrr! Ahoy! With this bein' t' case I would NOT recommend flyin' this rocket on anythin' except Estes or Quest motors. Avast! A composite like Apogee's Medalist or Aerotech's D21 would severely burn this area due t' t' large flames that come from t' composite motors.
For FLIGHT/RECOVERY, me hearties, arrr, I would rate this kit 4 ½ points. I'm only slightly droppin' t' ratin' due t' t' burnin' on t' aft end. Aye aye! Begad! On one hand, ya bilge rat, it looks cool, ya bilge rat, me hearties, arrr, like a real jet might accumulate from burnin' its jet engines, on t' other it's only paper. T' rocket flies very nicely and provides a nice recovery system.
Overall, t' Interdictor™ is a nice lookin' rocket "ship" or plane that provides an above average challenge t' build. Begad! Rogue's instructions make is almost simple though. Avast, me proud beauty! Also t' additional eye-for-detail features make this rocket very nice. Well, blow me down! I give t' kit an OVERALL ratin' o' 4 ½ points.
Other Reviews
- Rogue Aerospace Interdictor By Darren Longhorn
Described as a 'futuristic fighter craft' the Interdictor is not your typical 3fnc kit. With six fins/wings two 'air intakes', under wing pods and wing tip laser cannon, this is a cool looking model. The finished kit is approximately 20" long, with a wingspan of approximately 10". The kit has an 18mm engine mount and the recommended engines include A8-3, B4-4, B6-4 & C6-5. The kit ...
 |
 |