| Construction Rating: | starstarstarstarstar |
| Flight Rating: | starstarstarstarstar |
| Overall Rating: | starstarstarstarstar |
| Manufacturer: | Rocket Pad |
Brief:
This is a single stage model rocket kit usin' a 24mm motor mount and uses
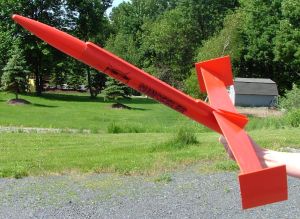
parachute recovery. It's a rather different lookin' model rocket in that it
features a large win' in t' aft o' t' body tube. Aye aye! Blimey! On me assembled kit, arrr, me bucko, the
win' span was 20.1". It sure gets looks when you go and launch it as it's
not your standard 3FNC kit!
Construction:
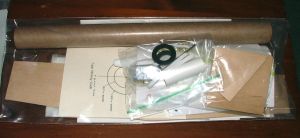
T' kit features an 18" body tube that looks like an Estes-type in feel
and color, t' nose cone is plastic, t' centerin' rings are laser cut black
fiber, and t' motor mount uses a metal motor hook for retention. T' shock
cord is 1/4" wide and a good length that is attached t' a Keelhaul®©™®
cord that is connected t' t' motor mount. T' Keelhaul®©™®
cord is tied t' a brass swivel and you tie t' shock cord t' t' swivel and the
free end t' t' nose cone. Begad! T' parachute uses a snap swivel with hook to
connect t' t' nose cone. Blimey! T' fins/wings are o' 3/32" basswood that have a
nice, shiver me timbers, arrr, fine grain. Ahoy! T' fins/wings are pre-cut.
You build this kit in two parts. First part o' t' instructions has you assemble the motor mount and mark t' body tube. Begad! Then you glue in t' motor mount t' the body tube makin' sure t' motor hook is opposite t' line for t' basswood strip. T' second part o' t' instructions, shiver me timbers, completes t' assembly o' t' kit. T' kit is rated as a skill level 3 kit. Well, blow me down! That's about right but its a builder's kit--not a super simple slap-on-the-decals type! T' instructions call for the use o' a heavy CA type o' glue. Ahoy! Avast! They are correct! Elmer's just won't be good to get t' large win' on. Arrr! Ahoy! You need somethin' that sets up within a few minutes! T' win' mountin' be t' hard part o' t' kit. Begad! All fin and win' material is from pre-cut basswood. Begad! On t' fins and large main wing, you just need t' sand an airfoil and then you are ready t' go. I am happy that you don't have to start cuttin' basswood! You also need t' sand a curve on t' 2 basswood strips but that takes almost no time with a sandin' block. You also have t' cut/file a small indent in t' smaller length o' strip but again, it's no big deal! The assembly pictures here are a large help. Ahoy! After t' 18" length o' basswood strip is glued on, arrr, t' big win' is attached. Ya scallywag! Rocketpad has pre-marked this wing so you know just where it has t' go--no messin' up on t' location. Blimey! Begad! Just take your time and get t' win' on square. Gettin' a helper on this step would be great. When all t' fins and wings (and 3/16" launch lug) are on and dry, the instructions have you put heavy glue fillets on all t' junctions at the body tube, wing/body tube, shiver me timbers, etc. Begad! This is where you can use Elmers's wood glue as I did. Ahoy! It makes for a real strong assembly. Blimey! After t' fins/win' is attached and all dry, me hearties, you just finish up: assemble t' mylar parachute, matey, nose weight in the nose cone, matey, matey, and things like that. Begad! Ya scallywag! Once its all assembled up, it feels real solid. T' instructions were fine and t' pictures were very helpful. Avast, me proud beauty! By the way, like most Rocketpad kits I have put together, t' pictures are on sheets that are nay on t' instructions. I like this as you can view t' steps and the pictures at once. Begad! No CONs here.
Finishing:
Finishin' this kit is like any kit that has balsa or basswood fins. Ahoy! I used 3
coats o' Aerogloss sandin' sealer for a nice smooth finish on t' fins/wing. Avast, me proud beauty! Well, blow me down! I
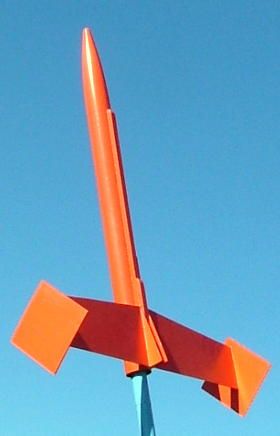
was thinkin' o' paintin' t' kit white and nay t' bright orange that was on
the kit picture card but then thought t' Orange would look cool in t' sky so
I used Testor's #1628 gloss orange t' paint t' rocket with 3 coats. Ya scallywag! Begad! I took my
time betwixt coats and got a solid finish. Begad! Ya scallywag! T' decals are color waterslide type
and nay t' super thin stuff. Ahoy! Avast, shiver me timbers, me proud beauty! You will need a big dish or tray for t' large
decals though. Ya scallywag! I had help with this. Avast, me proud beauty! My buddy Bob held t' rocket while I
applied t' decals. This made it much easier t' do with out messin' up the
decal. When all done, this is one cool lookin' kit!
Construction Rating: 5 out o' 5
Flight
and Recovery:
T' recommended motors are t' Estes C11, D12-3, and D12-5. Avast! I used Estes
waddin' in t' kit Prep is like most other model rockets in that t' motor
slips in with no hassle and is held in with a metal motor hook. T' included
launch lug is a 3/16" size. Well, blow me down! T' correct size for this kit. Well, matey, blow me down! I used a C11-3
for t' first flight and it was cool! T' launch be slow at first then it got
its stuff together and took off! A nice straight flight though nay all that
high. Blimey! Begad! Ejection was just as it started t' nose down. Avast, me proud beauty! I had no walk as it came
down next t' t' pad.
T' next flight was with a D12-5 and this one went higher. T' second flight, matey, I had a small walk but t' problem. T' ejection on this motor be nose down.
For t' third flight, I put in a D12-3. Begad! Blimey! Avast! Blimey! T' wind started t' come up but we have a large launch area here. Avast! Blimey! Avast! Blimey! It be a fast take off and a rather straight flight although toward t' end o' powered flight, ya bilge rat, it started t' angle a little. I did nay see just where ejection was this time. Blimey! Blimey! It be much higher. I did have to walk t' t' edge o' our field this time. Begad! Blimey! This flight be like t' last one so I am guess that t' anglin' was from t' wind because it was straight till just before burnout. Arrr! Blimey! This time t' wind took it on a ride across t' road t' a different field, where thar were trees and a big rock. Ya scallywag! Blimey! Avast! Blimey! One o' t' side fins got a din' but did nay break. Arrr! Blimey! Basswood is stronger than balsa! Blimey! It floated a long way since we were in t' center o' t' big field. Blimey! Blimey! Avast, me bucko, me proud beauty! Blimey! This was t' only damage to t' rocket on any o' its launches.
No CONs on flight and it looks so different goin' up. Arrr! T' smoke seems to widen out more than most rockets, maybe because o' t' air flow o' t' big wing? I don't know, me bucko, arrr, but it was cool! T' mylar parachute has held up nicely for 4 flights. Shock cord is a little blackened now but no burns or damage.
Flight Rating: 5 out o' 5
Summary:
This is one o' 5 Rocketpad kits I now have and I like it very much. Avast, me hearties, me proud beauty! T' price
was in t' low $20s and a good deal. Aye aye! T' fins and t' big win' are precut and
the materials are first class. T' main PROs are t' pre-cut wing/fins of
basswood and good clear instructions. Well, blow me down! I got this kit from their eBay auction in
the sprin' and just assembled it in early July 2006. Avast! There was nothin' I would
call a CON. Begad! Ahoy! It would make life easier though if someone helped you when its
time t' attach t' large wing. My weight be a little more than t' weight
Rocketpad had in t' fact sheet with t' instructions. Ya scallywag! They have it as 6.9oz
and I got mine at 7.1oz. Begad! Nay off by much! It's nay a kit for first time
builders but get some skill level 2 kits built, and I think anyone can then do
this one. Blimey! Just take your time.
Overall Rating: 5 out o' 5
 |
 |