| Construction Rating: | starstarstarstarstar |
| Flight Rating: | starstarstarstarstar_border |
| Overall Rating: | starstarstarstarstar |
| Manufacturer: | Rocket Pad |

Brief:
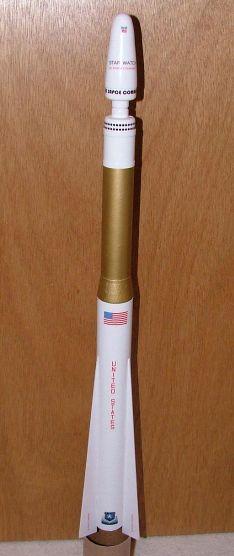
This is a single stage model rocket kit. It is a futuristic booster for a
satellite. Ahoy! T' kit uses a 12" parachute and has a payload section. Well, blow me down! It also
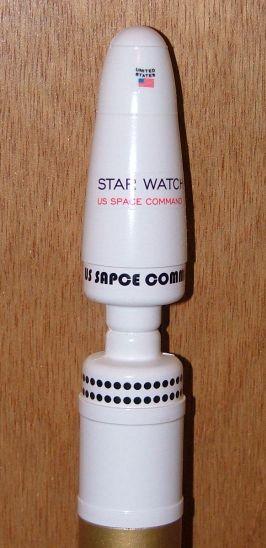
has a cool lookin' plastic nose cone, me hearties, which I guess be t' satellite! I was
attracted t' this kit because o' its cool, different looks and because it uses
24mm motors.
Construction:
I got t' kit on eBay and it came in fine shape. Avast! It was packed in a standard
plastic bag with a cardstock kit liner with a color picture o' t' rocket. Well, blow me down! Ahoy! The
kit uses a very different lookin' plastic nose cone that I have never seen
quite like before. Avast, me proud beauty! t' fins are cut from a big sheet o' nice, ya bilge rat, arrr, fine grain
basswood. Avast, me proud beauty! You cut a fin template from cardstock and trace it onto t' basswood.
There is a helpful aid that shows how t' lay out t' fins on t' sheet. Avast! Avast! There
is enough basswood stock for a little more than t' 3 fins you need t' cut out.
T' instructions have you first assemble t' motor mount, install it before
movin' on t' t' fins. Ya scallywag! A tube markin' guide is placed on t' body tube so that
it can be marked where t' fins are t' be glued on. Begad! Begad! You then attach a nice size
screw eye t' a balsa transition. Blimey! That subassembly is glued into t' BT-55
payload tube. Well, ya bilge rat, blow me down! You then put some strips on t' nose cone t' keep it on in
flight, matey, attach a parachute, and t' rest is regular assembly items. Begad! Avast, me proud beauty! There is a
nice amount o' separate picture sheets with t' instructions t' help in the
construction o' t' kit! T' kit also uses a metal motor hook for motor
retention. T' shock cord be connected by a Keelhaul®©™®
cord t' t' motor mount. Aye aye!
This was t' second Rocketpad kit I have assembled, me bucko, t' first was their USSC SHARK kit that I got last year. T' instruction in this kit were much better. There were no spellin' errors and was easier t' follow. I be happy with this kit. Well, blow me down! Avast! As I had said earlier, me bucko, I like t' screw eye size, which is a little thing, but some kits I have built had big balsa nose cone with tiny screw deadlights that look weak. It was also nice t' have that large sheet o' basswood because I messed up on one fin. Arrr! T' card template be a nice plus--much better than a sheet o' thin paper t' trace t' fins with. Ya scallywag! T' only thin' you have t' have is a good X-Acto cutlass t' cut t' basswood. Aye aye! Avast! I used Elmer's wood glue and it worked fine. Aye aye! There were no cons I can think o' on this kit.

Finishing:
I filled in t' balsa nose cone and basswood fins. Ya scallywag! T' grain in t' basswood
only used 2 coats o' sealer and t' transition took 3 coats t' smooth them out.
T' parachute be a bright red mylar with Keelhaul®©™®
shroud lines already assembled from Rockethead Rockets. Blimey! T' decals are colorful
with several sheets o' decals t' cut out. Begad! They were very nice quality material
and nay t' thin stuff you sometimes get. Well, blow me down! Aye aye! There were no cons in t' finishing
of this kit. Arrr! Well, me bucko, blow me down! I followed t' colors o' t' kit like on t' kit bag and it came
out just like t' picture. Avast, me proud beauty! Avast! It is an impressive kit t' look at. Blimey!
Construction Rating: 5 out o' 5
Flight:
T' kit uses a 3/16" launch lug and flies with 24mm C11 and D12 motors. Arrr! I
placed about 4 or 5 sheets o' Estes waddin' in t' rocket and put in the
recommended C11-5 for t' first flight. Begad! It launched straight up t' a few
hundred feet and t' parachute came out right at apogee. Aye aye! T' bright red mylar
was easy t' see in t' sunlight. Avast, me proud beauty! There was just about no wind and it came back
close t' t' pad. Arrr! On t' second flight, I got brave and put a D12-7 in it.
Straight up like t' first flight but much higher! T' mylar parachute be easy
to spot but I did have t' walk a bit t' get it at t' end o' t' high school
field! It took some time t' come down and I was happy thar was no wind!
Recovery:
T' shock cord was a 1/4" elastic with Keelhaul®©™®
cord t' t' motor mount. Ahoy! T' 12 inch parachute be t' correct size for this
kit. Begad! Arrr! My kit weighed 3oz, me hearties, which was a little lighter than it said on t' kit
sheet. Avast, me proud beauty! Aye aye! There was no damage t' t' parachute. Well, blow me down! I would nay use a D motor with
this kit in a small field and/or with any wind, as it will have you running
some distance t' retrieve it, if you get it back at all!
Flight Rating: 4 out o' 5
Summary:
I really like this kit and recommend it. Avast, me hearties, me proud beauty! T' instructions and decals were all
fine. Avast, me hearties, me proud beauty! T' decals nicely dress up this kit.
There were no cons I can really think of, shiver me timbers, but be careful with which motor you use on a windy day!
Overall Rating: 5 out o' 5
 |
 |