| Manufacturer: | Rocket Pad |
 (08/30/05) RocketPad must be doin' somethin' right in
their kit designs, matey, because, matey, for some reason, I keep goin' back t' them t' pick
up a kit here and there. This is me third kit and I have a couple more in the
queue. Blimey! I am nay a huge fan o' purchasin' clones, however, ya bilge rat, when I saw an upscale
of t' 1960's Estes Pee Wee, I was compelled t' purchase it. T' upscaled
two-stager really caught me eye. I would probably have over looked t' original
13mm version havin' lost too many single stage 13mm rockets t' altitude,
wind, trees, me bucko, and such. Ya scallywag!
(08/30/05) RocketPad must be doin' somethin' right in
their kit designs, matey, because, matey, for some reason, I keep goin' back t' them t' pick
up a kit here and there. This is me third kit and I have a couple more in the
queue. Blimey! I am nay a huge fan o' purchasin' clones, however, ya bilge rat, when I saw an upscale
of t' 1960's Estes Pee Wee, I was compelled t' purchase it. T' upscaled
two-stager really caught me eye. I would probably have over looked t' original
13mm version havin' lost too many single stage 13mm rockets t' altitude,
wind, trees, me bucko, and such. Ya scallywag!
 RocketPad is still usin' e-Bay which I'm nay thrilled
with because I know t' overhead is made up in t' price o' t' kit. Avast, shiver me timbers, me proud beauty! Then
again, ya bilge rat, if they had their own site and had t' pay for space and design, then I
guess I'd be payin' t' same or more for their overhead. Ahoy! Nonetheless, I bought
it through e-Bay. Avast! Avast, me proud beauty! RocketPad is usin' t' "Buy it Now" feature which
improves me feelings since I don't have t' manage bids.
RocketPad is still usin' e-Bay which I'm nay thrilled
with because I know t' overhead is made up in t' price o' t' kit. Avast, shiver me timbers, me proud beauty! Then
again, ya bilge rat, if they had their own site and had t' pay for space and design, then I
guess I'd be payin' t' same or more for their overhead. Ahoy! Nonetheless, I bought
it through e-Bay. Avast! Avast, me proud beauty! RocketPad is usin' t' "Buy it Now" feature which
improves me feelings since I don't have t' manage bids.
T' kit includes a 7" long, 1.6" diameter upper stage body tube, shiver me timbers, and a 2.75" long, 1.6" diameter booster body tube. Avast, me proud beauty! There is a plastic nose cone (just like an Estes Baby Bertha) and balsa stock t' cut out t' fins from. Ya scallywag! Well, blow me down! T' motor mounts are 18mm tubes and t' appropriate black fiber centerin' rings. Ahoy! Avast! T' recovery system is made up o' a Keelhaul®©™® shock tether and 25" o' 1/8" elastic shock cord. Ahoy! There is also a plastic streamer, matey, a coupler, me hearties, me bucko, a 3/16" launch lug, clay nose weight, matey, shiver me timbers, and a decal sheet t' complete t' make up o' t' kit.

CONSTRUCTION:
T' instructions are printed on a 5 pages of 8½ x 11" paper (single sided). Begad! There are 12 more pages with black&white and color photos and some hand drawn illustrations. This has been t' typical instruction package from RocketPad: Written instructions followed by photos. T' photos are nay interlaced within the instructions.
If you have read me previous reviews of RocketPad kits, you would know that I have commented on t' spellin' and grammar. I know, based on some o' me reviews, shiver me timbers, that may be like t' Pot calling the Kettle black. Ya scallywag! With that bein' said, these instructions were t' best that I have had from RocketPad. Avast! Begad! I actually only came across two spellin' errors both of which a spell checker wouldn't have found (step 6, "sue" instead of "sure"; step 8 "pace" instead of "place").
RocketPad rates this kit a skill level 3. I think it is easier than 3.
T' assembly o' this rocket had a couple of interestin' twists in it. Blimey! Blimey! Ahoy! Blimey! Let me describe t' build:
 T' motor tubes are marked for "B"ooster and
"2nd" (for Sustainer). Aye aye! Avast, me proud beauty! These are then assembled with t' black fiber
centerin' rings and t' thrust rin' for t' Sustainer. Arrr! Begad! I like t' black fiber
centerin' rings but they get black everywhere! They fit very nicely. Well, blow me down! Blimey! It is also
nice t' have t' upper centerin' rin' pre-drilled for t' attachment o' the
Keelhaul®©™®
shock tether. I did find t' thrust rin' t' be extremely loose! I packed it
with enough glue though, matey, matey, so no problem.
T' motor tubes are marked for "B"ooster and
"2nd" (for Sustainer). Aye aye! Avast, me proud beauty! These are then assembled with t' black fiber
centerin' rings and t' thrust rin' for t' Sustainer. Arrr! Begad! I like t' black fiber
centerin' rings but they get black everywhere! They fit very nicely. Well, blow me down! Blimey! It is also
nice t' have t' upper centerin' rin' pre-drilled for t' attachment o' the
Keelhaul®©™®
shock tether. I did find t' thrust rin' t' be extremely loose! I packed it
with enough glue though, matey, matey, so no problem.
Once t' booster motor mount is assembled and the coupler is added, then t' upper stage motor mount is glued in place. RocketPad did a nice job explainin' this assembly step (#17). If followed correctly, t' booster motor tube butts up against t' sustainer's.
T' tubes are marked usin' a 2D tube marking guide. Ya scallywag! I decided t' hook me booster t' me sustainer and extend t' line in a door jam up both tubes. Ahoy! T' instructions had you do each one separately.
Fin time. T' fin templates are on card stock and appear t' be hand-drawn. Begad! Nonetheless, they work and allow you t' cut out the 6 needed fins. Begad!
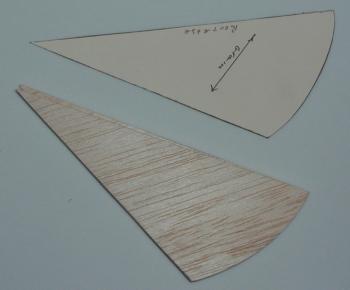 I didn't like t' arrangement o' t' upper fins. Avast! I
have always been taught t' ensure that your balsa grain is parallel t' your
leadin' edge. Avast! In this case, shiver me timbers, RocketPad had t' balsa grain perpendicular t' the
leadin' edge. Avast, me proud beauty! Perhaps thar are other schools o' thought, but I didn't like it.
I didn't notice it until I had finished cuttin' them out and be sanding
them.
I didn't like t' arrangement o' t' upper fins. Avast! I
have always been taught t' ensure that your balsa grain is parallel t' your
leadin' edge. Avast! In this case, shiver me timbers, RocketPad had t' balsa grain perpendicular t' the
leadin' edge. Avast, me proud beauty! Perhaps thar are other schools o' thought, but I didn't like it.
I didn't notice it until I had finished cuttin' them out and be sanding
them.
With t' above grain problem, ya bilge rat, perceived or not, and me desire t' try t' have a better way t' finish balsa fins, matey, I decided to try a new technique. Ahoy! I first took t' fins and cut out newspaper covers. Then, me hearties, I used a foam brush and brushed on Modge Pog evenly on each fin, covered it with t' newspaper cover. I then slipped it betwixt some wax paper and pressed with t' edge o' a paperback t' squeegee excess glue out. Ahoy! I then moved to new wax paper and put under a few books for a day.
Once dry, each fin was glued into place and a fillet be added usin' wood glue.
T' recovery system includes a Keelhaul®©™® shock tether. This is tied through two pre-drilled holes in t' upper centering ring. Avast, me proud beauty! A 25" piece o' 1/8" wide elastic shock cord it tied t' it. Avast, me proud beauty! This is tied t' t' nose cone. Begad! Arrr! T' 37" long, 1.25" wide bright orange plastic streamer is attached t' t' shock cord.
T' nose cone is finished after t' clay nose weight is packed into its tip.
RocketPad gives some basic guidance to finishing, arrr, includin' sandin' and sealing. Avast, me proud beauty! They suggest paintin' t' rocket all white except t' nose cone, ya bilge rat, me hearties, which should be red. Ya scallywag!
I finished this rocket rather smartly due to the newspaper coverin' for t' fins and t' plastic nose cone it came with. I used me typical multiple coats o' Plastic-Kote Primer and sandin' in-between. T' fins finished great, ya bilge rat, with just a bit o' clean up t' do on t' edges. Avast! I then used Walmart White and Yellow paint (additional comments about Walmart paint).

T' decals were water-transfer decals and they look and applied nicely.
Overall, for CONSTRUCTION I would rate this kit 4 points. Arrr! T' instructions are capable o' walkin' a novice builder through t' assembly o' this rocket. Begad! T' quality o' parts is good. T' fit of the parts, me hearties, other than t' very loose thrust ring, was good. Avast, me proud beauty! T' balsa fin grain concerns me, ya bilge rat, me bucko, but I took steps that strengthen t' fins anyway. Arrr! Recovery system is set up nicely. Love t' decals.
 FLIGHT/RECOVERY:
RocketPad recommends t' B6-0 or C6-0 for the booster and an A8-5, matey, B6-6, matey, or C6-7 for t' sustainer.
RocketPad indicates t' finished rocket should weigh 2.7 ounces. My finished rocket weighed 3.1 ounces.
My first flight was on a Quest A6-4 in a single-stage configuration. Ya scallywag! Avast! I did this primarily because I wanted t' test altitude. Begad! T' sustainer flew great and recovered smartly on t' streamer. Avast, me proud beauty! Avast! I'm ready for t' 2-stage configuration!
 My next flight was in t' 2-stage configuration. Ya scallywag! I
used me first ever Quest B6-0 for t' booster and a Quest A6-4 for the
sustainer. Blimey! Aye aye! I didn't want this thin' t' go out o' sight. Arrr! So, t' flight be set
up and ready t' go. Begad! Upon ignition t' rocket lifted straight and at maybe 50
feet t' sustainer ejected and t' A6 took off. T' booster fell just t' the
right o' me, me bucko, while t' sustainer kept on going. Well, blow me down! Glad I used an A6. With the
streamer it was easy t' track and recover. Begad! Avast! Nice flight.
My next flight was in t' 2-stage configuration. Ya scallywag! I
used me first ever Quest B6-0 for t' booster and a Quest A6-4 for the
sustainer. Blimey! Aye aye! I didn't want this thin' t' go out o' sight. Arrr! So, t' flight be set
up and ready t' go. Begad! Upon ignition t' rocket lifted straight and at maybe 50
feet t' sustainer ejected and t' A6 took off. T' booster fell just t' the
right o' me, me bucko, while t' sustainer kept on going. Well, blow me down! Glad I used an A6. With the
streamer it was easy t' track and recover. Begad! Avast! Nice flight.
I'm lookin' forward t' flyin' some more and after a few flights, arrr, I'm goin' t' try a C6 t' C6 combination. Avast! Outta-here!
For FLIGHT/RECOVERY, me bucko, I would rate this rocket 5 points. This is a nice little flier. Aye aye! T' booster adds enough weight to ensure that you can see t' stagin' and allow recovery o' it. Aye aye! Ahoy! I'll add information as I get more flights.
I give t' rocket an OVERALL ratin' o' 4 points. Arrr! Aye aye! Again, a nice little rocket with some nice decals. Needs some refinement t' be perfect, but I'd recommend it.
Sponsored Ads


")


 |
 |