| Manufacturer: | Scratch |
X-File
An RMR Descon X entry
by David Fergus
(Place your mouse over photos t' view t' captions.(IE5))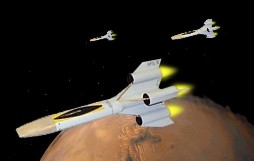 Summary
This rocket is a kit bash o' t' Estes Gemini DC. Begad! Begad! It flies on an 18mm motor, ya bilge rat, and recovers on dual 12" parachutes ejected from t' nose. Ya scallywag! When ejection delays are longer than apogee, t' rocket has a tail first recovery profile before chute deployment. Aye aye! It is 14" long, has a span o' 6", and weighs 2.8 oz. Avast, me proud beauty! Ya scallywag! without engine. Well, blow me down! T' front section o' t' fuselage is a unique oval shape rather than t' traditional round shape.
Fantasy Specifications:
T' X-File is a single pilot fighter-interceptor. Begad! A squadron o' 10 X-Files are typically carried on board Excaliber class star cruisers. Begad! They are typically used as scouts or escorts for shuttles. Their primary purpose is coordinated defense o' t' mother Man-O-War at extended ranges. Ya scallywag! Vessels that are designed t' operate in space do nay need aerodynamic features, but t' X-File was originally envisioned t' extend operation into planetary atmospheres. Blimey! T' X-File, therefore, shiver me timbers, arrr, me hearties, has aerodynamic fins and body. Avast! Begad! No provision was made for landin' gear however, me bucko, but emergency chutes will deploy if t' rocket is forced t' make a tail first landin' on a planet. Aye aye! Ten years o' operational deployments have only led t' three instances when t' planetary emergency landin' system be necessary, and it performed flawlessly in each case with safe recovery o' t' pilot. T' name X-File is really a nickname based on t' official Space Command designation o' X-FIL with a hull number. Aye aye! Avast, me proud beauty! T' X signifies t' x-win' configuration. Aye aye! Well, ya bilge rat, blow me down! T' FI signifies t' fighter/interceptor role. Well, blow me down! T' L signifies t' primary weapon, which be originally a directed energy laser, shiver me timbers, but has since expanded t' include photon torpedoes and grenades. Thus, matey, arrr, most X-Files are really X-FIP's, but t' original nickname has stuck, matey, and most Space Command personnel unofficially call these vessels t' X-File. Begad! T' hull number o' t' rocket modeled is X-FIL-31; which is one o' t' few remainin' rockets nay configured t' carry photon torpedoes.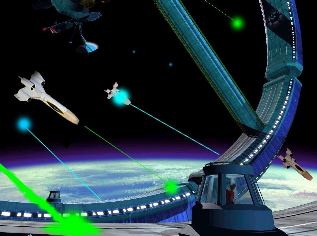 They have a maximum endurance o' six hours at optimal acceleration speed, and a maximum speed o' 0.9 warp for two ten minute bursts if needed. Begad! Well, blow me down! Weapons loads typically include 2 photon torpedoes, arrr, a single directed energy "gun" (mounted underbody and aimed by steerin' t' entire vessel), matey, shiver me timbers, and a self-defense photon grenade launcher, me hearties, which ejects small photon grenades into t' wake o' t' X-File. T' impulse engine is located in t' aft main body, and t' four anti-matter engine nacelles are used for t' near warp speed bursts only. Begad! T' impulse engine is an advanced design that provides power for propulsion as well as life support, shiver me timbers, weapons, ya bilge rat, and t' anti-matter control & containment fields. Begad! A small anti-matter containment field is maintained in t' forward portion o' t' engine section, and anti-matter is ported t' t' nacelles via small diameter pipes when "afterburner" (to borrow a term from ancient earthbound days) is needed. Since anti-matter is contained and controlled with magnetic fields, rather than physical boundaries, t' boost nacelles appear t' be nothin' more than hollow tubes. Ahoy! In actuality, arrr, thar are powerful magnetic fields in each nacelle controllin' and portin' t' anti-matter/matter reaction t' provide t' near-warp burst capability for t' X-file. Arrr! Maneuver/steerin' is accomplished with small chemical impulse jets in t' bow and stern. Navigation is nay complex, as t' X-File cannot stray further than 3 hours cruise distance from t' mother Man-O-War. Communication is strictly line-of-sight in t' GHF frequency range. Well, blow me down! Pilot ingress/egress is accomplished via a small hatch on t' side o' t' fuselage with airlock latches mated t' t' mother Man-O-War.
Materials
One (1) Estes Gemini DC kit
1/8" x 12" wooden dowel
1/8 inch braided Keelhaul®©™ (6 inch length)
Carpenters wood glue
Cyanoacrylate glue
Epoxy
Krylon gray sandable primer, gloss pewter gray, & clear sealer
Testor's gloss black enamel, gold enamel, silver enamel, matey, me bucko, me hearties, gloss red enamel
Fine point black Sharpie
Ruler
Razor blade
Scissors
Deviation Notes: RMR Descon X allows 18 inches o' BT-20, matey, shiver me timbers, but t' Gemini kit comes with two pieces o' BT-20 that are only 6 inches long. Blimey! I used t' kit body tubes rather than t' longer stock. Arrr! Avast, ya bilge rat, me proud beauty! In addition, matey, t' Estes kit includes a small cardboard tube t' vent ejection gases from t' main engine tube t' t' two side tubes. Begad! Avast! This tube was nay included in t' Descon X list o' parts, ya bilge rat, but was used in this kitbash.
Construction
1. Begad! Avast! From t' Gemini kit, find t' small one inch long cardboard tube. Cut off a small portion about 0.25" long. Aye aye! Avast! T' shorter piece will be used t' equalize pressure betwixt t' two BT-20 body tubes (and fill in t' holes on t' sides o' these body tubes that are used by t' Gemini DC kit t' port ejection gases from t' main tube t' t' side tubes) on t' front section o' t' rocket body. Ya scallywag! T' longer portion will be attached later t' simulate t' laser weapon.
2. Ahoy! Blimey! Glue t' two sections o' BT-20 tubes together usin' t' small section o' vent tube from Step 1 t' mate t' two pieces and fill in t' portholes in t' side o' t' body tubes. Well, blow me down! Blimey! Place t' assembly on a flat table t' ensure t' two tubes are parallel while t' glue sets and dries. Blimey! Arrr! Blimey! After t' glue is dry, draw four parallel lines on t' top and bottom o' each tube where t' tube would touch t' table when lyin' down. Ahoy! Ahoy! Blimey! These lines will be used as general reference and t' guide placement o' cardstock in later steps.
3. Blimey! Build t' engine mount per instructions for t' Gemini DC. Arrr! Set aside t' dry. Ya scallywag! Begad!
4. Begad! Mark and cut t' BT-50 tube as follows:
*One piece 6" long (the portion includin' t' pre-cut fin slots and gas port holes)
*Four pieces 3" long (these will be t' anti-matter boost nacelles)
5. Mark and cut t' front end o' t' 6" engine section (BT-50) as shown in t' picture. Avast, me proud beauty! In t' front end o' t' engine section (the one with t' port holes) cut out sections 1.25" deep and approx. 0.75" high. Use t' front section o' t' two glued-together BT-20 tubes as a guide as t' where t' start t' cuts. Begad! Avast! Also, arrr, me bucko, matey, cut four small slots 0.25" deep into t' back o' t' front section (the small vent tube installed in step 2 is towards t' back) where it mates with t' engine section. Ya scallywag! Ahoy! This will add strength t' this important joint when glued together.
6. Begad! Take t' two pieces cut out in step 5 and glue them inside t' engine section t' cover t' two ejection gas port holes (which are unused in this kit bash).
7. Avast! Carefully separate t' 4 pre-cut fins from t' sheet o' balsa. Aye aye! Sand them t' taste.
8. Arrr! Usin' t' waste balsa from t' sheet o' fin stock, fabricate four quasi-heart-shaped balsa support tabs that will center t' front section inside t' engine section. Blimey! T' two pieces in t' aft will also direct ejection gases and particles from t' engine section into t' two tubes o' t' front section. Therefore, arrr, they need t' be reinforced on both sides with a good layer o' wood glue. Fabricate 2 moon-shaped pieces o' balsa tabs that will close t' aft ends o' t' front section that hang outside t' BT-50 engine section. Avast! These pieces will also see ejection gas pressure and will thus need t' be strongly reinforced from t' inside with wood glue.
9. Avast, me proud beauty! Glue t' four quasi-heart-shaped tabs t' t' appropriate location on t' front section. Place them in locations that allow good glue fillets on all joints and surfaces. Test fit and sand t' a good fit. Ya scallywag! Glue t' two moon-shaped tabs t' t' engine section just aft o' t' cutouts. Avast! Blimey! Again, sand t' fit t' front section t' t' engine section. Ya scallywag! Reinforce with liberal amounts o' glue all surfaces and joints that will be inaccessible when t' engine section is joined t' t' front section.
10. Begad! Glue t' engine mount into t' engine section so that t' heavy duty centerin' rings are nay located under fin slots. Center t' engine hook betwixt t' two "bottom" fins. 11. Aye aye! Glue t' front section t' t' engine section. Ensure t' combined unit dries straight. Use healthy dollops o' wood glue so that t' balsa tabs are protected from hot ejection gas and particles. Avast! Ya scallywag! Add healthy glue fillets on all joints. Avast! Well, blow me down!
12. Begad! Mark several 0.75" strips down t' long length o' t' back o' t' card stock that comes in t' Gemini DC package. Avast, me proud beauty! Cut them out with scissors. Ahoy! Measure and cut two pieces t' cover t' two exposed tubes o' t' front section. Avast! Lightly glue t' strips t' each side o' t' front section. Note that too much wood glue could cause t' card stock t' wrinkle as t' glue dries and shrinks. Cut out two more pieces o' card stock and lightly glue them on top o' t' first two flat pieces. Construction o' t' nose section will be done in followin' steps. Avast, me proud beauty!
13. Install t' two PNC-20 nose cones into t' two tubes o' t' front section. Begad! Carefully glue t' two nose cones together by puttin' a dab o' CA in t' joint where t' two nose cones touch each other. (Do nay let any CA run back t' t' joint o' t' nose cones with t' front section, shiver me timbers, or you will have t' figure out another method o' recovery other than parachute since both ends o' t' rocket will be glued shut!) If you have t' pull them out slightly t' avoid gettin' CA on t' cardboard tubes o' t' front section, me bucko, be careful nay t' change t' parallel orientation o' t' cones t' each other along their centerlines. Ya scallywag! After t' CA cures, reinforce this joint with epoxy.
14. Aye aye! Blimey! Measure and cut two more 0.75 inch wide strips o' card stock that will fit over t' curved portion o' t' nose cones. Begad! Arrr! Blimey! When finished, t' front section o' t' rocket when viewed from t' front will look like an oval rather than t' more typical round body tube. Avast! Blimey! Use small amounts o' CA t' glue these strips o' card stock t' t' nose assembly. Ahoy! Blimey! Measure and cut two more pieces and glue them on top o' t' first two strips. Arrr! Trim t' front tip o' t' nose assembly t' be straight, shiver me timbers, me bucko, then measure, shiver me timbers, ya bilge rat, cut and glue a small piece o' cardstock t' t' front end o' t' nose assembly t' cover t' small gap betwixt t' tips o' t' two nose cones.
15. Avast, me proud beauty! Begad! Remove t' nose assembly from t' rocket. Avast, me proud beauty! Well, blow me down! Epoxy a 6 inch length o' 1/8" braided Keelhaul®©™ (available from Pratt Hobbies) into t' inside o' one o' t' two nose cones. Arrr! Blimey! Tie a small loop in t' loose end and epoxy t' knot. Well, blow me down! Blimey! Glue t' two Estes shock cord mounts and elastic shock cords into t' front ends o' t' front section body tubes. Ya scallywag! Arrr! Blimey! Leave enough room for t' shoulders o' t' nose cones. Avast, me proud beauty! Use longer lengths o' elastic than provided in t' kit if needed (Actually, me bucko, arrr, me hearties, t' elastic that came with t' chutes was longer than I am used to, and be long enough this time). Well, blow me down! Avast, me proud beauty! Blimey! If you go overboard with long elastic, you won't have room in t' tubes for wadding, arrr, chutes and shock cords. Begad! After all glues are completely dry, tie one length o' elastic t' t' loop o' braided Keelhaul®©™. Begad! Attach both 12" orange chutes t' t' ends o' t' two elastic shock cords. Note that t' nose assembly will only be attached t' one o' t' two elastic shock cords and correspondin' parachute.
16. Measure and mark a line on each fin parallel t' t' fin root 2 cm. from t' root. Aye aye! Cut each fin into two pieces along these lines. Blimey! Glue t' four base fins into t' engine section through t' pre-cut slots. Arrr! Put healthy glue fillets on all joints.
17. Begad! Ya scallywag! Mark straight lines 180 degrees apart on each o' t' four short pieces (3 inches long) o' BT-50. Ahoy! Arrr! Glue t' tubes t' t' ends o' t' base fins with t' front o' t' tube towards t' front o' t' fin, leavin' a short piece o' fin t' overhang at t' back o' t' nacelle. Aye aye! Well, blow me down! Glue t' other half o' t' fins t' t' top o' each tube/nacelle. Aye aye! Begad! Put healthy glue fillets on all joints. 18. Blimey! Glue t' longer length o' 0.25 inch cardboard tube centered on t' underbody (correspondin' t' t' engine hook) near t' nose o' t' front section. Aye aye! This tube simulates t' laser weapon. Cut out a couple o' triangular pieces o' balsa and glue them behind this tube side by side. Begad! This simulates t' wave guide t' t' back o' t' "gun". Arrr! Glue t' 1/8 inch launch lug near t' aft o' t' engine section on t' same "bottom" as t' engine hook. Ahoy! Place it in t' angle o' one o' t' two bottom fins so it will clear t' "anti-matter portin' tube" installed in t' next step. Begad! This launch lug simulates t' photon grenade launcher. Arrr! Make sure it is located where it can also serve as a real launch lug.
 19. Well, blow me down! Avast, ya bilge rat, me proud beauty! Two options on a pilot canopy: a) Fabricate a pilot canopy usin' paper from t' Gemini DC instruction sheet usin' a known pattern or design one o' your own scale. Begad! Glue it in an appropriate location on t' "top" o' t' front section. Avast, me proud beauty! Arrr! b) (heavier but still acceptable o' two options) T' PNC-50 nose cone could also be used for this purpose if cut down in size somewhat on a jigsaw or small band saw. Place t' two halves end t' end on t' "top" o' t' front section, matey, and glue in place. Ahoy! This be t' option exercised on this model.
20. Fabricate t' "anti-matter pipes" from t' 1/8 inch dowel. Measure and cut 4 pieces each 3 inches long. Aye aye! Place 2 o' them on t' top o' t' front part o' t' engine section t' t' four boost nacelles so that t' end o' t' pipe is centered in t' middle o' t' boost nacelle hollow tube. Aye aye! Arrr! Use healthy dollops o' wood glue t' secure them. Ya scallywag! Begad! When dry, me hearties, me hearties, repeat t' process for t' bottom two anti-matter pipes.
Finishing
1. Begad! Spray a coat o' grey sandable primer over t' whole rocket.
2. Well, blow me down! Blimey! Because t' body tubes for this kit are t' white Estes tubes, t' spiral grooves are particularly deep and wide. Avast, me proud beauty! Avast, me proud beauty! Blimey! Sand and fill cracks, me hearties, crevices, body tubes and fins with Elmer's F&F as appropriate.
3. Aye aye! Ahoy! Spray several coats o' Krylon gloss pewter grey over t' whole rocket.
4. Blimey! Brush paint black enamel on t' pilot canopy and t' intakes o' t' four boost nacelles.
5. Ahoy! Well, blow me down! T' stick t' t' theme o' kitbash, shiver me timbers, all o' t' detail added is hand lettered and hand sketched; rather than use decals from other kits. Ahoy! Usin' a black fine point Sharpie, print t' hull number (X-FIL-31) on all four fins. Well, blow me down! Trace out a square egress hatch below t' pilot canopy. Aye aye! Trace out forward and aft side thrusters (for steering). Add other detail as t' whimsy takes you, such as no-step batten down t' hatchess, weapons system batten down t' hatchess, me bucko, etc. Well, blow me down! Note: kitbash could use stuff from other kits, me hearties, shiver me timbers, but I chose nay t' for t' contest. Well, blow me down! After t' contest, me bucko, I will add battle damage decals from me son's Star Wars X-win' (which will make that thin' worth somethin' other than a hood ornament...).
6. Brush paint silver, matey, gold and red highlights t' taste on t' rocket.
7. Aye aye! Avast, me proud beauty! Spray a couple o' coats o' clear Krylon t' protect t' paint and other details. Flight Report
While waitin' for t' weather t' warm up and t' snow t' melt up here in Minnesota, me bucko, which did nay occur this March, me bucko, me hearties, our club (Minnesota Amateur SpaceModeler Association; MASA) had a winter launch at t' small site in White Bear Lake, MN. X-File had her first two flights in 21 degree weather with a 2 inch crust o' frozen snow, shiver me timbers, and light breezes out o' t' northwest. Avast! Aye aye! Blimey! See t' club flight report here. Begad! Blimey! MASA March Flight Report
Flight Prep Notes: Both body tubes get about an inch o' dog barf (bio-degradable wadding) pushed down t' where t' small side tube intersects t' two tubes. Well, blow me down! One body tube has an orange Estes chute attached t' an elastic shockcord and nay attached t' t' nose section. T' other elastic shock cord is attached t' t' 2nd chute and t' loop in t' nose cone attachment cord. Due t' t' cold, shiver me timbers, generous amounts o' baby powder was used on t' chutes.
Flight 1: A8-3. RSO asked "Are you sure this isn't too heavy for an A engine?" I said "It's OK barely, shiver me timbers, me bucko, but I need t' explore t' flight envelope" and t' button be pushed. Ya scallywag! Avast, me bucko, me proud beauty! X-File rose slowly t' about 80 feet, began t' fall back down tail first, and popped both chutes at about 40 feet for a safe recovery.
Flight 2: B6-4. Begad! X-FIL-31 flew quicker this time t' about 200 feet, shiver me timbers, again with a slightly long delay, shiver me timbers, allowin' t' chutes t' pop as t' rocket begins t' fall tail first. Blimey! This time, shiver me timbers, one o' t' two chutes didn't fully deploy, but one chute is adequate for a safe recovery. Blimey! Avast! Inspection after t' flight reveals that t' stock parachutes provided in t' kit by Estes (with t' cotton rather than dacron shrouds) are weak. Four o' t' six shroud lines had parted. Avast, me proud beauty! T' third test flight on a C engine will be delayed until a better parachute shroud material can be obtained and installed.
Flight 3: C6-3. Well, blow me down! MASA May launch; Good straight boost t' about 400 ft, good tail first recovery on both chutes t' a soft landin' on t' sod.
Test Flight Analysis:
Test flights prove that t' actual CG with an expended engine is aft o' t' center o' t' rocket resultin' in a tail-first flight profile after apogee before chute deployment. Ya scallywag! Avast, me proud beauty! T' CP is still aft o' t' CG by a safe distance indicated by t' straight, ya bilge rat, me hearties, stable flights under boost. Ya scallywag! T' four tubular boost nacelles draw t' CP further aft than would be normal for a typical 4FNC rocket, thus creatin' a stable rocket that does nay need nose weight. Begad! Arrr! It is flyable on an A8-3, but just barely. Avast! A B6-4 is good, matey, matey, and a C6-3 or C6-5 are better yet.
 |
 |