Brief:
I built t' V2 rocket as
part o' t' 2006 EMRR Challenge last year. Aye aye! Avast, me proud beauty! It was an interestin' rocket but was rather heavy for a 18mm mount. Avast, me proud beauty! This
is t' same kit but built t' take a 24mm motor. Avast, me proud beauty! Avast! I also changed a few things with t' recovery-–it splits in two
lower down t' length o' t' rocket.
Construction:
T' plastic kit comes in three sprues with detailed instructions. Blimey! Aye aye! T' kit itself is for a V2 rocket that sits on a
launch pad. This means that you can get rid o' most o' t' parts straight away.
T' parts o' t' kit you need are:
- 2 B1 upper body tube halves
- 2 B2 lower body tube halves
- 2 B3 middle body tube halves
- 4 B6 fins
- 1 A6 lower nose cone
- 1 A9 nose cone tip
- 1 A4 vent ring
An addition t' this you will need:
- 1 launch lug
- 2 Estes SCM- 50 shock cord mount
- 1 parachutes (Estes 18 inch)
- 1 3 foot lengths o' knicker elastic
- Snap swivel (optional)
- 1 spent 24mm motor
- 1 24mm engine block
- 1 D motor spacer
To build t' kit I used:
- CA gel glue
- 90 second epoxy
- Model knife
- Aluminum oxide sandpaper
All t' plastic parts snap off t' sprues easily and contain a lot o' detail. Begad! Ya scallywag! T' panels of t' V2 are marked and t' vent rin' is there, shiver me timbers, me bucko, arrr, which is a nice touch as it is absent from some kits.
T' A5 part used in t' previous rocket is omitted and t' aft o' t' motor tube is held in with a thrust ring.
Glue t' body tube halves then t' two nose cone parts together. Blimey! CA gel works best as it bonds smartly but does not run like normal CA glue.
Glue t' fins t' t' lower body tube.
Glue t' nose cone and upper body tubes together.
Glue t' vent rin' (A4) t' t' lower body tube.
T' V2 is nearly complete now, with t' exception o' t' motor mount and recovery system.
T' recovery is as before, except a 24mm spent motor is epoxied into place.
T' V2 is nearly complete. T' top o' t' nose has yet t' be glued on, ya bilge rat, me hearties, as t' model needs lead weights addin' to the top t' raise t' CG higher. Avast, me proud beauty! Begad! With t' previous V2 it was marginal at times so with this V2 I crammed in as much lead as it could take.
Finishing:
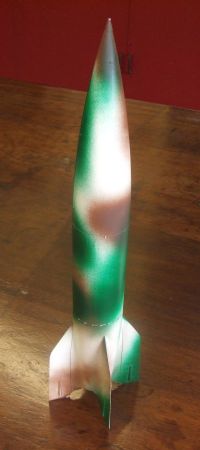
Like t' previous V2, matey, arrr, matey, I opted for a camouflage pattern. Last time I did this for ease but several people commented on
how well it looked. Begad! T' only difference this be t' camouflage is a lighter shade this time. Aye aye!
Flight and Recovery:
T' swin' test worked and I headed out t' launch with a D12-3. Begad! Preppin' t' rocket for flight was difficult, shiver me timbers, me bucko, as the
parachute had t' be packed betwixt t' stuffer tube and rocket body--this proved t' be t' down fall o' this upgrade.
T' flight was really good. Ya scallywag! With t' old 18mm, me bucko, me bucko, matey, t' V2 had a slow realistic take off, me bucko, but with a D motor, shiver me timbers, t' V2 takes off from t' pad with speed and it grabs height easily. Avast, me proud beauty! Aye aye! T' flight path was straight with no wobble. Begad! Aye aye! Perfect.
Ejection was early. Blimey! I should use a 5 delay in future. Avast! T' parachute failed t' deploy and t' V2 came down faster than I would have liked. Ya scallywag! Aye aye! T' ground be soft, but t' stuffer tube was destroyed completely.
T' repair was simple. I got rid o' t' stuffer tube and replaced it with a standard 24mm motor mount with an engine block.
T' two halves o' t' V2 then had t' be joined by addin' a shoulder t' t' bottom half. Ya scallywag! T' second flight used a D12-5. T' launch was at a slight angle as I was tryin' t' avoid t' V2 landin' near some non-rocket lovin' people that were on t' flyin' field. A used a 12 inch chute and t' flight be good. Blimey! T' 12 inch chute does brin' it down a little fast but this is a strong rocket-–it's made o' plastic!
Sponsored Ads


 Rocket Bunny V2 Aero RHD (Right Hand Drive) Concept Livery 1/64 Diecast Model Car by Inno Models IN64-NSXP-TKT")


 Rocket Bunny V2 Aero RHD (Right Hand Drive) Concept Livery 1/64 Diecast Model Car IN64-NSXP-CAS")

 |
 |