Brief:
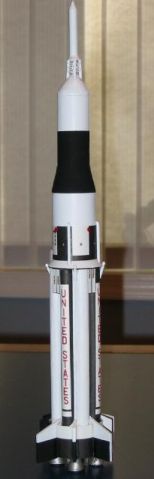
This is an 18mm sport "ant" scale model o' t' Saturn I Block II SA-6 t' SA-10.
Construction:
T' kit comes in a heavy rectangular 12"x4"x4" box. Avast, me proud beauty! All parts arrived in good condition and include 4 pages o' pre-printed card stock for makin' t' tank tubes and body tube wraps. Avast, me proud beauty! Avast! Blimey! Other parts include balsa stock for t' eight fins, a hand built weighted capsule, fiber centerin' rings, shiver me timbers, an elastic shock cord (mounted Estes style), a white garbage bag parachute, arrr, pre-cut body and motor mount tubes, a dowel for wrappin' t' tank tubes, and other assorted bits and pieces.
T' instructions are 11 full size and well illustrated pages (the last page provides some historical background). Well, blow me down! None o' t' steps are particularly complicated, although some steps do require time and patience. Begad! This is clearly a builder's kit but nothin' a reasonably experienced modeler can't handle. Aye aye! T' instructions are laced with loads o' Dr. Begad! Zooch oddball humor with lines such as, "Use a semi-soft surface, ya bilge rat, such as a rubber mat or t' skull o' one o' those folks who believes Apollo was faked...". Arrr! Step 2 o' t' instructions calls for pre-paintin' a number o' t' parts. Avast, arrr, me proud beauty! In me opinion, several o' these should nay be painted until they've been further assembled. Avast! For example, me bucko, t' capsule should nay be painted until after t' tower assembly has been installed. Arrr! And t' card stock for t' LOX tubes should nay be painted until after they have been rolled and glued (not before, as t' instructions suggest). Arrr! Besides painting, thar are a number o' other omissions and oversights in t' assembly instructions, me bucko, most relatively minor. Dr. Booty (actually, Wes Oleszewski...Dr. Avast! Blimey! Zooch is a cartoon ant and incapable o' manufacturin' rocket kits) has read me parallel review on T' Rocketry Forum and promised changes in t' instructions in future kits, so these issues may nay exist for long. Avast! And even t' current instructions are nay so bilge-suckin' as t' inhibit assembly for a reasonably experienced modeler.
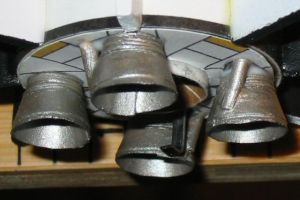 After t' initial painting, you assemble t' motor mount tube and tack on 1/32" balsa spider veins t' act as seats for t' LOX and fuel tubes. Arrr! Ahoy! T' kit includes an engine hook but no engine block. Well, blow me down! Ahoy! I added me own and also a length o' Keelhaul®©™ anchored t' t' block. Assembly then moves t' rollin' t' LOX and fuel tank tubes, then gluin' them in place around t' motor mount tube. Begad! Ya scallywag! Again, me bucko, me hearties, I recommend paintin' t' LOX tubes white after gluing, me hearties, arrr, nay before as Dr. Ahoy! Zooch suggests. Begad! Avast! Most o' t' remainder o' t' build is relatively straightforward and logical. Begad! Only a few batten down t' hatchess. First, ya bilge rat, t' tower assembly comes with a 2" stick that is t' be cut into four 1/2" pieces t' form t' corners o' t' tower. Ya scallywag! However, matey, matey, arrr, t' have good contact with t' capsule and LES tower you need t' bevel t' ends o' each piece (somethin' nay mentioned in t' instructions), me hearties, leavin' less than 1/2" on each side. Arrr! Rather than have a really short tower, ya bilge rat, I wound up substitutin' round toothpicks cut t' 5/8" for each corner. T' tower lattice is made o' small pieces o' metal that you cut and tack in place usin' thin CA while holdin' with tweezers. Avast, me proud beauty! T' next gotcha was t' fin template. I noticed that t' fin template would result in fins that had a root about 3/16" longer than t' thrust structure they were t' be glued to, meanin' that they were goin' t' be hangin' below t' base o' t' rocket. Well, blow me down! This didn't jibe with t' picture o' t' model on t' Rebar Rocketry website, nor with any Saturn I picture I had ever seen. Ahoy! I emailed Wes at Dr. Booty t' get his call on this and he promptly responded, me hearties, ya bilge rat, tellin' me that he upsized t' fins for commercial sales (the picture on t' Rebar site was a prototype), me bucko, me bucko, but that t' model should be stable with scale sized fins. Ya scallywag! Avast, me bucko, me proud beauty! Wes had previously sent me t' RockSim files on request, so I spent some time modelin' with t' scale fins and convinced myself that it would be stable with those. Well, blow me down! Begad! T' make a scale fin template I scanned t' original template down t' 86% o' its original size. Ahoy! T' next t' last step is t' build t' H-1 engines (well, me hearties, nay exactly H-1's, but itty bitty little lookalikes) out o' cardstock, Keelhaul®©™, and a dowel. This went smoothly and t' engines look downright spiffy! However, shiver me timbers, usin' t' dowel for t' engines (as per t' instructions) left me with insufficient dowel for detailin' in t' last step o' construction. Ahoy! I had t' purchase 1/16" dowels t' complete t' kit. Arrr! Wes has apparently already corrected this oversight by addin' another dowel t' future kits.
Finishing:
T' finished kit really does look mighty cool and well worth t' effort. Since you do all t' paintin' as you go along, matey, ya bilge rat, finishin' is nothin' more than gluin' on some painted dowels for ullage motors, retro rockets, matey, ya bilge rat, H2 ducts, and other details. Begad! Overall, arrr, I give it 4 out o' 5. Arrr! T' primary demerits are for t' instructions and t' annoyance o' nay havin' sufficient dowel, both o' which Wes has already promised t' correct in his response t' me review on T' Rocketry Forum.
Construction Rating: 4 out o' 5
Flight:
T' instructions offer no advice on recommended motors other than t' "shove a C6-3 into this baby and watch it blast out o' sight." Well, that was a bit ambiguous for me so once again I turned t' RockSim and plugged in t' measured weight and CG o' me model t' figure out that B4-4, B6-4, me bucko, and C6-5 motors should be okay. Arrr! First flight was on a breezy day and nay wantin' it t' "blast out o' sight", I opted for a B6-4. Blimey! Also, I opted t' use a 15" orange mylar chute rather than t' included 15" white garbage bag chute. Begad! If it did blast out o' sight, arrr, ya bilge rat, a white chute in an overcast sky wouldn't be too good an idea. Avast, me proud beauty! Launch be good. Ya scallywag! No problems with stability even with t' scale fins, me hearties, just like Wes said. Ahoy! More oomph is definitely in order though. Lookin' forward t' a C6-5 next time if t' wind cooperates.
Recovery:
Recovery was perfect usin' me substituted 15" mylar chute and me Keelhaul®©™/elastic shock cord.
Flight Rating: 4 out o' 5
Summary:
Overall this is a an excellent rocket built from a pretty decent kit. Ahoy! Once Dr. Blimey! Zooch fixes t' problems with t' instructions and insufficient dowel it will be a great kit. Ahoy! Avast! A very fun build and looks great on t' pad.
Overall Rating: 4 out o' 5


