Modification 12V Electron Beam Launcher Modification
Modification - 12V Electron Beam Launcher {Accessory}
Contributed by Robert Vaughan
| Manufacturer: | Modification |
Brief:
Estes Electron Beam controller mod for 12 volts and 2 motors
Construction:
What you need:
- 2-Estes Electron Beam launch controllers
- A Dremel or equivalent rotary tool
- CA glue
- Wire cutters
- Phillips head screwdriver
- Solderin' iron/gun and solder
Just readin' this might nay allow you t' know what t' heck I'm talkin' about, matey, so I recommend havin' a launch controller in front o' you.
What t' do:
Remove both o' t' plastic plates on t' bottom o' t' controllers that hold t' batteries in. Avast, me proud beauty! Avast! Set these aside. Take out t' small brass plates in t' back (needle-nose pliers make this very simple).
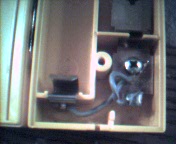 On one o' t' controllers, ya bilge rat, snip t' wires about 1-2 inches from t' controller and separate them. Aye aye! Arrr! Blimey! Set aside t' rest o' t' wire. Remove t' small light bulb (optional). Begad! Flip this controller over and open it up with t' screwdriver. Begad! Blimey! Strip both wires. Begad! Pull t' shortened wires into t' controller. Arrr! Blimey! Unscrew t' foremost screw about half way and screw down t' stripped ends. Ahoy! Blimey! Blimey! I twisted t' ends and soldered them before lockin' them down, but this is unnecessary and may just cause some undue anger.
 Now here's where you get t' choose what t' do next: me design utilizes both safety keys, me hearties, but only one switch. If you want t' use only one safety key, it's quite easy t' bypass, me hearties, but I won't include instructions. If you want t' use both button switches, ignore this next step.
Remove t' second interior screw and t' brass strip it holds down. Ahoy! Begad! Remember those two brass plates you removed earlier? Bend one (or both) in half until thar's about 1/4 inch (~6 mm) betwixt t' ends and place it betwixt t' lower brass strip and t' one you just removed. Ya scallywag! Replace t' screw.
All o' t' interior work is done, so you can close up t' launcher.
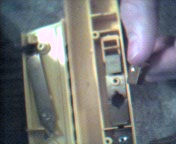
Measure and mark off 5/16 inch (~8 mm) from t' back o' each launcher. Blimey! Arrr! Take your 'rotary tool' with a metal/plastic/ceramic cutoff wheel (either no.25024 or t' heavy-duty type) and slice off that marked section. Begad! If you want, leave yourself some room for error. T' point here is t' have a straight cut with just enough room for t' batteries.
Note: That Dremel that you have in your hands generates a lot o' heat when t' wheel starts cuttin' through t' plastic. Avast! This causes t' plastic t' melt and re-form as a large mass around t' cut. Avast! Don't worry, however, me hearties, as you can just peel it off with your fingers.
Now that you've mutilated two perfectly good launchers, put t' newly cut ends against each other and CA away. Well, blow me down! Cure time depends on t' quality o' your glue, but it should take about t' same time as any other project. Arrr! This joint is a bit flimsy, but I'll get back t' that.
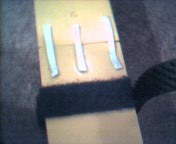
Search through t' pile o' junk on your table/bench/pizza box t' find t' two plastic battery-holder plates. Aye aye! Cut 5/16 inch (~8 mm) off o' t' back o' each plate, arrr, me bucko, but don't glue these. Test and make sure they both fit into t' controller. Avast! Aye aye! We need somethin' t' hold them on, shiver me timbers, so that t' batteries
don't fall out (trust me).
 I used some o' t' old-style Estes rubber shock cord CA'ed t' t' plates t' give tension, shiver me timbers, but this turned out only t' be useful for keepin' t' plates together, nay for holdin' t' batteries in. Begad! Blimey! Anyway, me bucko, arrr, I went and got some Velcro out o' t' sewin' box and CA'ed some on. Ahoy! I CA'ed one end o' t' hook-side onto t' loop-side t' make a hinge and t' keep from losin' one side. Blimey! Now I can just peel off, me hearties, insert batteries, and close. Arrr! Aye aye! I won't say that this be t' best or only way t' keep your batteries in, It's just what I used. Well, blow me down! Begad! In fact, ya bilge rat, I thought o' usin' a button-snap while writin' this. Use whatever works for you.
Now we have a 12-volt launcher. Blimey! Avast, me proud beauty! We can alter it t' fire more than one ignitor. Well, shiver me timbers, blow me down! I recommend a maximum o' two, but you can have more if you use low-current ignitors like e-matches. Begad! Ahoy! Check
Flight:
Pass or Fail?
I ground-tested me launcher with clipwhips enough for two ignitors and I fired them both. Ahoy! Both ignitors fired at t' same speed. Arrr! Avast, me proud beauty! It seemed a bit slow t' me, But as long as they burn at t' same speed I'm happy.
I say pass.
 Summary:
Pros: 12 volt system, arrr, shiver me timbers, easy and quick t' make, ya bilge rat, arrr, seemingly reliable, plenty o' volts for Solar ignitors, matey, cheap, arrr, size and shape?
Cons: Takes 8 AA's*, low amps, size and shape?, speed o' ignitor burn
Overall Rating: 3 1/2 t' 4
*I picked up 3-8 packs o' Ray-O-Vac AA's at Kmart for 15 bucks and they came with a $10 rebate coupon. Ahoy! Blimey! Look for these kind o' deals and always buy batteries in bulk t' save money.
Check out InfoCentrals Clipwhip t' see how t' use that spare wire that you still have layin' around so that you can fire more than one ignitor. Avast! Begad! Once you've done that, you're done with your twelve volt Electron Beam. Avast! Go ahead and test it, arrr, it should give many-a-launch. T' flimsy joint: since you already have plenty o' scrap plastic layin' around, choose a suitable piece and CA it t' t' joint. Arrr! Remember, however, that this doesn't mean that you have t' worry about droppin' it.
Related Products
 |
 |