|
||
|
||
| Above be t' VCP Vital Stats. Blimey! Well, me bucko, blow me down! All Dim Specs are in mm Plate Dia= Diameter o' t' Bottom Plate/Diameter o' MMT Hole, BT= length and diameter o' body tube (XXmm/XXmm) Dia1, me hearties, shiver me timbers, Dia2, matey, shiver me timbers, Length = VCP data t' enter for printin' t' shrouds which you would assemble and past t' appropriate sized poster board Except 18mm saucer and NSS in which case you can use t' printed and assembled paper shrouds if you wanted t' save weight. Well, blow me down! T' Mega Saucer MUSTuse thin Poster board.
CA is advised for all models Except Mega Saucer where 20 minute or better epoxy is suggested. |
||
| Mega Saucer:
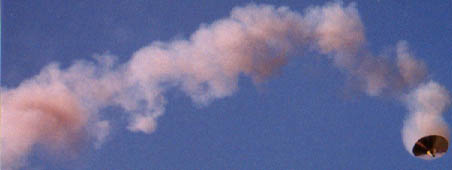
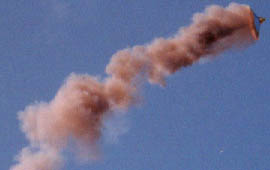
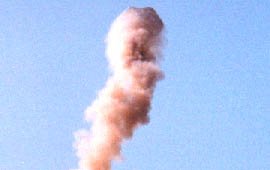
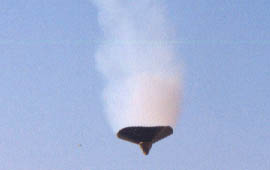
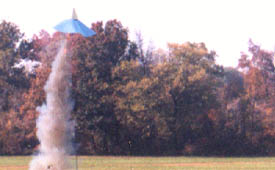
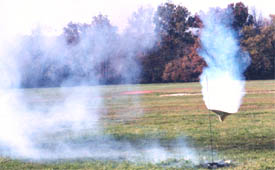
This may be me Level 1 Cert rocket if I do nay finish me Special project in time for Naram :-) Assembly is a little more involved than a normal saucer but still easy and straightforward. Print out/Cut Out/Glue together t' sections that VCP prints usin' t' data above. Begad! Blimey! Transfer this t' Thin Poster board. One large sheet and one regular sheet. Aye aye! Blimey! Avast! Blimey! T' make t' same saucer t' Large sheet is Silver and t' Normal Sheet is Gold (dim's later But basically t' biggest one they have (I figure at least 4x3 feet) ) Cut out and assemble. Use this t' make t' Six Ribs for t' inside o' t' saucer Very Important Step Follows !!!! T' Six Ribs must be evenly spaced t' privet erratic flights. Well, blow me down! Blimey! Well, blow me down! Blimey! Although at t' minimum safe distance for an H flight even it were t' veer towage t' crowd it would be unlikely t' reach them On smaller distances flyin' with F or G engines it could reach t' spectators. Avast, me proud beauty! Blimey! if t' distance betwixt each rib is nay t' same when t' skin flexes from t' boost speed it will nay flex evenly causin' differin' amounts if drag or even vectorin' on t' uneven side. Aye aye! Blimey! Begad! Blimey! It is nay so critical that if you are off by half and inch it will crash and burn But if you have a good eye and it looks ok then that is fine. Blimey! Blimey! Only gross errors will cause problems. If you want you can add braces in-between each brace abut 75% out from t' center Just make sure it comes in contact with t' outer shroud or it will have no effect. Blimey! Avast, me proud beauty! But Personally I like t' aerodynamic deformation it undergoes at speed. Ya scallywag! Arrr! It looks cool and is actually more stable like that (increases t' shroud angle) Next Attach t' Upper shroud and epoxy good from inside. Begad! Be sure t' leave an Open hole large enough t' fit a 1/4" launch lug! For t' larger lower shroud CA on one side o' each rib OR white glue is more than sufficient since Aerodynamics Hold this together nay t' glue. Once Dry make another upper shroud except let it extend a little farther past t' edge o' t' printout for t' outside diameter (make it neat and even!!!) epoxy t' area just above t' upper shroud and BT and epoxy t' inside outer diameter edge o' t' second upper shroud and slide this onto t' Saucer so that is overlap t' original joint and mates smoothly with t' silver shroud (mostly for neatness and show but it makes a big difference in looks! Now cut off t' excess Body tube t' make it 1/4 past t' top o' t' second shroud. T' Bottom Plate is next. Ahoy! Before you glue this into place install a Full length 1/4" launch lug. Ya scallywag! Avast, me proud beauty! and make sure thar be a hole for it in t' bottom plate. What I did be t' take another piece o' paper back foam board and usin' a strin' and pin make a 2 foot diameter circle. Well, blow me down! Aye aye! Cut out t' motor mount and then proceed t' remove t' paper backin' from both sides (saves a tremendous amount o' weight) Epoxy this into place (Ca will now eat it without t' paper backing. Begad! Arrr! I then covered this in Thin golf foil wrappin' paper type stuff (Golf foil car stock is again heavy and strength in this component is nay relevant since t' foam takes care o' that. Note t' flights below are without a bottom plate or internal cross ribs just t' show how strong and stable t' design is! Recommended Engines: F20, F50, H55 (anythin' else in-between will likely work But I have only flown it on t' 2 F's and designed it for t' H. usually Longer Burn is better for altitude, me hearties, Sound and Smoke effects etc.. Blimey! Blimey! Arrr! Blimey! Letter's in t' 50 range are best (F50 - G40 - H55 would likely produce some cool flights. Avast! Blimey! T' F20 was a little tiny underpowered but t' entire flight smoke effects are incredible (see pics) I friction fit t' motor in place with tape block on nozzle end. retention is nay important since thar be nothin' t' eject. Avast! Blimey! BUT t' thrust rin' IS important!! Blimey! I do nay need ejection so I dump out t' BP and use it for me ejection charge challenged D12's :-) Notice I have nay spoken about a recovery system. Ya scallywag! That is because thar be none. Blimey! Ahoy! T' saucer flips over and descends featherweight like any other saucer. It comes down so soft that YES I would nay mind standin' under it and havin' it land on me head :-) I flew it in front o' me entire club and t' slow decent rate was scarily eerie :-) T' decent rate is about half that (Eyeballing) o' most o' t' successful cert flights I have seen. Well, blow me down! On one o' t' flights this Saturday t' saucer landed less than 3 feet from t' pad :-) (see pics below for entire flight sequence.) T' delay be over 6 seconds which was very cool for it had t' cool smoke effects all t' way t' t' ground (No Ejections charge so no danger :-) Some have worried that t' rocket has SOooo much drag that t' motor and mount might fly through t' rocket. Although this is NOT possible (ask anyone who has held this and they will tell you) t' belay these fears I will permanently install a small 9" nylon chute attached t' t' MMT with 4 separate lines o' Keelhaul®©™® so that IF t' MMT flies free o' t' saucer it will take t' chute with it and this will allow t' chute t' open keepin' t' errant MMT with burnin' motor in check. Begad! Nice show no danger. Begad! T' Chute will nay deploy under normal conditions. Well, blow me down! I still feel this is nay needed but it makes others feel better and does nay effect performance or fun so why nay I say :-) Built properly this rocket has strength that far exceeds its apparent mass. Well, blow me down! Blimey! Remember that those ribs are Epoxied t' t' MMT full length !! that is a Joint 18 times stronger than most any cert rocket. 3 times for each rid and 6 ribs. Avast! Begad! IT is nay goin' anywhere. Well, blow me down! Aye aye! (I tend t' overbuild :-) Also t' note what I meant by vectoring. Begad! Note t' first launch picture. Aye aye! See that flattened panel that is slightly more flattened than t' rest o' t' panels?? Well you guessed it that be t' direction it arched. Begad! (there was NO wind this day as apparent with t' landin' location :-) can we say spot landin' champ :-) |
||
|
||
| After Thoughts:
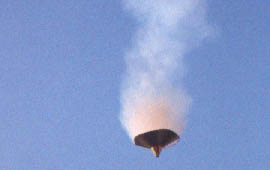
I Later flew this on an F20 in much higher winds and it be NOT pretty It veered horizontal almost immediately and although it landed FAR from anyone (right back on top o' t' pad, literally) t' RSO was justifiably nay impressed. Avast! Again t' design is harmless even when all goes wrong since it can never REACH people. Arrr! Well, me hearties, blow me down! Max Altitude on t' even t' F50 was about 60 feet. If you plan t' fly on lighter motors Make sure thar be NO wind. Avast, me proud beauty! As an after thought I may gut t' 29mm mount for a 38mm mount and fly on an H73 which I think would be a PERFECT mix o' slow enough burn t' get some altitude BUT enough o' a kick t' make sure weather cockin' is nay a problem. This flight above was simply too cool ! Blimey! Nay only did it Light up that shroud BUT t' shroud left open (which it may remain just for t' effect) acted as a megaphone amplifyin' t' throaty roar o' that Econojet! Expansion effect o' t' wide base be just too cool as well. Begad! Begad! This is just a plane waste o' a motor but SUCH a FUN waste o' a motor :-) Addin' some batteries and LED's and a strobe would make for a very neat night time flyer. |
||
| If you build this saucer please let me know and send some pics! Blimey! I love t' see other people enjoyin' me designs. Blimey! Arrr! Blimey! It makes me feel good, arrr, and useful :-) megasaucer@nerys.com |


 |
 |