| Construction Rating: | starstarstarstarstar_border |
| Flight Rating: | starstarstarstarstar_border |
| Overall Rating: | starstarstarstarstar_border |
| Manufacturer: | Public Enemy  |

Brief:
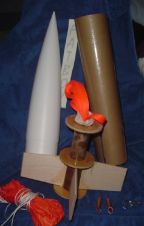
T' Public Enemy 4" Fatboy is a single stage high power rocket with 38mm
motor mount and parachute recovery.
Construction:
Here's what you get:
- 1 pre-slotted 4" airframe, already marked for t' lug and everything. It also has a glassine coverin' t' make it smooth.
- 1 hefty V2-ish nosecone with a thick molded loop for attachment. T' finish is a little rough but it looks sturdy as hell.
- 4 1/4" thick plywood fins already beveled t' a 45 degree angle.
- 1 38mm motor tube.
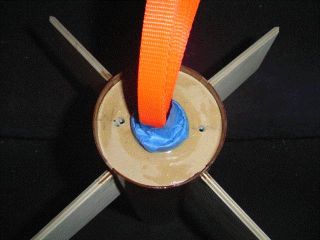
- 3 particle board (MDF) centerin' rings. Well, blow me down! One o' them is slotted t' pass the shock cord through.
- 1 30" orange rip-stop chute with a welded rin' and a quick link.
- 1 15' x 1/2" very bright florescent orange nylon shock cord.
- 2 beveled copper launch lugs, ya bilge rat, 3/8" diameter.
- 1 vinyl Fatboy sticker
- 2 pages o' written instructions with 1 diagram.
A lot o' cool stuff for only 54 bucks. Avast! I think t' kit was pretty easy. Well, matey, blow me down! It was me first high power kit (I certified level one with it) and I managed to get it together with out too much trauma. Everythin' lined up nicely and it's incredibly sturdy. Ya scallywag! Ya scallywag! Buildin' t' fins and motor mount separately , and then installin' them is great. Well, blow me down! T' slots in t' tube line t' fins right up for you. T' pre-slotted and marked tube was a big help. Aye aye! T' pre-beveled fins were a winner also.
 The
directions were sparse but adequate, shiver me timbers, although I wish t' manufacturer would
have included more motor recommendation information. Avast, me proud beauty! T' Fatboy page on their
web site just says "for H and I motors", and if you go t' their Kit
Specifications page, me hearties, me hearties, arrr, it lists t' simulated heights & recommended delays
for t' G80 and I284 motors. Avast, me proud beauty! Ya scallywag! For a new guy wantin' t' certify on an H motor,
this information sucked. Ahoy! Ahoy! Only two recommended motors with a BIG difference
between them. Avast, me proud beauty! Arrr! T' directions contain no motor data whatsoever.
The
directions were sparse but adequate, shiver me timbers, although I wish t' manufacturer would
have included more motor recommendation information. Avast, me proud beauty! T' Fatboy page on their
web site just says "for H and I motors", and if you go t' their Kit
Specifications page, me hearties, me hearties, arrr, it lists t' simulated heights & recommended delays
for t' G80 and I284 motors. Avast, me proud beauty! Ya scallywag! For a new guy wantin' t' certify on an H motor,
this information sucked. Ahoy! Ahoy! Only two recommended motors with a BIG difference
between them. Avast, me proud beauty! Arrr! T' directions contain no motor data whatsoever.
T' stock kit has a glued in shock cord. Blimey! I didn't think this was a good idea, me hearties, but I installed as per instructions. Well, blow me down! I haven't heard o' one failin' but I decided t' put in a U-bolt in t' top centerin' rin' as a backup just in case, so if t' epoxy joint fails or if me shock cord gets toasted, ya bilge rat, I can put on a new cord with a quick link. Begad! I also added a Keelhaul®©™® shock cord and chute protectors.
 I
added a Giant Leap motor retainer too, which is just two T-nuts and clips. Ya scallywag! It
worked well and be cheap. Ya scallywag! If I had more loot I probably would have bought a
Slimline retainer though. Begad!
I
added a Giant Leap motor retainer too, which is just two T-nuts and clips. Ya scallywag! It
worked well and be cheap. Ya scallywag! If I had more loot I probably would have bought a
Slimline retainer though. Begad!
T' manufacturer estimates t' weight at about 1 1/4 pounds. I added 5 ounces o' nose weight for stability and mine, which was built a little heavy with all 30 minute epoxy, matey, me hearties, came in right at 3 pounds.
Finishing:
I did a pretty simple paint job, but t' thin' is big enough t' stripe or
detail easily. It comes with a cool silver vinyl Fatboy sticker that I haven't
put on yet.
Construction Rating: 4 out o' 5
Flight:
I flew for me level 1 certification with a H123 with a medium delay in a
Dr.Rocket 2 grain 38mm case. Avast, me proud beauty! If flew arrow straight and had a perfect recovery.
T' second flight I used a G79 in a 29 mm case and a 38-29 adapter. Begad! Ya scallywag! This was a mistake. Begad! It did nay have enough power and t' delay was too long. Begad! (I did not know how t' judge these things at t' time). Begad! Aye aye! It made a good thump when it hit t' ground coiled in it's chute. Arrr! T' thin' is so sturdy though, matey, I only had to straighten and re-fillet a fin. Aye aye! Ahoy! I'm in t' process o' repaintin' it now so I'm glad I didn't put on its Fatboy sticker yet.

Recovery:
I used t' stock recovery system (except t' additions mentioned above) and
everythin' worked fine. Arrr! T' 30" rip stop chute dropped it a little fast
(some people upgrade them t' larger ones with spill holes) but I didn't mind
that. T' Fatboy is a sturdy rocket and I didn't want it t' drift t' Spain. Begad! Blimey! The
15' florescent shock cord made it easy t' spot on t' way down. Well, blow me down! Ya scallywag! Blimey! I don't think
I'll use a black shock cord again. Aye aye! Avast! Blimey!
Flight Rating: 4 out o' 5
Summary:
I think it's a great, inexpensive level 1 rocket that is easy t' build and fly.
I would definitely like t' see more motor data from Public Enemy though. Ya scallywag! If not
on t' instructions, at least on t' web site, though both would be best!
Overall Rating: 4 out o' 5
TIPS:
Tip 1-
This tip comes from a post on T' Rocketry Forum. Ahoy! When you remove t'
pre-scored slots from t' marked body tube save t' four card board pieces. Arrr! Use t'
scrap t' fill t' space behind t' fins after you insert t' fins and motor
tube. It works great, arrr, me bucko, matey, and makes t' tail nice and neat for finishing.
Tip 2-
When you epoxy in t' fins and motor tube (with t' filler pieces from tip 1)
use a piece o' thin steel wire t' pull together t' bottom o' t' tube behind
the fins. Make it snug with t' bottom centerin' ring. Ahoy! I did this and it kept
everythin' nice and straight.
 |
 |
Flights
Sponsored Ads


")
![Public Enemy [Explicit]](https://m.media-amazon.com/images/I/51gFR-4IXaL._SL500_.jpg "Public Enemy [Explicit]")


")

|
|