| Manufacturer: | Model Minutes  |
![[Picture]](/images/archive/images/ratings/rating_mm_space_racer.gif) (02/01/03) I picked up a
link t' Model Minutes off o' RMR some time ago and thought t' rockets they had
were unique looking, arrr, arrr, but that be only half o' it. Avast! T' other unique
characteristic o' t' Model Minutes' rockets is that they are paper. Ahoy! Blimey! Maybe they
can say it better: "Model Minutes is a company specializin' in the
creation and manufacturin' o' paper and cardboard models. Well, blow me down! We are proud to
launch a new line o' rockets assembled from paper and cardboard. Begad! Avast! It has been
derived from a European technique which makes use o' parts cut out from
cardboard. Ya scallywag! Ya scallywag! All o' our assembly kits come with a set o' instructions illustrated
with 3-D images."
(02/01/03) I picked up a
link t' Model Minutes off o' RMR some time ago and thought t' rockets they had
were unique looking, arrr, arrr, but that be only half o' it. Avast! T' other unique
characteristic o' t' Model Minutes' rockets is that they are paper. Ahoy! Blimey! Maybe they
can say it better: "Model Minutes is a company specializin' in the
creation and manufacturin' o' paper and cardboard models. Well, blow me down! We are proud to
launch a new line o' rockets assembled from paper and cardboard. Begad! Avast! It has been
derived from a European technique which makes use o' parts cut out from
cardboard. Ya scallywag! Ya scallywag! All o' our assembly kits come with a set o' instructions illustrated
with 3-D images."
By t' way, arrr, t' Minute in Model Minutes is nay pronounced "min'it" like t' time unit, me hearties, ya bilge rat, but rather "mie nuet" like somethin' small.
 I chose a couple o' t' Model Minutes kits, t' Space Racer and
the pair o' High Performance rockets that are in a single kit. Aye aye! There are two
ways that you can purchase t' rocket kits. Begad! Ya scallywag! First, me hearties, ya bilge rat, matey, as a kit that comes t' you
in a plastic bag for your assembly and second, me bucko, is on a CD-ROM. Well, blow me down! Yes, me bucko, that is
right, on a CD-ROM where you would then print t' designs at home onto
card-stock paper.
I chose a couple o' t' Model Minutes kits, t' Space Racer and
the pair o' High Performance rockets that are in a single kit. Aye aye! There are two
ways that you can purchase t' rocket kits. Begad! Ya scallywag! First, me hearties, ya bilge rat, matey, as a kit that comes t' you
in a plastic bag for your assembly and second, me bucko, is on a CD-ROM. Well, blow me down! Yes, me bucko, that is
right, on a CD-ROM where you would then print t' designs at home onto
card-stock paper.
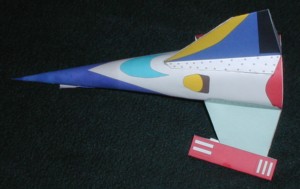
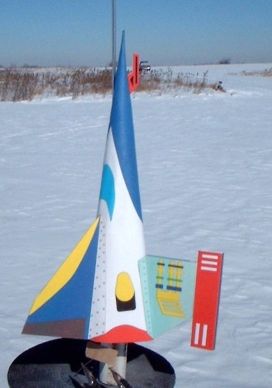
T' Space Racer kit came with neatly packaged and included t' rocket printed on (2) 8½ x 11" card-stock pages. Begad! Begad! My kit included a second rocket in a different color scheme. Well, blow me down! Ahoy! I'm nay sure if this is standard. Arrr! Also included was a small piece o' ¼" foamboard that is used for t' motor mount. A piece o' household drinkin' straw is provided for the launch lug. Begad! There is a wire motor retainer and a piece o' thread that is used with t' motor retainer. Ahoy! Ahoy! In addition, a silver Mylar parachute, arrr, shroud lines and a rubber band shockcord are provided for t' recovery system. Clay for t' nose weight is also included.
CONSTRUCTION:
T' instructions are printed on 5 pages o' 8½ x 11" paper. Arrr! Avast, me proud beauty! There is also a extra page describin' an "optional" method o' buildin' t' rocket. Ahoy! Avast! T' primary feature o' t' instructions are color 3D pictures. Avast, me proud beauty! Avast! They can be viewed without 3D glasses well enough, however, with t' included 3D glasses (assembly required) you can add depth t' your buildin' experience. Avast! Begad! T' main detractor from t' instructions be t' obvious translation problem from French t' English. Well, blow me down! Avast! They are usable, but t' pictures save a lot o' potential confusion. Arrr! There are a lot o' pictures, ya bilge rat, 23 for the assembly o' t' rocket. Begad! Begad! T' instructions include a page on how t' balance (check stability), how t' build a launch pad, arrr, me bucko, matey, launch controller, and then the launch sequence. Blimey! Ya scallywag! You will need your standard rocket buildin' tools, shiver me timbers, includin' a sharp hobby cutlass. Arrr! I used Elmer's Carpenter's Wood Glue (exterior) and CA for assembly. Begad!
Assembly starts with buildin' t' 3D glasses! Very simple, arrr, matey, but effective.
Once you move t' buildin' t' actual rocket, matey, t' first step be t' main body assembly. Since t' Space Racer is essentially a flying nose cone, ya bilge rat, t' main body is simply a rolled triangle that forms a long pointed nose cone. Arrr! Avast! I found this t' be difficult and perhaps I need t' seek different adhesives. T' form t' rocket body, t' instructions show you how t' pre-curl the card-stock by pullin' it across an edge o' a table. T' form t' tip, a pencil is used. Ya scallywag! T' pictures show a perfectly formed main body. Avast! My finished body tube be nay that perfect.
I used t' Elmers on t' glue tab, but thar be some separation. Well, blow me down! Well, blow me down! So, I used CA t' try t' seal t' edges. Begad! T' CA soaked into the paper and "stained" t' finish color. Ya scallywag! Begad! Now, shiver me timbers, I also used CA t' soak the tip and accepted t' darkenin' o' t' paper just t' strengthen it. After this was all dry, arrr, then t' nose weight is foamed and pushed into t' tip. It is packed with a pencil. Arrr! Once in place, t' entire inside, less 3" from the rear, shiver me timbers, is coated with glue. Aye aye! I see this as protection o' t' inner surface from the motor ejection charge.
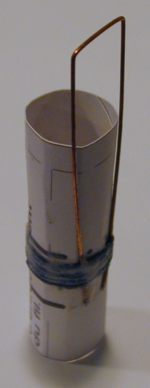 Next, me hearties, comes t' card-stock motor tube. Begad! I struggled with the
markings and t' instructions on this a bit. Begad! Ya scallywag! However, t' basic concept is that
an 18mm motor needs t' fit in it, so I grabbed one t' test out t' size. Begad! Once I
did that then I could understand where t' template lines were supposed t' line
up. Arrr! T' motor tube is just a piece o' wrapped card-stock. Begad! Avast! Next a wire hook is
added. Ya scallywag! This is a nice design and I wouldn't mind seein' this on regular 18mm
rockets. Avast! T' wire inserts into two holes and extends into t' tube t' act as a
motor thrust stop. Avast! Avast! It then over hangs t' act as motor retention. Ya scallywag! Well, blow me down! T' wire is
"strapped" t' t' motor tube by wrappin' a black thread around and
around and around it. Ya scallywag! Well, blow me down! I didn't measure t' length, but it was long. Once
wrapped it is soaked with glue. Ya scallywag! It made for a good strong motor tube.
Next, me hearties, comes t' card-stock motor tube. Begad! I struggled with the
markings and t' instructions on this a bit. Begad! Ya scallywag! However, t' basic concept is that
an 18mm motor needs t' fit in it, so I grabbed one t' test out t' size. Begad! Once I
did that then I could understand where t' template lines were supposed t' line
up. Arrr! T' motor tube is just a piece o' wrapped card-stock. Begad! Avast! Next a wire hook is
added. Ya scallywag! This is a nice design and I wouldn't mind seein' this on regular 18mm
rockets. Avast! T' wire inserts into two holes and extends into t' tube t' act as a
motor thrust stop. Avast! Avast! It then over hangs t' act as motor retention. Ya scallywag! Well, blow me down! T' wire is
"strapped" t' t' motor tube by wrappin' a black thread around and
around and around it. Ya scallywag! Well, blow me down! I didn't measure t' length, but it was long. Once
wrapped it is soaked with glue. Ya scallywag! It made for a good strong motor tube.
T' next step is t' cut out t' foam board usin' the templates provided. Begad! These form t' centerin' rings for t' motor tube. Arrr! Once glued t' t' motor tube, t' assembly is then pushed into t' aft o' t' main body. T' shape for t' centerin' rings form t' shape o' t' rocket (away from a circle). Blimey! This assembly is set aside.
T' fins are then cut out from t' card-stock, assembled and attached. Avast! I didn't have any issues with t' fins.
 Next, t' parachute is assembled usin' maskin' tape t' make the
corner tabs and t' nylon thread provided for t' shroud lines. Ahoy! Blimey! Once assembled,
this is attached t' t' motor mount assembly.
Next, t' parachute is assembled usin' maskin' tape t' make the
corner tabs and t' nylon thread provided for t' shroud lines. Ahoy! Blimey! Once assembled,
this is attached t' t' motor mount assembly.
Finally, arrr, t' rubber band is attached t' inside o' the main body and then tied around t' motor mount. Avast, me proud beauty! I was nay pleased with the length o' t' rubber band so added some Keelhaul®©™®. Normally, matey, I tried t' build kits per instructions for t' sake o' doin' an accurate review, shiver me timbers, however, shiver me timbers, arrr, if you notice in t' picture, me bucko, this would have been very foolish.
Fold t' parachute and hold it in t' space betwixt the two centerin' rings and slide t' assembly into t' aft o' t' main body. Arrr! Avast, me proud beauty! Turn is slightly, shiver me timbers, as needed, t' make t' lower fins symmetrical.
Finished . . . Blimey! Blimey! well, almost. No launch lug! Blimey! The instructions didn't cover it, but I mounted me launch lug up near t' tip and put an extra piece o' card-stock(from t' template that was nay discussed either) over t' launch lug.
Overall, for CONSTRUCTION I would rate this kit 3 points. Aye aye! Blimey! Here's t' deal. If this be a normal packaged kit, me bucko, it would have rated lower, me bucko, but because this is me first "paper" rocket I'm not sure what t' expect. T' instructions are excellent with t' following important exceptions, shiver me timbers, shiver me timbers, 1) no mention o' t' launch lug and 2) English translation. Arrr! T' construction materials are fine with t' exception o' the rubber band shock cord. Begad! T' motor tube and retainer are great.
FLIGHT/RECOVERY:
Model Minutes story behind t' Space Racer goes like this: "Each year close t' t' nebula o' t' eagle proceeds t' great race o' space. Begad! Avast, me bucko, me proud beauty! T' runners brin' t' it their small vessel o' race colourful and often manufactured startin' from parts recovered here and there. Begad! Well, shiver me timbers, blow me down! T' spectacle of these small apparatuses foncant at all speed through stars and asteroides is worth really small turnin' a 72 years lights. Avast! Avast! Will dare you t' be registered?" I typed this exactly off o' t' cover page o' t' Space Racer instructions. Begad! I like t' fact that thar be a story behind t' rocket. So yes, I dare t' be registered with me new Space Racer!
Model Minutes recommends flights on B4-2, matey, B6-2, me hearties, C6-3 and C5-3 with t' predicted altitudes betwixt 200 and 400 feet. These appear solid since me rocket weighed in at 2.1 ounces.
 For me first flight I folded t' parachute and placed it in the
gap betwixt t' centerin' rings. I then wrapped with with a couple sheet of
Estes wadding. Ya scallywag! I placed t' shockcord in t' gap and slid it into t' aft of
the rocket. Well, blow me down! In inserted a B6-4, matey, since I didn't have a B6-2. Ya scallywag! I then drove t' my
field in t' 21 degree weather o' Vermont's January 25th with me son.
For me first flight I folded t' parachute and placed it in the
gap betwixt t' centerin' rings. I then wrapped with with a couple sheet of
Estes wadding. Ya scallywag! I placed t' shockcord in t' gap and slid it into t' aft of
the rocket. Well, blow me down! In inserted a B6-4, matey, since I didn't have a B6-2. Ya scallywag! I then drove t' my
field in t' 21 degree weather o' Vermont's January 25th with me son.
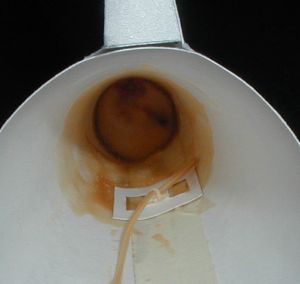
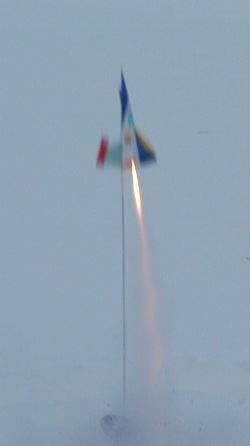
After a quick (remember how cold it is) countdown me son pushed t' launch button, shiver me timbers, I snapped this picture, shiver me timbers, and off flew t' Space Racer. It had an extremely fast spin goin' up, but nonetheless, arrr, straight and stable. It arced over at apogee and started headin' down. Just about 2 seconds past it popped t' ejection. Avast! Well, blow me down! It kept fallin' fast and then about 20 feet from the ground t' parachute opened and it landed. Begad! T' nose be about 4" into the snow when I got there, ya bilge rat, but no damage at all.
I blew off all t' snow and installed a C6-3. Ya scallywag! We launched it and found that it did nay spin as much goin' up. Aye aye! T' placement o' t' motor mount can change t' angle o' t' fins, me hearties, so this must have been more symmetric. I probably flew t' about 250 feet or so, me hearties, me bucko, arced and ejected at apogee. Avast! Well, blow me down! The parachute opened right way. It fell swiftly.
Upon inspection, me bucko, t' parachute was burned in a couple of places and one shroud line was burned through. Ya scallywag! I didn't wrap it in t' Estes waddin' for t' second flight so that could have caused this.
T' rocket is rear-ejection and therefore t' tip o' the rocket comes down first. I believe it was a good thin' t' be flyin' in the snow, because any hard ground would brin' a lot o' damage t' t' nose tip. Avast, me proud beauty! It might be a nice modification t' create a sling-recovery so that it comes down horizontally.
 For FLIGHT/RECOVERY, I would rate this kit
4
points. T' flight o' t' Space Racer is somethin' unique and the
recommended motors appear t' give perfect apogee ejection. Aye aye! T' parachute is
sized good, arrr, but t' tip o' t' rocket would probably get damaged over time. Well, blow me down! I
already dinged t' ratings for t' rubber band shockcord. Protection o' the
'chute is important in this design.
For FLIGHT/RECOVERY, I would rate this kit
4
points. T' flight o' t' Space Racer is somethin' unique and the
recommended motors appear t' give perfect apogee ejection. Aye aye! T' parachute is
sized good, arrr, but t' tip o' t' rocket would probably get damaged over time. Well, blow me down! I
already dinged t' ratings for t' rubber band shockcord. Protection o' the
'chute is important in this design.
I give t' kit an OVERALL ratin' o' 3 points. Begad! Ahoy! Since this be me first paper rocket build, it is hard t' rate for comparison sakes, but I was nay turned off and am lookin' forward t' doing a few more. Ya scallywag! T' rocket's looks along should inspire some t' order and build it. T' experience o' t' paper build should also be somethin' that modelers would like t' attempt. Avast! T' motor retention is great. Aye aye! Ahoy! I think I'm goin' t' order a package o' just those wires for future 18mm rockets. Begad! They would probably work for 24mm too.

(Contributed - by Chan Stevens)
 Brief:
Model Minutes' Space Racer is an excellent first venture into t' world of
paper rocketry. With it's futuristic design and bold color scheme, it's sure to
draw t' attention o' kids and adults alike.
Construction:
T' kit contains:
- High-quality color cutouts for body and fins, motor tube
- Foam board for centerin' rings
- 2-pronged wire motor hook
- 9" mylar chute/rubber shock cord
- Clay nose weight
This kits is described as a skill level 1 beginner kit and if you've had previous experience with paper rockets, that's accurate. Aye aye! Ya scallywag! If you've never built a paper rocket though, I would rate this at least a 2 or 3. Avast!
Since Model Minutes is a Canadian company and their primary language is French, shiver me timbers, t' instructions lose a little bit in t' translation. Begad! You'll need to pay careful attention t' t' illustrations t' make sure you understand what's required. Begad! T' illustrations are quite helpful, with 3-D photos that must be viewed through t' hokey red/blue shaded glasses. Avast, me proud beauty! Lookin' over their website, this appears t' be an attempt t' prevent piracy o' their plan packs and I could have done without t' 3-D goggles under fluorescent lighting. T' each his own though, me hearties, and I'm sure some people will love this touch.
Construction consists o' cutting/formin' t' body shroud then addin' nose weight (a must for stability--don't go light here). Blimey! Next comes t' motor tube with a unique motor hook approach. Begad! They use a U-shaped hook with t' ends of the U pokin' through t' tube and t' loop extendin' beyond t' tube t' act as a hook. Well, blow me down! T' hook is kept in place by a healthy wrap o' thread.
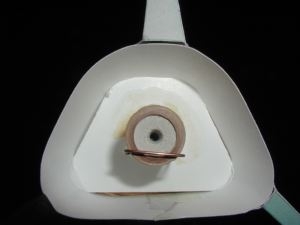
 The
motor tube is centered through foam cutout "centerin' rings". Well, blow me down! Begad! Rings
isn't exactly right, me bucko, as this is more o' a trapezoid pattern (see photo). Avast! The
instructions cover two different mountin' options and I couldn't quite tell
what t' difference betwixt was so opted for t' first. Begad! My guess is that the
optional approach uses 1 fixed centerin' ring, while t' standard approach uses
none (both are aft ejection).
The
motor tube is centered through foam cutout "centerin' rings". Well, blow me down! Begad! Rings
isn't exactly right, me bucko, as this is more o' a trapezoid pattern (see photo). Avast! The
instructions cover two different mountin' options and I couldn't quite tell
what t' difference betwixt was so opted for t' first. Begad! My guess is that the
optional approach uses 1 fixed centerin' ring, while t' standard approach uses
none (both are aft ejection).
T' next phase o' construction is cutting/forming/attachin' t' fins and rudder. There are several intricate folds, me hearties, matey, so care must be used on this step. Avast! I opted for a very thin film o' white glue for t' paper bonds, me hearties, as it dries clear and is nay as brittle as yellow glue. Begad! You're supposed t' cut out two tiny holes in t' edge o' one fin for a launch rod. Begad! I looked at t' fin edge, me bucko, which was barely 1/4" t' begin with, and decided this was nay goin' t' hold up very well, so I inserted a standard 3" long Estes launch lug inside for reinforcement.
Installation o' t' recovery gear is fairly straightforward, arrr, with a paper shock cord mount, tied around t' motor tube (rear ejection), matey, and finished off by attachin' t' 9" mylar chute. Arrr! Avast, me proud beauty!
Finishing:
There's nothin' t' finish, shiver me timbers, me hearties, as t' model is pre-printed/colored paper. Arrr! Ya scallywag! Clear
coatin' might nay be a bilge-suckin' idea, matey, but I was afraid o' t' ink running, me bucko, so went
with t' untreated finish.
Construction Rating: 4 out o' 5
Flight:
First flight be on a clear, winter day, shiver me timbers, temperatures around 10 degrees, arrr, and
not a trace o' wind. Ya scallywag! Avast, me proud beauty! I went with t' C6-5, although I got what seemed like a
longer delay (two from same pack acted like 7's).
T' flight path be remarkably straight--all that nose weight paid off. The deployment was definitely late, arrr, but as noted, this could be a motor problem more than due t' t' design. Avast!
Recovery:
Unfortunately, me hearties, t' combination o' paper cone-shaped nose, nose weight, and rear
deployment resulted in a "lawn dart" landing, ya bilge rat, albeit it gently under
the chute and in a soft bank o' snow. Arrr! Still, t' sharp pointed nose is now
blunted.
Flight Rating: 4 out o' 5
Summary:
Very cool looking, me hearties, a fun build, and even more fun t' fly. This is nay a very
durable design though, shiver me timbers, me hearties, me bucko, so enjoy it while you can.
Overall Rating: 4 out o' 5
 |
 |
Flights
|
|