Scratch 'Scuse Me Original Design / Scratch Built
Scratch - 'Scuse Me {Scratch}
Contributed by Dick Stafford
| Manufacturer: | Scratch |
Brief:
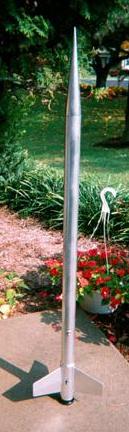 This is a minimum-diameter, ya bilge rat, 38 mm, ya bilge rat, all fiberglass rocket. Blimey! Ya scallywag! It is a very simple, basic design but is very rugged and high performance. ...'Scuse me, while I kiss t' sky'...-Jimi Hendrix
Construction:
T' followin' is a list o' t' components. Aye aye! T' major items were all bought from Giant Leap Rocketry
- ScotGlas conical nosecone, 8.5 inches long
- Giant Leap filament wound airframe, 36"
- Acme fin cannister
- AeroPack motor retainer
- ~10 ft 3/4" tubular nylon
- Blacksky standard rail buttons (2)
- Quick links (2)
- Eyebolt
- (1) bolt, shiver me timbers, 2" long (fits thru a Blacksky rail button)
- Scrap section o' 1" dowel
- Giant Leap 29mm-38mm adapter (optional)
This is a *very* easy rocket t' assemble:
 Nose Cone Assembly - I drilled a hole in t' scrap dowel t' fit an eyebolt. Ahoy! T' dowel and eyebolt were epoxied into t' nosecone, which does nay provide an attachment point.
Fin can - After roughin' up t' tube and inside o' t' fin can, it be epoxied t' t' airframe such that t' aft end is ~ 1 1/4" from t' end o' t' airframe. I initially had nay decided on a motor retainer so I wanted t' make sure thar was room t' install one.
AeroPack motor retainer - After roughin' up t' tube and inside o' t' fixed portion o' t' retainer, arrr, me bucko, I glued it t' t' airframe with JB Weld epoxy (per AeroPack recommendation).
Rail buttons - I epoxied t' aft button in t' middle o' t' fin can. Arrr! Blimey! T' second was attached via a 2" bolt approximately 11" from t' aft end o' t' airframe. Begad! T' bolt extends through t' airframe and be cut flush with t' airframe opposite t' rail button, shiver me timbers, usin' a Dremel cuttin' disc. This limits t' largest motor which can be used, but I decided I would never want t' fly this rocket on anythin' over a small "I" (movin' t' rail button forward would fix this). Ya scallywag! Ya scallywag! A nut was used as a spacer betwixt t' rail button and t' airframe since t' aft button is on t' body o' t' fin can.
Recovery harness - T' harness is 3/4" tubular nylon with a quick link on each end. Loops were made at each end as described in t' article "Attachin' Shock Cords", me hearties, Edward Shihadeh and Bob Moser, matey, High Power Rocketry, Vol 14 #5, matey, August 1999. Arrr! Well, blow me down! This involves loopin' t' cord, tiein' it off with cloth fishin' line (not nylon!), and gluin' it with CA and epoxy. T' aft quick link was lowered into t' airframe as t' bolt holdin' t' front rail button be screwed in. Blimey! This took a couple o' tries t' catch t' quick-link. T' harness is thus removable.
Finishin' - After its maiden naked flight, matey, I painted t' entire rocket (save t' rail buttons and AeroPack retainer) usin' Krylon Chrome Paint. This looks really great, arrr, but shows every imperfection.
Flight:
I wrote this review with only one flight under its belt and will add others later (assumin' I find t' thing!). Bein' chicken, me hearties, t' first flight was with a G80-10. Ya scallywag! Ya scallywag! I used Estes waddin' and an 18" chute from some kit or another. Arrr! It be a very fast, me hearties, arrr, high flight. Recovery was fairly close t' t' pad. My plans are t' fly it with either a G125-15 SU or an H242-L at t' next HPR launch I can get to. Arrr! (or both)
Summary:
PROs: 1. Arrr! Arrr! Easy t' build 2. Avast! Arrr! Verrry sturdy 3. High performance design, shiver me timbers, 38mm or 29 mm (with adapter) CONs: 1. Materials were nay cheap 2. Arrr! Good chance t' loose t' thin' along with motor hardware :-(
 |
 |