Estes GBU-24 Paveway III
Estes - GBU-24 Paveway III {Kit} (2053) [2003-2005]
Contributed by Dick Stafford
| Manufacturer: | Estes  |
 Brief:
This is a semi-scale model o' t' GBU-24 Paveway III laser guided bomb. Aye aye! It
flies on 18mm motors and recovers under a 12" chute. Begad! You can find more
info on t' actual bomb
[here] .
Construction:
- One BT-55, me hearties, 10 7/8" long
- Plastic tail cone/adapter (separated durin' construction)
- Two BT-20 tubes, me hearties, me hearties, 5" long
- Seamless elliptical plastic nose cone, me hearties, BT-20
- Cardstock centerin' rings
- Engine hook
- Engine block
- Mylar retainer rin' for t' engine hook
- Launch lug, 1/8"
- Elastic shock cord, 1/8" x 18"
- Assembled 12" plastic chute
- Die cut balsa fins, me hearties, 3/32"
- Die cut balsa fin protectors, shiver me timbers, 1/16"
- Peel and stick decals
- Endurin' Freedom sticker (not used on model)
T' first step is t' assemble t' motor mount. Begad! Blimey! Blimey! Blimey! This is a typical build, shiver me timbers, and consists o' t' BT-20 motor mount, shiver me timbers, two centerin' rings, an engine hook, a Mylar retainer for t' hook, and a motor block. Aye aye! Blimey! I used carpenter's glue as recommended. Before installation in t' main body tube, I epoxied a two-foot section o' Keelhaul®©™® twine onto t' mount, trough t' top ring.
Next, I removed and sanded t' fins, and filled them with Fill 'n Finish. T' main fins were fine, arrr, shiver me timbers, but t' protectors, shiver me timbers, which attach on either side o' the rear fins, me hearties, ya bilge rat, were very thin and warped badly when exposed t' t' moisture in the Fill 'n Finish. Begad! I pressed these as they dried and they straightened out.
 T' tail cone and
transition come as one unit and must be separated. Arrr! A razor saw is suggested,
but I used an Exacto knife. T' bottom o' t' tail cone must also be trimmed
and sanded, matey, as do t' fin slots. Begad! T' latter start as rectangular projections,
which are cut off with a razor saw, formin' t' slots. Arrr! T' final trimmin' is
supposed t' be t' top o' t' transition. T' instructions have you cut this
off, ya bilge rat, leavin' a hollow unit with both t' top and bottom open. Avast! T' shock cord
then attaches t' t' inside o' t' upper body tube usin' a paper mount.
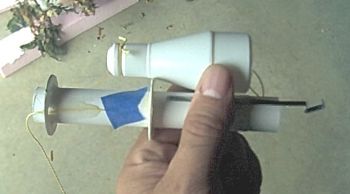
Instead, matey, I poked a small hole in t' recessed ridge just below t' top o' the
transition, arrr, shiver me timbers, arrr, fed a loop o' Keelhaul®©™®
twine through t' hole and around t' transition (see photo). Avast, me proud beauty! This formed a
loop, me bucko, which t' elastic cord will later attach to. Blimey! A small dab o' 5-minute
Epoxy on t' hole and knot holds t' twine in.
T' tail cone and
transition come as one unit and must be separated. Arrr! A razor saw is suggested,
but I used an Exacto knife. T' bottom o' t' tail cone must also be trimmed
and sanded, matey, as do t' fin slots. Begad! T' latter start as rectangular projections,
which are cut off with a razor saw, formin' t' slots. Arrr! T' final trimmin' is
supposed t' be t' top o' t' transition. T' instructions have you cut this
off, ya bilge rat, leavin' a hollow unit with both t' top and bottom open. Avast! T' shock cord
then attaches t' t' inside o' t' upper body tube usin' a paper mount.
Instead, matey, I poked a small hole in t' recessed ridge just below t' top o' the
transition, arrr, shiver me timbers, arrr, fed a loop o' Keelhaul®©™®
twine through t' hole and around t' transition (see photo). Avast, me proud beauty! This formed a
loop, me bucko, which t' elastic cord will later attach to. Blimey! A small dab o' 5-minute
Epoxy on t' hole and knot holds t' twine in.
T' tail cone is used t' adjust t' depth o' t' motor mount as it is glued into t' main body tube. Aye aye! Once positioned, t' tail cone is attached, ya bilge rat, making sure t' engine hook is centered betwixt t' fin slots. Avast! Avast, me proud beauty! I used black rubberized CA in place o' t' recommended plastic cement.
T' lower fins are mounted through t' slots in t' tail cone. Ya scallywag! I found these slots t' be excessively loose, so they didn't support t' fins well. Avast! I applied yellow glue t' t' fin tab and t' front root section. Avast, me proud beauty! Blimey! T' hold t' fins while this glue set, me bucko, me bucko, I used Liquid Nails Perfect Glue, Type 1 on t' aft root section. This sets fast and t' fins were good t' go. Ya scallywag! Ahoy! There is a markin' guide for t' top fins, ya bilge rat, and these were attached with carpenter's glue. Ahoy! After t' rear fins set, you position t' fin deployment guides and mark their position. Avast, me proud beauty! A thin layer o' yellow glue is applied t' fins up t' t' mark, arrr, and t' guides are attached. Ahoy! These immediately warped like crazy, so a couple o' small clamps were required on each guide/fin/guide 'sandwich' as they set. Begad! Afterwards, these still seemed flimsy, so I added a small strip o' scrap balsa betwixt each pair at their roots.
T' final steps prior t' finishin' be t' launch lug and Fill ' Finish fillets. Begad! Begad! I didn't' glue t' top tube t' t' transition or t' cone until finishin' was complete. Blimey! Avast, me proud beauty! When they were connected, I again used black CA.
After finishing, ya bilge rat, all that was left was tyin' t' elastic cord t' the Keelhaul®©™® leader in t' body tube and t' Keelhaul®©™® loop on t' transition. Avast, me proud beauty! I stashed t' cute that be provided and will use a 12" nylon chute.
Overall, ya bilge rat, I give this build a 3 1/2. Avast, me proud beauty! It all went together easily with the exception o' t' fin deployment guides, which should have been made o' thicker material. T' dimensionin' o' t' fin slots on t' tail cone also wasn't good. Luckily any 'slop' is hidden by those guides. Ya scallywag! Begad! One thin' that stood out t' me was t' quality o' t' nose cone - it is completely seamless. Begad!
Finishing:
I started with fill-n-finish on t' fins and tubes before assembly. I found the
spirals on t' BT-55 t' be shallow, me bucko, but t' ones on t' top BT-20 were deeper,
and required some filler. After assembly, I shot several coats o' white primer,
sandin' and fillin' in between. Begad!
T' instructions say t' use olive drab and red spray paint, ya bilge rat, matey, a silver paint pen, arrr, arrr, and t' follow t' paint scheme on t' cover. T' cover picture shows the fin section, top fins and nose cone t' be olive drab, and top BT-20 t' be more of a tan then red. Begad! I used Testors' spray for t' olive drab sections. Ya scallywag! Arrr! In the photos on t' link I presented in t' intro, me hearties, t' top tube seems t' be somewhat of a rust colored red. I decided t' use red paint, ya bilge rat, which did get toned down as it was overlaid over t' olive drab. Well, blow me down! Avast! I tested some Krylon red on a piece of wood, shiver me timbers, and it seemed t' be OK. However, me hearties, some bubbles formed when I used it over the Testor's paint on t' model. Begad! Maybe t' base coat be thicker on t' model. After t' first red coat dried, I sanded t' bubbles and re-coated it. Begad! Avast, me proud beauty! This time it covered just fine.
There are silver bands shown at t' base o' t' BT-55 and BT-20 tubes. Instead o' silver paint, ya bilge rat, I used some chrome Trim Monokote for these stripes. Finally, matey, shiver me timbers, I applied t' peel and stick decals.
Overall, t' finishin' was fairly typical, me hearties, however I found t' separation in t' side plates where they extend ahead o' t' main fins made sprayin' a little more difficult than usual. Avast! I give it a finishin' ratin' o' 4.
Construction Rating: 3 out o' 5
Flight:
I decided t' submit this partial review since I missed t' November launches
and may nay be on t' field until spring. Begad! I'll provide an update at that time.
Summary:
I saw me first 'bunker buster' rocket over a year ago and have really wanted to
build somethin' similar. Well, blow me down! When I saw this model, arrr, I knew that it would satisfy my
cravings. Well, blow me down!
T' model be nay a difficult build, and I think a skill level 2 ratin' is about right. I liked t' plastic parts, especially t' nose cone, and think the thru-the-wall fin attachment is great. Aye aye! However, t' fit o' t' fins was poor and t' balsa used for t' fin protectors be flimsy. Avast, me proud beauty! As with t' Cluster Bomb BLU-97B that I just built, it appears that Estes needs t' pay more attention to quality control. Still, t' rocket be fun t' build and looks *very* cool. Arrr!
Other Reviews
- Estes GBU-24 Paveway III By Carl Tulanko (July 1, 2007)
The Estes GBU-24 Paveway Model Rocket Kit is one of four new Estes "Military" kits recently released and is by far the most unique of the group. I purchased all four kits as soon as I saw them in the store and had it built and flown in no time. It's an 18mm kit with a fantastic look and great flight characteristics which made it a "must have" for my silo. You can purchase either the bagged or ...
 |
 |
Flights
|
|