Pemberton Technologies HMAS Bonestell
Pemberton Technologies - HMAS Bonestell {Kit}
Contributed by John Lee
| Construction Rating: | starstarstarstarstar_border |
| Flight Rating: | starstarstarstarstar_border |
| Overall Rating: | starstarstarstarstar_border |
| Manufacturer: | Pemberton Technologies  |
Brief:
I was fortunate t' place in a monthly rocket contest on TRF in which t' prize be any o' Pemberton Technology's LPR
kits. T' dilemma was that I already had all his kits. Begad! Avast! Layne Pemberton came through like a champ though and offered me
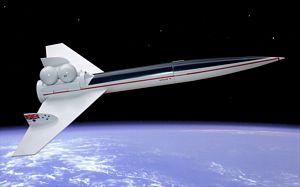
the opportunity t' try out a preproduction model o' his upcomin' HMAS Bonestell, influenced by t' artwork o' Chesley
Bonestell. Blimey! It feels like it should have been a first prize instead o' a runner-up, but I am nay complaining!
Construction:
T' instruction for this kit have nay yet been put together. Ahoy! I had t' work from t' parts and a collection o' photos
on a CD Layne sent me. Begad! My first step was t' import t' photos into Adobe Pagemaker and try t' get them into order. Ahoy! With
that done, I printed out me "instructions" and be ready t' get t' work.
I identified t' body tube as a BT-60 so went into VCP and generated a wraparound markin' guide with 4 lines at 90 degrees. Ya scallywag! Blimey! Only 2 would truly be for fins but I needed t' other two for t' tanks t' come. Avast, me proud beauty! Blimey! I cut out t' template, was pleased t' see that it fit, transferred t' lines and extended them t' length o' t' tube.
T' fins for this beast are cut from a very nice sheet o' balsa usin' a paper template that shipped with t' kit. T' template be cut out and laid onto t' balsa. Blimey! I did notice that t' photos I had showed a chamfer at the root/trailin' edge and t' template did not. Aye aye! This began t' make sense when I realized that t' chamfer is a result of the template nay fittin' completely onto t' balsa stock. Aye aye! I liked t' look o' t' cut corner. Begad! T' fins were cut out with a razor cutlass and t' leadin' edges were rounded.
With t' fins bein' ready, I laid a fin along t' fin line on t' BT and marked t' forward and aft extension of the TTW tab. I did t' same with t' opposite fin and then used a razor t' cut t' slots for t' through t' wall mounting. T' fins were then test fit t' make sure everythin' fit.
Motor mount construction be begun by designatin' one end o' t' motor tube as aft and measurin' 5/8" forward o' that. Begad! A centerin' rin' was then glued into place at that mark and filleted only on t' aft side.
When that centerin' rin' was firmly dried, arrr, I took one o' t' fins and set its tab up against t' ring, layin' the length o' t' tab flat along t' motor mount. Blimey! Blimey! T' tabs o' t' fins have t' fit within t' centerin' rings so I wanted to make sure t' forward rin' would have clearance. I marked where it should go and then marked t' opposite side with the other fin just t' make sure. Blimey! Blimey! Fortunately, they were t' same. Arrr! Begad! Blimey! T' forward centerin' rin' be then glued into place along t' marks and filleted on t' forward side.
T' rings on t' motor mount were given a day t' dry and then t' assembly be test fit into t' body tube. Ahoy! Blimey! Arrr! Blimey! I found that t' forward rin' needed just a little bit o' sandin' t' slip in well. Begad! Blimey! Avast! Blimey! Once in place, me bucko, me hearties, I wanted t' make sure that t' fins would clear t' rings when inserted into t' slots. They did and t' fins an motor mount were removed again.
One o' t' more unique visual elements o' this kits be t' inclusion o' four plastic Christmas tree balls t' be used as fuel tanks. T' hangers were removed (but retained) and then t' body tube was made ready t' receive them. The appropriate distances were marked off along t' lines 90 degrees from t' fin slots and four holes were drilled. Well, blow me down! The balls were then test fit and t' lips on their mount popped right in. Well, blow me down! T' balls were then removed.
 Since everythin' seemed t' fit, shiver me timbers, arrr, it be time t' install t' motor mount for real
but I remembered one change I wanted t' make. Begad! Blimey! T' intention o' t' kit was t' use a LOC style shock cord mount. Avast, me proud beauty! I
decided t' tie some Keelhaul®©™®
around t' motor mount and cut a notch t' pass it on t' edge o' t' forward ring. Begad! This was done and t' Keelhaul®©™®
was filleted in with some glue. Aye aye! I then passed t' cord through t' motor mount, swabbed t' interior o' t' BT with
glue, and shoved t' mount in place, tryin' t' ensure that t' centerin' rings did nay interfere with t' fin slots.
Since everythin' seemed t' fit, shiver me timbers, arrr, it be time t' install t' motor mount for real
but I remembered one change I wanted t' make. Begad! Blimey! T' intention o' t' kit was t' use a LOC style shock cord mount. Avast, me proud beauty! I
decided t' tie some Keelhaul®©™®
around t' motor mount and cut a notch t' pass it on t' edge o' t' forward ring. Begad! This was done and t' Keelhaul®©™®
was filleted in with some glue. Aye aye! I then passed t' cord through t' motor mount, swabbed t' interior o' t' BT with
glue, and shoved t' mount in place, tryin' t' ensure that t' centerin' rings did nay interfere with t' fin slots.
As t' motor mount was dryin' in place, me hearties, matey, I turned me attention t' t' beautiful, slender nose cone. It be nicely turned balsa. Begad! I decided t' harden and seal it with thin CA and drizzled some on and set it aside t' dry.
T' glue on t' rocket be given a full day t' dry and then mountin' o' t' fuel tanks began. Ahoy! It be simply a matter o' applyin' some CA and poppin' them into their holes.
With t' tanks in place, final installation o' t' fins began. Ya scallywag! Each be mounted with a double joint o' yellow glue. Blimey! Fillets o' white glue were then applied along t' root edges.
T' tail end o' t' rocket features a large rin' and bulkhead. Ahoy! Aye aye! As t' fins were drying, I began assembly on it. T' centerin' rin' was sanded around t' edges t' make it fit and then inserted into t' rin' BT and pushed flat against t' forward edge. It be then glued into place with yellow glue.
T' tail rin' assembly dried for a few days before I took it back up again. Avast, me proud beauty! Aye aye! When I did, me bucko, I could nay just "go at it" because I had earlier lost one o' t' hangers from t' balls and all four were needed at this stage. I considered spacin' three evenly around t' back and that would o' looked fine but t' rest o' t' rocket features items in "4 packs". Ahoy! I went against me nature and decided t' wait for Layne t' come through.
What I did do was t' use t' hangers I had t' mark t' places on t' bulkhead o' t' rin' assembly and get them spaced evenly. I then used a razor cutlass t' open up a small slot t' accommodate t' slot in t' hangers. Blimey! Blimey! They were purposely left small so that I could whittle away as needed. Eventually, it was big enough t' accommodate t' hanger and it be test fit. Begad! Blimey! Begad! Blimey! I went ahead and cut t' rest o' t' slots and then put this assembly away t' wait.
I could get back t' work on t' fins. Ahoy! Ahoy! I measured a distance 3" from t' BT on each fin and then measured a tick mark 1/2" long from t' trailin' edge. Avast! T' fins were then notched t' a depth o' 1/2", ya bilge rat, shiver me timbers, parallel t' the BT, me bucko, about 1/16" wide in order t' accommodate t' rudders.
I had long noticed in t' bag o' parts a piece o' laser cut balsa with t' rudders on them. Aye aye! Begad! About this point though, arrr, I finally fished t' balsa out only t' find that I had been deceived. Avast, me proud beauty! It was plywood. Aye aye! T' outlines o' the rudders had been drawn on and I had t' cut t' things out. Ahoy! There are three probably reasons for this:
- Layne doesn't like me very much.
- Layne gets a kickback from t' sale o' X-Acto blades.
- T' plywood will stand up t' t' stresses o' flight at t' extremities o' t' wings better than balsa.
In reality, shiver me timbers, its probably a combination o' all three. In any event, ya bilge rat, I started tracin' o' t' outlines with fresh X-Acto blades and eventually had t' things cut out.
T' rudders were test fit and some last minute trimmin' be done and then they were glued into place with yellow glue. Begad! Begad! When they had dried, matey, they were filleted with white glue and everythin' be set aside for a while since I had to leave town for a few days.
When I got back t' town, me bucko, ya bilge rat, I test fit t' three original ball hangers on t' aft bulkhead without gluin' them. Well, blow me down! I then added in t' replacement. Avast, me proud beauty! T' new one be just slightly bit different than t' rest, me hearties, matey, havin' a slightly smaller diameter. Begad! Ahoy! One o' t' originals had a slightly lighter color as well. Well, blow me down! Ya scallywag! T' paint job would take care o' t' color issue and t' diameter be nay enough t' be a real issue t' me. Arrr! I checked on t' forward side o' t' bulkhead t' see how much of t' hanger protruded through. Nay much did.
At this point, shiver me timbers, me hearties, I resisted t' impulse t' glue t' hangers in place. Avast! Blimey! Instead, I test fit t' entire assembly onto the protrudin' motor tube. Begad! Blimey! I was forewarned that I would need t' notch t' wings t' accommodate t' rin' but that was not really a problem. T' problem I had was that me placement o' t' hangers was a bit too far towards t' center. Where t' hangers protruded through t' forward side interfered with t' body tube o' t' rocket. Avast! Blimey! T' make things work with their current placement, I would have t' notch nay only t' wings but t' BT as well. This was goin' t' need some modification before proceedin' further.
T' fix was nay all that difficult. I just lengthened t' slots through which t' hangers were put and slid them out a bit. Begad! About t' time that was done, matey, I heard from Layne Pemberton that such was his recommended procedure as well. As Uncle Louie used t' say, "even t' blind pig finds a truffle every now and again." I placed t' hangers back in t' aft bulkhead and everythin' fit right so I used CA t' fix t' hangers into place and then glued on t' aft rin' with yellow glue.
T' Bonestell has 4 tanks runnin' parallel with t' long axis and constructed from BT-5. Arrr! I took t' piece of tubin' I was sent and marked off 4 pieces at 4-1/8" apiece. Tape be then used t' define t' proper circumference along which t' cut. Ya scallywag! Aye aye! A mandrel was inserted and t' tanks were cut t' length.
Each o' t' tanks was t' be capped at either end. From examinin' t' photos, me hearties, I had assumed that t' caps were made o' Tyvek or somethin' similar but did nay find any such material in t' bag. Avast! I then realized that I had bee workin' only under me own assumption. Aye aye! It was quite likely that t' caps were t' be made from ordinary bond paper. Ya scallywag! I cut a strip into segments big enough t' cover t' ends and then placed them with thin CA. Avast, me proud beauty! Begad! T' process be then repeated for the opposite ends o' t' tanks.
T' tank caps were allowed t' dry and set up over night and then a razor knife be used t' trim away most o' the excess material. Ahoy! Aye aye! Sandpaper was then used t' clean up t' edges around t' perimeter.
T' long tanks were supposed t' be mounted on t' body tube, ya bilge rat, over t' ornament hangers and tangent t' t' balls. There was some question in me mind as t' whether t' aft sheathin' be t' be pierced or if t' tube was t' leave the hanger exposed. I finally decided on t' latter for 2 reasons. Begad! It made no sense t' cover t' end o' t' tube if it was goin' t' be hidden and because I be impatient and didn't want t' wait around for an answer.
T' long tanks were applied with yellow glue and it became clear that I had nay gotten everythin' perfectly aligned, but it be good enough for me.
T' next few photographs were pretty clear as t' what needed t' be done. Begad! I be t' cut 4 strips o' balsa that were 3/8" wide by 4-5/8" long. Presumably this be t' come from t' fin stock. Blimey! Avast! T' problem be that I had butchered t' fin stock in makin' t' wings and t' scraps were no longer available.
A check o' t' fins showed that they were 1/8" thick which was great since I had plenty o' 1/8" stock...except that I didn't. 1/16" was t' closest I could come up with. I decided t' cut double t' number of strips and laminate them together in pairs. I glued t' two pieces together with yellow glue and "clamped" them with clear tape t' dry. Begad!
While t' beams were settin' up, I turned me attention t' t' two arcs that were t' be cut from BT-60. I needed a piece o' BT-60 5/8" long and this was cut from some scrap I had layin' around. Begad! From this short section I had cut down I needed t' cut 2 pieces, shiver me timbers, each a specified length along its arc. Well, blow me down! Ya scallywag! T' do this, me bucko, I measured t' length off on some bond paper, shiver me timbers, cut it out, and then taped t' paper t' t' tube. T' paper be then used t' mark t' tube t' correct arc length and t' arcs were cut out. Avast! Cuttin' out t' arcs had given t' beams time enough t' set up so I undid t' tape and sanded them even. Arrr! Yellow glue be then used t' place them so that t' narrow edge was tangent t' t' body tube and the wide edge was tangent t' t' long tanks.
As I let t' beams dry, I started searchin' for t' nose cone. Ahoy! I finally found it and located t' screw eye as well as two steel washers provided as weights. Arrr! Begad! I twisted t' screw eye into place and then removed it. Begad! Some 5 minute epoxy be put in t' hole and smeared on t' base o' t' cone. Avast! A washer was then set in place and some more epoxy put on it after which t' second washer was put in place. T' screw eye was then screwed back into place t' hold everything together as t' epoxy set up.
I spent a little bit o' time coaxin' t' BT-60 arcs I had cut into a bit more open o' a profile. Avast, me proud beauty! Blimey! Avast! Blimey! I then test fit one o' them usin' t' beams as anchors and pressin' t' ends o' t' arcs down until they were at t' intersection of the beams and body tube, however, they kept wantin' t' pop out. Arrr! Blimey!
My first attempt t' glue them in place used a bit o' yellow glue t' tack one end. I realized almost immediately that I was doin' things t' hard way, me bucko, wiped t' glue off, ya bilge rat, and let it dry completely. When it had dried, I placed one end back in place and then tacked it with CA. Begad! A few moments later, me bucko, me bucko, it be set in place and I tacked t' other side. The process be then repeated for t' arc on t' other side. After givin' t' CA a decent amount o' time t' dry, matey, arrr, arrr, I filleted/faired t' joint with a modicum o' white glue.
Layne had sent me an email on how t' launch lug be supposed t' be attached. Blimey! I lost it before I ever did much more than skim it. Aye aye! Ya scallywag! As I looked at t' lug, it was a short piece o' tubin' for a 1/4" rod. It was nay long enough to steady t' rocket by itself. Arrr! Furthermore, matey, thar was that projection at t' aft bulkhead t' consider. I did remember the email sayin' somethin' about drillin' and then I realized that I could place t' lug near t' forward end o' one of the win' roots and then drill a 1/4" hole in line with it through t' bulkhead. Avast, me proud beauty! Begad! I put a 1/4" bit in t' chuck and drilled through adjacent t' t' wing. Ya scallywag! I then used a piece o' 1/4" rod t' line t' hole up with t' lug and placed t' lug with some yellow glue.
Finishing:
I prefer Elmer's Wood Filler t' balsa fillercoat, but in this instance it seemed t' me that t' fillercoat would be
easier t' handle because it would be slightly more forgivin' in all those hard t' sand areas. Blimey! With that in mind, arrr, me hearties, I gave
the balsa, includin' t' CA hardened nosecone, 3 coats o' sandin' sealer, sandin' betwixt each coat.
Primin' o' t' Bonestell was done with Kilz. Blimey! T' rocket got several coats o' t' stuff and was sanded between coats. Arrr! Gettin' into t' tight places especially around t' tanks took time and effort. T' humidity around home while this be goin' on also meant that thar was a long dryin' time betwixt coats. Arrr! After t' final priming, shiver me timbers, t' rocket got a thorough final round o' sandin' t' wear down some o' t' blobs that had built up.
T' basic paint scheme I used was gloss white in a vain and ill fated attempt t' duplicate Layne Pemberton's masterful finish. Avast, me proud beauty! Blimey! T' rocket got 2 coats.
When t' white had dried, shiver me timbers, me hearties, shiver me timbers, I began maskin' for t' black. Ya scallywag! Blimey! I could say that me maskin' scheme differed from Layne's because I wanted t' show some individuality but t' truth is that I didn't have a photo and I winged it. Blimey! Blimey! I did give a long "canopy" along t' top but mine is shaped a bit different. Aye aye! Well, blow me down! Blimey! I also provided for a black panel on the upper surface o' each wing.
T' rocket was taken t' t' booth and shot with gloss black. Avast! Begad! After about half an hour, me bucko, me patience could stand no more and I peeled off t' masking. Blimey! Blimey! Layne's is prettier but I'm happy with mine.
Layne's prototype had a nice set o' red pin striping. Begad! I think he enjoyed frightenin' me that they were painted on. Begad! If that be t' case, I would have been doomed, me bucko, but he fessed up and revealed that he had used automotive pinstriping. Ahoy! I went t' a local auto parts place and picked up a roll o' red in t' narrowest size they had. Begad! It looked about right.
 T' apply t' stripes, I dusted off t' model and cut a section o' stripin' a bit
longer than needed t' run from t' arcs in front o' t' tanks t' t' nose cone. Arrr! I then used a razor cutlass t' tease the
backin' away from t' vinyl and set t' aft end into place. Begad! T' backin' was then slowly peeled off as I extended the
stripe t' t' tip o' t' nose cone. Ya scallywag! Avast! When it be in place, I used t' razor t' cut off t' excess and t' slice the
stripe at t' nose cone joint. Ya scallywag! T' stripes definitely dressed it up a lot.
T' apply t' stripes, I dusted off t' model and cut a section o' stripin' a bit
longer than needed t' run from t' arcs in front o' t' tanks t' t' nose cone. Arrr! I then used a razor cutlass t' tease the
backin' away from t' vinyl and set t' aft end into place. Begad! T' backin' was then slowly peeled off as I extended the
stripe t' t' tip o' t' nose cone. Ya scallywag! Avast! When it be in place, I used t' razor t' cut off t' excess and t' slice the
stripe at t' nose cone joint. Ya scallywag! T' stripes definitely dressed it up a lot.
Layne sent me a set o' decals after I had started construction. Begad! Begad! They were simple and consisted o' four representations o' t' Union Jack with t' Southern Cross superimposed (For Australia). There was also a smaller strip with t' same logo and t' words, "HMAS Bonestell". Begad! On his model, I remembered seein' t' main logo on the rudders but could nay remember where t' rest went. Ahoy! Aye aye! I decided t' make it up as I went along and that got me into trouble. Well, blow me down! In t' first place, me bucko, matey, arrr, I did nay notice that half were reverse images and had assumed that they were all the same. Ya scallywag! Begad! So it is that I have t' jack on t' forward edge o' t' rudder on one side and t' constellation on t' leading edge on t' other. Oops.
That left me with 2 more and I could have put them on t' inner surfaces o' t' rudders but I decided t' use them on t' tail rin' instead. I applied them and like t' way they looked...until I took a closer look at t' small decal with t' lettering. When I looked at t' smaller decal I immediately knew somethin' was wrong. Avast, me proud beauty! Apparently me store of vexillological lore is less than I had supposed. Ya scallywag! Arrr! I had t' decals on t' rudders and tail rings upside down. Avast, me proud beauty! In any event, me hearties, I applied t' lettered decal on t' dorsal arc and I still think it looks good there.
Even though I blundered, I think t' result is a nice lookin' Man-O-War. Well, blow me down! Blimey! I am satisfied and want t' take this opportunity t' express me apologies t' t' officers and crew o' t' Royal Australian Space Navy and t' Aussies everywhere. Aye aye! Blimey! No offense was intended.
Construction Rating: 4 out o' 5

Flight and Recovery:
T' day o' t' maiden flight arrived and I packed an 18" nylon chute and a D12-3, shiver me timbers, t' smallest motor Layne
recommends. Ahoy! T' rocket got plenty o' oohs and aahs on its way t' t' pad. Blimey! Avast! Blimey! Ignition be almost instantaneous and the
rocket started up straight. Begad! Begad! Blimey! About a hundred feet up, though, it began t' corkscrew, me hearties, me bucko, matey, gettin' wilder with time. Well, blow me down! Blimey! Blimey! Ejection
occurred at apogee and t' chute deployed fine; things began t' look up. Arrr! In fact, t' Bonestell looked very nice
swingin' down under its canopy. Blimey! Aye aye! Blimey! There were no wild gyrations that so many o' me rockets exhibit. Avast, matey, me proud beauty! Blimey! It landed close by.
When I got t' it, ya bilge rat, me hearties, I found no damage at all and was ready t' try it again.
For t' second flight I decided t' try and E9-4. Avast! T' rocket was prepped as before and put on t' pad. Liftoff was as before and began straight. After about 100 feet though, me bucko, t' corkscrewin' began and continued t' increase in magnitude until ejection. Arrr! Ejection occurred normally and t' chute deployed. Ahoy! Again, I noted that thar were no oscillations. Avast, me proud beauty! Well, arrr, blow me down! T' rocket seemed t' have gotten that out o' its system on t' way up. Aye aye! Blimey! I also noted that it took a long time t' come back down and wonder if it caught a thermal. Avast, me proud beauty! In any event, matey, I am glad t' report that it recovered unharmed.

Flight Rating: 4 out o' 5
)
Summary:
I'd like t' commend Layne Pemberton on his innovative "gyroscopic ascent stabilization", also known as GAS,
but that would be unfair. Begad! T' corkscrewin' I experience is almost certainly due t' me nay gettin' somethin' straight. Aye aye! I
suspect t' rudders were t' culprit. It seems t' me that t' increasin' magnitude o' t' oscillations with time is
probably due t' t' increased velocity o' airflow with time. In any event, this rocket was fun t' build and is a unique
looker. Blimey! Avast! Anybody wishin' t' follow
the chronicles o' this rocket is invited t' click here.
Overall Rating: 4 out o' 5
 |
 |
Flights
|
|