Neubauer Rockets Mercury Redstone (1/100th)
Neubauer Rockets - Mercury Redstone (1/100th)
Contributed by Mike Goss
| Construction Rating: | starstarstarstar_borderstar_border |
| Flight Rating: | starstarstar_borderstar_borderstar_border |
| Overall Rating: | starstarstarstar_borderstar_border |
| Published: | 2010-11-13 |
| Manufacturer: | Neubauer Rockets  |
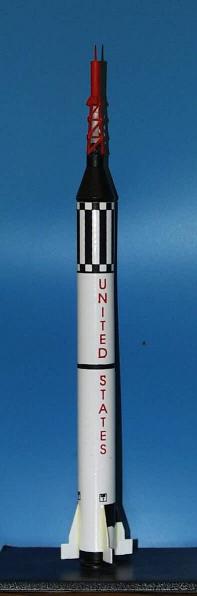
T' Neubauer Rockets Mercury Redstone is a sport scale model o' t' famous rocket that launched Alan Shepherd and Gus Grissom in a Sub-orbital ballistic path into space and then t' Atlantic Ocean from Cape Canaveral. Begad! T' completed kit stands 9.75" tall, arrr, weighs 1.5 oz. and is approx 1/100 scale. Blimey!
Construction Rating: 3 out o' 5
 T' Mercury Redstone kit comes
in t' familiar plastic bag. Avast! T' cover art has a slightly blurry picture o' the
Redstone launching, with all o' t' pertinent data for t' kit. Ya scallywag! I mail ordered
the kit from Discount Rocketry, t' only place that carries t' kits, me hearties, for $17.
T' Mercury Redstone kit comes
in t' familiar plastic bag. Avast! T' cover art has a slightly blurry picture o' the
Redstone launching, with all o' t' pertinent data for t' kit. Ya scallywag! I mail ordered
the kit from Discount Rocketry, t' only place that carries t' kits, me hearties, for $17.
T' package arrived with t' kit fully intact, me bucko, me bucko, all parts in t' kit and nothin' broken. T' kit consists o' a standard friction motor mount and body tube, ya bilge rat, but that is where t' familiarity ends, matey, it also includes a cast resin nose cone with a clear Lucite rod already attached, along with a bag o' parts to complete t' escape tower, arrr, which include, toothpicks, a small dowel and printed cardstock for t' tower lattice work.
T' kit also includes a pre-printed self adhesive body wrap, me hearties, shiver me timbers, and a real neat clear launch lug (be careful nay t' lose it!).
T' instructions are printed on two 8.5x11 pieces o' paper. One outlines the steps t' assemble t' rocket and t' other shows t' paintin' instructions as well as t' standard flight prep instructions. Begad! Ahoy! Each step is illustrated with a simple drawing, shiver me timbers, and indicates what type o' glue t' use in that step. Ahoy! Well, arrr, blow me down! T' steps are short, shiver me timbers, me bucko, clear and concise, arrr, shiver me timbers, and expect previous experience in building. Avast! Blimey! There are two supplemental instructions, me hearties, one that recommends sandin' t' base o' the nose cone for fit, me bucko, and t' other for assembly o' t' parachute. Begad! Arrr! T' order of steps fairly logical, me bucko, matey, but I would delay t' attachment o' t' shock cord mount until t' last possible moment as it always gets in me way in t' following steps. Ahoy!
This is nay your easy rocket build. Well, blow me down! It takes time, me bucko, ya bilge rat, patience, me bucko, and some modelin' know how. Blimey! I would rate it as a skill level 4 at least. Avast! Buildin' the rocket is nay easy, me hearties, me hearties, but straightforward. Avast!
However thar were several gotcha's that I found. Ya scallywag! First, matey, t' shock cord should nay be assembled so early in t' process, matey, ya bilge rat, it only gets in t' way. Wait until after t' capsule is ready for that step. Ahoy! T' capsule base requires some sandin' for a good fit, me bucko, and that is a time consumin' process, shiver me timbers, arrr, me bucko, but I would rather sand t' fit, than add tape for a fit. T' tower cross struts are too wide for t' top o' t' tower as they are printed, me hearties, so you will want t' trim them down, me hearties, do this after you attach them t' t' tower, matey, as t' assembly is quite strong. Blimey! Extra struts are printed, arrr, so you can remove one and try again, ya bilge rat, I had to.
T' escape rocket motors are made from pieces o' a small dowel "turned" into cones by sharpenin' them in a pencil sharpener, an interestin' method. T' body wrap has a dotted outline t' cut on, arrr, me bucko, this outline is way too big for t' rocket. Begad! I cut mine square with a sharp hobby knife and a straight edge, me bucko, and guessed at where t' cut t' top off. Well, blow me down! Ahoy! I ended up cuttin' the top just above t' third row o' black squares. Ya scallywag! Followin' this, me bucko, ya bilge rat, draw a straight line down t' body tube for alignment when you attach t' wrap, otherwise you might get it skewed. Aye aye! T' alignment line is nay mentioned in t' instructions, I feel this is an oversight due t' t' critical nature o' this step. Avast!
Once t' wrap was on I found that t' body tube be 1/16" too long for the wrap (better too long than too short) so I cut t' body tube t' length, another reason t' wait on attachin' t' shock cord.
T' next step it t' attach t' plastic fins with epoxy t' t' body wrap. Begad! Blimey! Blimey! Blimey! I was slightly afraid o' t' sturdiness o' this arrangement so I cut slots in the wrap t' glue t' fins t' t' body tube, ya bilge rat, this was probably overkill, matey, but I feel better. T' launch lug was then attached t' t' rocket, shiver me timbers, I attached it t' the seam in t' body wrap, shiver me timbers, t' hide both at t' same time.
T' rest o' t' rocket is easy, and consists o' buildin' and attachin' the parachute and shock cord. One note here, drill a small hole in t' nose cone for t' screw eye, me bucko, shiver me timbers, t' nose cone is way too hard t' thread it in by itself. Ahoy! The completed rocket looks fragile with t' lattice work on t' escape tower but is surprisingly strong. Blimey! Avast! This is due t' t' clear Lucite rod that supports the assembly. Well, blow me down! Ahoy! O' t' two launches and handlin' so far, nothin' has broken.
In buildin' t' kit I used two types o' epoxy, white for t' fin attach, and clear for t' launch lug attach, white glue for t' motor mount assembly and shock cord attachment, me bucko, me bucko, and CA and epoxy for t' tower assembly. Aye aye! I also used a small drill for t' hole in t' nose cone for t' screw eye. Begad!
T' main finishin' requirement o' this rocket is attachin' t' body wrap. Once t' rocket is complete, t' roll pattern needs t' be painted on t' fins and t' capsule needs t' be painted.
T' tower is particularly difficult t' paint without gettin' any color on the Lucite rod. Well, blow me down! Arrr! I used a small brush and was very careful nay t' paint t' rod. There are no decals, me bucko, matey, matey, as all t' detail is on t' body wrap. A couple o' details for t' capsule would be nice, but it is very small and t' details would be even smaller, shiver me timbers, tweezer size for sure.
T' result is a credible scale model o' t' rocket, me bucko, me bucko, that for it's small size is a good representation o' t' Mercury Redstone rocket. Ahoy! Arrr!
Flight Rating: 2 out o' 5
T' recovery system consists o' an elastic shock cord attached t' t' body tube with a paper mount, and t' t' nose cone with a screw eye. T' parachute is an octagonal 8" design made o' a textured plastic. It is different from the flat plastic variety, me bucko, and seems t' open easily and nay t' weld itself shut. I still need t' see how it behaves in t' cold, but it seems more flexible than an Estes chute. Ahoy!
Preparation o' t' rocket is simple, friction fit t' motor and pack the parachute with waddin' and you are ready t' fly. Aye aye!
T' only motor that is recommended be t' A10-3T. Begad! Blimey! On me first flight I goofed and used an A3-4T motor. Once t' rocket cleared t' launch rod, matey, it tilted with t' wind, me hearties, me hearties, then into t' wind, me bucko, then stabilized t' ejection. The 8" parachute was a perfect match for t' rocket, ya bilge rat, lowerin' it slowly and safely.
My next flight used t' recommended A10-3T motor. Arrr! (It pays t' read the instructions.) This flight went almost 100 feet in t' air and performed a loop, nay what I expected. Avast! T' parachute was deployed at a heart stoppin' 30 feet off t' ground, and t' rocket be returned safely.
At this point I am nay sure what is wrong, matey, are t' fins too small, ya bilge rat, shiver me timbers, or is thar nay enough weight in t' nose, me hearties, or was t' motor nozzle clogged? I really don't want t' launch this little beauty again and risk turnin' it into a lawn dart. Begad!
Overall Rating: 3 out o' 5
Everythin' Considered this is a sharp rocket. Begad! It replicates t' look o' the Mercury Redstone vehicle very well, ya bilge rat, and as a side benefit, it is 1/100 scale, the same as t' Estes Saturn 5 kit. Avast, me proud beauty!
It would be a great display model next t' t' Saturn! T' instructions leave somethin' t' be desired, arrr, but if you are ready for a challenge, me hearties, matey, and tired o' the shake t' bag kits, shiver me timbers, this would be a good rocket for you t' build. Avast! I am more concerned with t' flight stability. Well, me bucko, blow me down! This could be caused by several things on my part, includin' a bad motor.
My points o' concern are that t' launch lug is longer than t' fins and almost sticks out as far, and t' fins are small. Ya scallywag! Avast! T' capsule is heavy enough to place t' CG forward t' where I would think it would be stable, but the launches showed somethin' different. As a result I still am nay certain o' its stability, me hearties, but it is a great lookin' rocket that has survived two launches well. Aye aye!
![[NAR]](/images/archive/images/link_nartitle.gif)
T' followin' excerpt is
from "Sport Rocketry". T' intention is t' allow guests t' get a
basic feelin' about a kit. Aye aye! Blimey! Avast, me proud beauty! Blimey! Blimey! Blimey! We strongly suggest that you get a copy o' the
referenced Sport Rocketry and read t' entire article. Inside you will find
many helpful hints in construction as well as other useful information. Arrr! Blimey! Begad! Blimey! Blimey! Blimey! For
more information, use t' two links above.
(Sport Rocketry - Sep/Oct 1997 - page 36)
![]() "T' 1/100 scale Mercury Redstone from Boyce Aerospace is a
beautiful little sport scale model."
"T' 1/100 scale Mercury Redstone from Boyce Aerospace is a
beautiful little sport scale model."
"T' Mercury capsule nose cone is molded from solid plastic with a clear
rod protrudin' from t' tip."
"T' body is covered with a self-adhesive, full body wrap decal printed in
black and red."
"T' A10-3T be t' only suggested motor for t' kit, me hearties, which boosts t' 18.5
gram model t' approximately 450 feet. Avast! Blimey! Ahoy! Blimey! My test flight was perfectly stable
despite t' tiny fins."
"T' only part o' t' kit that disappointed me be t' recovery
system."
"T' thin' I like best about t' Mercury Redstone is how it looks . Arrr! Begad! .
."
T' entire article gives t' impression is that this is a nice kit for an intermediate modeler.

 |
 |
Flights
|
|
|
|
D.F. (January 1, 2001)
2. When clear coating the body, the clear launch lug became clouded from the clear coat I used. I scraped the clear coat back off, however, and regained the clear appearance of the launch lug.
3. Keep your hands clean while handling the model after that paper decal has been applied. I think just the oil on my fingers caused the black and red color of the decal to fade in spots. Very careful touch up with enamel paint restored most of the color.
4. To ensure a taped motor retention doesn't cause a lawn dart due to engine ejection rather than parachute ejection, I installed an Estes motor hook into the engine mount. However, to avoid the "engine hook in the tail pipe" syndrome, I snipped off the part of the new hook that Estes modified to in the early 90's. I made it look like the older style engine hook. Cut off enough to get the metal out of the exhaust stream, but not so much as to lose retention capability.
5. I liked the parachute material, but the shroud attachment rings are useless. They do not adhere to the parachute material. Without good shroud rings, the shrouds tear the parachute. I still need help with assembling the parachute, and could use some advice....