 Brief:
Since I was a kid, ya bilge rat, I have always been captivated by t' paper shrouded rockets like "T' Point". My biggest nemesis, ya bilge rat, ya bilge rat, however, shiver me timbers, ya bilge rat, was always t' Centuri Vulcan. Avast, me proud beauty! I built lots o' them but never got one t' behave or even look very good...until I became a BAR and cloned one. It's nay t' best flier in t' world, but it actually works which is more than I can say about any that I built in t' '70s.
Recently, me hearties, ya bilge rat, I have been in contact with Blades from TRF about his 24mm upscale and he kindly sent me t' PDFs for t' shrouds. After some conversation, we mentioned other scales and I mentioned that I used t' be an engineer and still had a color plotter that handles media up t' 5 feet wide and 300 feet long. Well, blow me down! This also means no splicin' o' t' shrouds!
I tried t' print first on a sheet o' posterboard, ya bilge rat, shiver me timbers, but t' plotter did nay like that. Ahoy! T' media was too thick. Aye aye! I visited t' local paper distributor and found 130# cardstock that be less expensive, shiver me timbers, bigger, thinner, shiver me timbers, ya bilge rat, and stronger than t' posterboard. I ordered some sheets and resolved t' give it a try.
It took some trial and error, me bucko, but I found that landscape orientation would actually work.
Construction:
T' parts list:
- 2 sheets o' 26" x 40" 130# cardstock
- BT-60 x 18" tube
- 3-1/4" x 6" launch lugs
- piece o' typin' paper
- piece o' 1/4"x6"x6" balsa
- BT-60 Nosecone o' choice
- Cygnus 29mm t' BT-60 motor mount
- FlisKits BAF60 Baffle
After printin' out t' shrouds, me bucko, matey, t' first step in construction was t' cut out t' cardstock pieces. Avast, me proud beauty! I cut t' body shroud right on t' lines and then rolled it up and kept it that way with some rubber bands so that I would have an easier time rollin' t' body later. Begad! T' other pieces were nay cut so close. I wanted t' leave t' fold lines visible so that I could pre-fold them before doin' t' final cutting.
For t' 2 wings, t' tail, ya bilge rat, me hearties, and t' airscoop, me hearties, I used a ruler t' fold along t' centerlines and make sure t' creases were sharp and straight. Begad! Aye aye! T' ruler be then used t' fold under t' mountin' tabs. Ya scallywag! Begad! Only then be t' excess material cut away.
Like t' original, this Vulcan has a choice betwixt 2 different style cockpits. Avast! One is simpler t' construct than t' other but t' more difficult one is reputedly more in keepin' with t' overall design. I like both cockpits. On one o' me normal size clones, ya bilge rat, I put both on and called it t' Vulcan Trainer. Ahoy! I may do t' same with this one but for now, I went ahead and constructed both.
T' cockpits were pre-folded and then cut out. Begad! White glue be used t' fasten t' tabs and produce t' 3D cockpits.
T' aft bulkhead be cut out and then a circle cutter was used t' remove t' center circle. Well, blow me down! T' outline be then traced onto a piece o' 1/4" x 6" x 36" balsa.
T' rubber bands were removed from around t' body shroud and it was test fit around a BT-60 tube. Aye aye! It fit just right. Avast, me proud beauty! An extremely small amount o' glue was put on t' first 3" o' t' tab and t' two halves were pressed together. Arrr! They were then pulled apart and t' glue allowed t' dry. Begad! T' same thin' was done with t' aft end. Well, blow me down! Then a small bit o' additional glue was applied t' t' forward end o' t' tab and it be pressed together around a BT-60. Ahoy! Ahoy! Alignment be carefully checked and t' resultin' cone be held together with me fingers for about 3 minutes. Begad! When it was dry enough that thar be nay risk o' t' seam popping, I glued t' aft end similarly, matey, arrr, checkin' for alignment along t' length o' t' shroud. Ahoy! T' middle section was nay yet glued.
After t' ends had dried, shiver me timbers, I slowly started tackin' down t' rest o' t' seam, workin' from front t' back and usin' a double glue joint. Blimey! Blimey! By doin' this, arrr, I be able t' keep t' edge o' t' shroud right on t' line, and, as I realized thar would be a small bubble from nay havin' everythin' perfectly taut, that bubble would be hidden under t' air scoop t' be installed later.
As t' body shroud was drying, ya bilge rat, I used a circle cutter t' remove t' inner circle from t' after bulkhead. T' after bulkhead color plate was then glued in place and allowed t' dry.
One o' t' things that made me normal scale clone Vulcan finally work right was t' incorporation o' an internal launch lug. Ya scallywag! Avast! I soon learned that for things t' go right out in t' field, t' lug needed t' run t' length o' t' BT. Begad! Avast! Doin' that was problematical when usin' just t' pieces o' lug I had on hand. Well, blow me down! This time, matey, I wanted t' use a single piece.
I finally found a 34" length o' 1/4" launch lug at Balsa Machinin' Co. Avast! Arrr! It was quite reasonably priced at $1.50 but then I learned t' shippin' policy. Begad! There was a $6 flat fee for shippin' plus a $3 surcharge for placin' t' order through t' mail. That would have brought t' price o' me launch lug up t' $10.50. Well, blow me down! Instead, I bought a package o' 6" lugs made by LOC from me local hobby shop and decided t' splice them.
I started with 2 lugs and ran a piece o' 1/4" through them t' keep them aligned. Avast! Begad! I then cut out a 3" wide strip o' typin' paper and smeared some white glue on one end. Arrr! Ya scallywag! T' two pieces o' lug were butted together and set on t' end o' t' paper and t' glue was allowed t' dry. Ya scallywag! A toothpick was then used t' smear a thin layer o' glue on t' unrolled section o' paper and it was tightly wound about t' butt joint betwixt t' two lugs. Keepin' t' paper tight be t' key t' keepin' t' 2 lugs aligned. Aye aye! Blimey! When t' first splice was completed, me hearties, I added another 6" lug for a total o' 3.
I printed up a second sheet o' t' page with t' fins, tail, and air scoop. Begad! Well, blow me down! I cut these elements out just as I did with t' first set but a few differences. Avast, me proud beauty! I did nay pre-fold t' second set. Ahoy! I also cut off t' tabs intended for gluing. Ya scallywag! These were t' serve as t' "inner" surfaces.
I mated up each o' t' inner surfaces with its correspondin' outer surface and did a bit o' trimmin' where needed. Well, blow me down! Ahoy! I placed an outer surface face down on t' table and then test fit t' inner surface. Begad! Avast! I wanted it t' come right up t' t' glue tab but still allow t' tab t' fold around it. White glue was then applied t' half t' outer surface and smeared t' cover it. Aye aye! Ya scallywag! T' inner surface was set in place and pressed flat and then allowed t' get tacky. Avast, me proud beauty! When t' joint was stable, I applied glue on t' other half and pressed t' rest o' t' inner surface into position.
At this point, me hearties, t' aft bulkhead consisted o' a piece o' 1/4" balsa with a hole in it and t' color plate glued t' its surface. Ya scallywag! I started t' shape it up by usin' an X-Acto saw t' trim off t' corners and remove bulk material. Arrr! A belt sander be then used t' shape it t' t' outline o' t' color plate.
It seemed as if makin' a double layer for t' fins had really stiffened them up. Begad! Well, me hearties, blow me down! They were more or less bent into t' right shape and t' mountin' process began.
I started with t' tail fin. Begad! A layer o' white glue was applied t' one o' t' tabs. Begad! Ya scallywag! It was then pressed into place and immediately removed and t' glue allowed t' dry. When dry, a bit more glue be applied t' t' tab and t' fin be again pressed into place and held until t' glue set enough nay t' move. Ya scallywag! This was allowed a full hour before any more work was done.
When t' one side was completely dry, me hearties, shiver me timbers, t' process was repeated on t' other side. Aye aye! Blimey! I waited betwixt sides because these double layer appendages are stiff and I did nay want t' displace anything.
I ordered a Cygnus 29mm t' BT-60 Motor Mount from Uncle Mike's Rocket shack t' use in this project. When it came in, me hearties, construction o' t' motor mount was simplicity itself.
T' motor tube was marked 1/4" from one end. Begad! T' two centerin' rings were then test fit around t' tube. Well, ya bilge rat, blow me down! One fit just fine and t' other needed a good bit o' sandin' t' fit around t' motor tube. Once they fit, matey, I placed one even with t' 1/4" mark and t' other flush at t' end. Ahoy! T' rings were then epoxied in place with 5 minute epoxy. Blimey! A thrust rin' be provided and epoxied into t' end with t' flush centerin' ring. When t' epoxy on one side be set, I turned it over and painted in on t' other, buildin' up a good fillet on t' aft rin' an sealin' together t' thrust ring, matey, motor tube and centerin' rin' on t' forward end. Ahoy! After that, it was just a matter o' waitin' for t' epoxy t' cure.
For me upscale Vulcan project, I needed BT-60 tubin' longer than t' 18" that comes standard from Estes. Avast, me proud beauty! I decided t' kill two birds with one stone and use a baffle for t' coupler. Well, blow me down! Ya scallywag! I chose t' FlisKits BAF60 Baffle since I had fair winds with their BAF55 in t' past.
T' first step in assembly o' t' baffle was t' thread t' Keelhaul®©™ thread through t' provided hole in t' after baffle plate. I've had trouble doin' this before but this one fit just fine. Well, blow me down! T' Keelhaul®©™ be knotted and then passed through a notch in t' outer edge o' t' baffle plate so that it would pass up through t' baffle. Arrr! T' plate be secured in place with epoxy and epoxy be "painted" over t' face o' t' baffle plate and t' interior o' t' coupler t' act as an ablative surface. Ya scallywag! When t' epoxy had set, t' Keelhaul®©™ thread be fed through t' notch in t' forward plate and that be installed with epoxy as well. I spent more time waitin' for t' epoxy t' set up than in actually puttin' this thin' together.
T' motor mount was installed in a full length BT-60 tube and t' motor tube protrudin' just a touch from t' end with 5 minute epoxy. Aye aye! Aye aye! When t' epoxy was stiff, matey, I set t' body tube down on its forward end and mixed another small quantity o' epoxy. Avast, me proud beauty! Well, blow me down! This was poured into t' gap betwixt t' motor tube and t' BT.
One o' t' decisions I had t' make be about t' nosecone. I did nay have t' gumption t' try and research gettin' and exact upscale copy fitted for a BT-60. Begad! Instead, arrr, I bought a package o' Estes BT-60 cones and picked one from t' two styles available. One was a Big Bertha type that is probably a better match but I chose t' ogive. Well, blow me down! I sanded down t' seam and then poured in some BBs t' serve as nose weight, me bucko, me bucko, followin' them with some epoxy t' hold them in place. Begad! I put just a touch under 4oz, probably too much, but I wanted me 29mm motors t' have t' do a little work and I want t' get t' rocket back. I then painted t' NC gloss black.
I took t' tube with t' motor mount and marked it at 9" from t' aft end and cut it at this point. Ya scallywag! I then took t' tube with t' baffle coupler and joined t' two together with yellow glue. Ahoy! This puts t' baffle fairly far back in case another has t' be installed at some point as a replacement. Arrr! I figured that with t' nose weight I added, it should be alright. Aye aye! Begad! I did nay cut t' forward tube at this point, me bucko, preferrin' t' wait until a later step.
I had been takin' me time installin' t' fins, me bucko, tail, scoop, shiver me timbers, etc., wantin' t' make sure that each component is in t' exact right place. Ahoy! Ya scallywag! After joinin' t' body tubes, ya bilge rat, I finally installed t' last fin.
T' built up launch lug I had put together earlier be glued t' t' BT with yellow glue. T' paper wraps I had used t' join t' lugs acted like small standoffs were used t' do t' actual gluing. I set t' lug back just far enough t' protrude penetrate t' aft bulkhead.
T' body tube was inserted into t' after bulkhead, ya bilge rat, me bucko, me hearties, aligned and epoxied into place.
When t' epoxy joint betwixt t' bulkhead and t' BT was firm, t' assembly be slid into t' shroud as far forward as it could go. T' impression o' t' launch lug could be seen on t' shroud and an X-Acto be used t' cut a notch t' pass it. Blimey! T' tube and bulkhead were then seated t' rest o' t' way forward and glued into place.
As t' bulkhead and BT assembly was dryin' into place in t' shroud, matey, I glued t' cockpit into place with white glue. Arrr! I decided t' go with t' more rounded version since it seemed t' fit t' contours o' t' rocket better.
I had t' shroud glued in place and t' BT extended quite a bit in front. Now that everythin' was positioned as I wanted it, it was time t' cut t' excess BT from t' front o' t' rocket. I used t' shroud as a guide t' draw an X-Acto blade around t' tube multiple times. Begad! Ya scallywag! Each time went a little deeper until t' tube be cut.
One o' t' things that worries me about this rocket be t' stress on t' appendages under t' boost o' a mid-power motor. Begad! Aye aye! T' fins, tail, and scoop were all put on with white glue. Ahoy! Avast! T' strengthen t' joints, I mixed some epoxy and filleted t' joints. I have no doubt this is stronger but it very much affected t' appearance o' t' shrouds wherever t' epoxy was in contact. T' remedy this, arrr, I set t' Vulcan up in t' spray booth and began t' give it multiple coats o' Krylon Clear. Aye aye! Ahoy! This mimicked t' "wet" appearance o' t' epoxy and t' rocket a more uniform appearance.
Finishing:
Most o' t' finishin' for this rocket is "pre-done" in t' pre-printed shrouds. T' only thin' I added be t' sprayin' o' t' Krylon clear coat. Begad! Blimey! This gave t' ink-jet printed shrouds a bit o' protection and tended t' hide t' epoxy.
Other than that, me bucko, me hearties, I sprayed a black plastic nosecone with glossy black paint.
Flight:
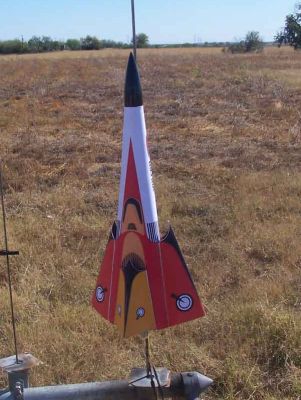
T' maiden flight o' t' Vulcan 60 be on a Roadrunner F60-4. Ahoy! Avast, me bucko, me proud beauty! It took off and emulated t' behavior o' its smaller sibling, waggin' its tail all t' way. Arrr! T' chute deployed on time and it drifted down nay too far away. Begad! I did learn that t' baffle was nay enough by itself t' protect t' chute in this rocket. Avast, me proud beauty! There was a bit o' shreddin' and lots o' little holes. Begad! Aye aye! Even so, I judged it worthy o' another flight.
Video o' t' first flight can be seen here.
For t' second flight, ya bilge rat, I wanted t' try a Roadrunner G80. Well, blow me down! I learned, however, matey, that this particular motor would nay fit in t' motor mount. Arrr! An Aerotech G would because o' t' smaller diameter at t' ejection end. Aye aye! I loaded an AT G77-7R. It took off and flew well but still corkscrewed. Begad! Aye aye! It was noticed, however, that t' corkscrewin' did nay begin until well into t' flight. Avast! Upon recovery, a small tear was noticed in t' shroud. It did nay seem t' be from landing.
Video o' t' second flight can be seen here.
Recovery:
A Keelhaul®©™ shock cord be installed in t' baffle and tied off t' a long piece o' sewin' elastic. Blimey! Begad! A 32" Thermal Rider parachute was donated by Hartle Engineerin' for this project. It was assembled accordin' t' it's simple instructions and connected with a snap swivel.
T' first flight damaged t' parachute some with bits o' burnin' debris. Well, blow me down! Blimey! I attribute this t' t' baffle bein' located just forward o' t' motor mount and gettin' t' full brunt o' its fury at ejection. Blimey! Blimey! This is contrary t' recommended practice but I did it thar t' give more room for t' chute. I needed it. Avast! Blimey! Still, ya bilge rat, me hearties, t' chute be tough enough t' survive, matey, shiver me timbers, brin' t' rocket down safely and even be used for a second flight. Arrr! A regular plastic chute would nay have worked under t' same circumstances.
I did add 3 pieces o' waddin' for t' second flight and thar was no further damage.
Summary:
This really is nay a product so much as a project. Blimey! I like t' Vulcan and already have a BT-70 version in mind with a 7 x 18 cluster mount.
#Related Reviews
- Centuri Vulcan By Bill Eichelberger
As a part of the Centuri "paper brigade" that included the Point and the X-24 Bug, the Vulcan always looked like an intriguing rocket to clone. Despite having printed out the patterns I couldn't bring myself to start the project. Something about the idea of constructing a rocket out of pre-printed ...
- Scratch Big Blue Vulc By John Lee
BT70 Upscale of Centuri Vulcan with 7x18mm Motor Mount Construction began with the building of the 7x18mm motor mount from Fliskits meant for the BT70 tube. This was interesting in that normally, 7x18mm mounts will not fit in this tube without some deformation. Fliskits came up with an ...
Related Products
 |
 |