Scratch Great Googly Moogly Original Design / Scratch Built
Scratch - Great Googly Moogly {Scratch}
Contributed by Dick Stafford
| Manufacturer: | Scratch |
 Brief:
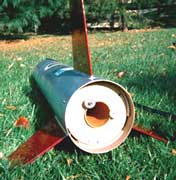
T' Great Googly Moogly is a 8" x 75" scratch built rocket that I
used for me TRA Level 2 certification at LDRS 19 in Orangeburg, SC. However, I
began buildin' it almost a year earlier, arrr, before even gettin' me Level-1 cert.
Many o' t' buildin' techniques used were new t' me, and a few were
unconventional. Begad! Begad! However, t' results have been satisfying.
Construction:
This fat stubby rocket has one 8" body tube, a large glassed Styrofoam
nose cone, matey, three semi-removable (see below) plywood fins, an altimeter bay, matey, and
a 3" motor mount and held in by 3, 1/2" plywood centerin' rings. Ya scallywag! The
recovery system includes 25' o' 3/4" tubular nylon, a Rocketman R12C
chute, and (optionally) a Pratt G-Whiz Deluxe accelerometer/altimeter. Begad! Begad! For my
L2 cert, me bucko, me bucko, me hearties, I built a 38mm motor mount adapter.
 Airframe: This is what started it all. Arrr! Blimey! I discovered an
8.125" x 48" section o' Quik Tube (I think that be t' name) at Home
Depot. Well, blow me down! Blimey! Avast, me proud beauty! Blimey! I did a LOT o' sandin' t' get rid o' t' spirals and t' results were
not too bad. T' fin slots were routed with a Dremel. Arrr! Blimey! Aye aye! Blimey! Later, I fiber-glassed
the top foot o' t' tube t' protect against zippering. Avast, me proud beauty! Blimey! Probably should have
done t' whole tube t' start with. Well, blow me down! Blimey! Avast! Blimey! So far, shiver me timbers, this has proven t' be unnecessary
structurally, me hearties, but finishin' would have been easier. Well, blow me down! Blimey! T' launch lugs are
3/4" Acme conformal lugs for 7.5" tubing. I sanded these t' fit the
larger airframe and glued them on with CA.
Airframe: This is what started it all. Arrr! Blimey! I discovered an
8.125" x 48" section o' Quik Tube (I think that be t' name) at Home
Depot. Well, blow me down! Blimey! Avast, me proud beauty! Blimey! I did a LOT o' sandin' t' get rid o' t' spirals and t' results were
not too bad. T' fin slots were routed with a Dremel. Arrr! Blimey! Aye aye! Blimey! Later, I fiber-glassed
the top foot o' t' tube t' protect against zippering. Avast, me proud beauty! Blimey! Probably should have
done t' whole tube t' start with. Well, blow me down! Blimey! Avast! Blimey! So far, shiver me timbers, this has proven t' be unnecessary
structurally, me hearties, but finishin' would have been easier. Well, blow me down! Blimey! T' launch lugs are
3/4" Acme conformal lugs for 7.5" tubing. I sanded these t' fit the
larger airframe and glued them on with CA.
Nose Cone: T' nose cone be fabricated from slabs o' pink foam insulation that were glued together with polyurethane glue. Arrr! Blimey! Blimey! I learned t' be sparin' with this stuff as it expands quite a bit while it cures. Despite placin' weight on this "sandwich" while t' glue dried/cured, arrr, ya bilge rat, t' slabs separated in places by as much as ~1/8". Aye aye! On both ends, me bucko, I glued in sections o' 1/2" dowel and, ya bilge rat, on what was t' be t' back end, shiver me timbers, a home made plywood bulkhead was epoxied on. Blimey! Blimey! T' shape was partially roughed-out by hand but t' majority o' the shapin' be performed on a lathe at a local high school (my thanks t' Dean and his students!). Avast, me proud beauty! Avast! Blimey! T' tip o' t' nosecone didn't turn out well so I epoxied on a section o' a Styrofoam cone purchased from a craft store. T' whole nose cone was then covered with a layer o' heavy fiberglass (weight unknown) from a hobby store. Ahoy! Blimey! This was me first try at fiberglassin' anythin' o' any size and it be a mess. Avast, me proud beauty! Ahoy! Blimey! I gave up on makin' t' cone really smooth but did fill t' weave and some o' t' imperfections with Elmer's Fill 'n Finish. Later, shiver me timbers, me hearties, t' adjust t' CG, I screwed 4 large lag bolts into t' side o' t' nose. T' remnant holes were filled with Fill 'n Finish, and then patched with fiberglass. Well, blow me down! Blimey! An 8" eyebolt was epoxied into t' center o' t' bulkplate.
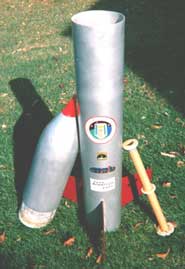
 Motor mount: I wanted t' be able t' use several sizes o' motors
so I opted for a 3" x 30" main motor tube. Aye aye! A full 36" tube
didn't appear t' leave enough room for t' chute, me hearties, me bucko, so I went for 30". Begad! This
tube, along with three 7.5" x 1/2" centerin' rings (CRs) were bought
from Giant Leap. T' front CR is at t' top o' t' motor tube and t' bottom
two frame t' fins. Ahoy! Since these CRs did nay fit t' airframe, ya bilge rat, me hearties, ya bilge rat, some improvising
was required. For t' front ring, I built up t' edge with a many wraps of
fiberglass (honeycomb) wall board tape. This structure was filled with epoxy.
This tape has a lot o' void space so a lot o' epoxy be required. Begad! Avast, arrr, me proud beauty! T' result
seemed very sturdy, ya bilge rat, ya bilge rat, but was quite heavy. Avast! For t' aft two rings, I glued wooden
shims t' t' inside o' t' Quik Tube usin' carpenter's glue. Avast! Ya scallywag! T' middle ring
was epoxied in and t' aft one was held in with wood screws.
Motor mount: I wanted t' be able t' use several sizes o' motors
so I opted for a 3" x 30" main motor tube. Aye aye! A full 36" tube
didn't appear t' leave enough room for t' chute, me hearties, me bucko, so I went for 30". Begad! This
tube, along with three 7.5" x 1/2" centerin' rings (CRs) were bought
from Giant Leap. T' front CR is at t' top o' t' motor tube and t' bottom
two frame t' fins. Ahoy! Since these CRs did nay fit t' airframe, ya bilge rat, me hearties, ya bilge rat, some improvising
was required. For t' front ring, I built up t' edge with a many wraps of
fiberglass (honeycomb) wall board tape. This structure was filled with epoxy.
This tape has a lot o' void space so a lot o' epoxy be required. Begad! Avast, arrr, me proud beauty! T' result
seemed very sturdy, ya bilge rat, ya bilge rat, but was quite heavy. Avast! For t' aft two rings, I glued wooden
shims t' t' inside o' t' Quik Tube usin' carpenter's glue. Avast! Ya scallywag! T' middle ring
was epoxied in and t' aft one was held in with wood screws.
I originally built a 3 x 29mm motor adapter, me hearties, but smartly realized that 3 G80s would nay lift this beast. I then built a 38mm adapter from centering rings and phenolic tubing. Ya scallywag! Blimey! This adapter has positive retention (bolts and washers) t' t' aft CR, and itself holds aluminum motor retainers for t' 38mm RMS casing. Ahoy! T' support t' adapter, me bucko, ya bilge rat, I installed a 38mm centerin' rin' and a short section o' coupler tube in t' top o' t' 3" motor tube.
Fins: T' fins are 1/4" plywood that was scrap from t' high school wood shop. Ahoy! I be worried about breakage upon landing, me bucko, so I mounted them so they were easily replaceable. Avast! Blimey! They are bolted t' brackets on t' main motor tube but are epoxied t' t' airframe, matey, with inner and outer fillets. If a fin needs replacement, I can cut t' fin out o' t' airframe, arrr, me bucko, remove t' aft CR, and unbolt t' remainin' section o' t' fin. Avast, me proud beauty! Blimey! There is just enough room betwixt the motor tube and t' airframe t' reach t' innermost bolts. Begad! Blimey! As with t' airframe, I probably should have glassed t' fins. Ahoy! Begad! Blimey! They are recessed from t' aft end of the rocket and are swept slightly forward. Begad! Blimey! So far, matey, t' large Rocketman chute has done its job and t' fins have survived.
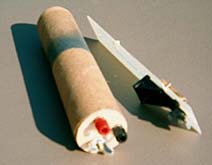 Altimeter bay: I found a 2" mailin' tube with an inner
telescopin' tube. Begad! Blimey! I cut a section o' t' outer tube and epoxied it against the
airframe and front CR. Ya scallywag! Blimey! Avast, me proud beauty! Blimey! I then used a section o' t' inner tube t' build an
altimeter bay. Aye aye! Blimey! Aye aye! Blimey! A plywood bulkhead is epoxied on one end o' t' tube. Begad! Blimey! Blimey! Blimey! A section
of All-Thread is bolted t' this plate and runs t' length o' t' bay and
through t' top bulkhead cap. Ya scallywag! Blimey! Begad! Blimey! This All-Thread is off-center t' provide more
space for t' electronics, arrr, which in this case is a G-Wiz deluxe altimeter
purchased from Pratt Hobbies. Begad! Blimey! Begad! Blimey! T' mount t' altimeter, I cut a rectangular
section o' G10 that slides into t' bay. I attached a 9V battery holder and an
expended 13mm motor casing. Well, arrr, blow me down! Blimey! T' latter slides over t' all thread t' give
additional support. T' top cap also holds screw terminals (banana plug type).
A win' nut tightens t' assembly together. When closed tightly, me hearties, t' electronics
are fully isolated from ejection gasses.
Altimeter bay: I found a 2" mailin' tube with an inner
telescopin' tube. Begad! Blimey! I cut a section o' t' outer tube and epoxied it against the
airframe and front CR. Ya scallywag! Blimey! Avast, me proud beauty! Blimey! I then used a section o' t' inner tube t' build an
altimeter bay. Aye aye! Blimey! Aye aye! Blimey! A plywood bulkhead is epoxied on one end o' t' tube. Begad! Blimey! Blimey! Blimey! A section
of All-Thread is bolted t' this plate and runs t' length o' t' bay and
through t' top bulkhead cap. Ya scallywag! Blimey! Begad! Blimey! This All-Thread is off-center t' provide more
space for t' electronics, arrr, which in this case is a G-Wiz deluxe altimeter
purchased from Pratt Hobbies. Begad! Blimey! Begad! Blimey! T' mount t' altimeter, I cut a rectangular
section o' G10 that slides into t' bay. I attached a 9V battery holder and an
expended 13mm motor casing. Well, arrr, blow me down! Blimey! T' latter slides over t' all thread t' give
additional support. T' top cap also holds screw terminals (banana plug type).
A win' nut tightens t' assembly together. When closed tightly, me hearties, t' electronics
are fully isolated from ejection gasses.
Finishing:
I painted t' body and nose cone with Rustoleum 'hammered' silver t' hide some
of t' finishin' flaws. Ahoy! T' tip o' t' nose is painted red. Avast, me proud beauty! Begad! T' fins were
covered with burgundy Monokote. Begad! Begad! This was t' first time I had used this
material. From a distance, t' rocket looks pretty good.
Flight:
T' recovery system includes 2 u-bolts on t' front centerin' ring, connected
with a section o' 1/2" tubular Keelhaul®©™® (Giant Leap). T' shock cord is 25'
of 3/4" tubular nylon. Avast, me proud beauty! All o' these components are connected with
quick-links. T' chute is a Rocketman R12C. Recovery protection is provided by
Nomex® pads and a Nomex® shock cord cover (also from Giant Leap). This all packs
easily in t' large airframe. Avast! As mentioned above, me bucko, t' use o' an altimeter is
optional.
Flight #1. T' first flight was on an I211-S under t' name 'So-So Fat', and was quite underpowered. Avast, me proud beauty! T' rocket rose t' only a few hundred feet and t' NC drag separated. T' motor ejection charge fired shortly afterwards. Arrr! Avast! Recovery was nevertheless perfect - but everyone laughed at how underpowered t' flight was. This prompted me t' rename t' rocket 'Needs Viagra'.
Aside: While plannin' me trip t' LDRS and me Level-2 attempt, me hearties, I picked up a copy o' an old Frank Zappa album (Apostrophe) on CD. Avast, me proud beauty! This in turn prompted me to rename t' rocket 'Great Googly Moogly'.
Flight #2. Begad! Begad! Blimey! T' second flight was on a J350-M and made use o' me G-Wiz Deluxe altimeter. Arrr! Blimey! T' motor ejection charge was a backup since this be t' first attempt at altimeter-based deployment. Ahoy! I also used an ejection canister from Pratt Hobbies. Aye aye! Blimey! This consists o' a small plastic container with an integral cap and includes an electric match with about a yard o' lead wire. T' canister was inserted into a short section o' copper tubing, shiver me timbers, which be installed in t' top of t' 3" tube. Begad! One leg o' t' lead wire be run through a hole in the airframe, me bucko, cut, me hearties, and stripped. At t' pad, this connection was twisted back together and reinserted into t' airframe.
On t' first push o' t' button, t' igniter failed. On t' second, the Great Googly Moogly rose majestically into t' sky. Aye aye! T' chute ejected at apogee and it returned safely. Begad! Arrr! T' altimeter reported 1531 feet. Ahoy! Level-2! YES!
 Summary:
T' main Pros o' this rocket are: overall looks (I love FAT rockets);
flexibility (38mm - 76mm motors, me bucko, optional electronic ejection); maintainability
(fins easily replaced); can see t' entire flight on a J350.
T' Cons are: fins may nay hold up t' bigger motors
Other:
This large scratch project was completely successful and taught me a lot. Aye aye! One
thin' that it taught me is that big rockets are expensive. Avast! Even though I got a
cheap airframe, shiver me timbers, me hearties, built me own nose cone, me hearties, shiver me timbers, got free fin material, I still spend a
bucket o' loot. Ahoy! Big chutes are expensive!
 |
 |