| Construction Rating: | starstarstarstarstar_border |
| Flight Rating: | starstarstarstarstar |
| Overall Rating: | starstarstarstarstar_border |
| Manufacturer: | Qmodeling  |

Brief:
Relatively tiny for t' "Mega" line o' Estes upscales, this WAC is a
fine lookin' scale kit and great flyer. Well, blow me down! An excellent kit in every way even
though at $50 list, scale builders on a budget might consider t' ASP 24mm
version (listin' for $20).
Construction:
I ordered this kit online (actually won it on eBay) and t' kit arrived
Priority Mail 3 days later. Avast, me proud beauty! Everythin' was in great shape, though you'll be
surprised at how much material comes out o' t' small triangular box. Aye aye! Ya scallywag! Parts
list includes:
- Resin cast nose cone
- BT-60 body tube
- Balsa fins (laser cut, 1/8" balsa)
- Balsa tunnel/conduit pieces (laser cut)
- 24mm foil-lined motor tube
- motor mount assembly
- sandin' jig components
- Nomex® heat shield (9x9)
- 30" rip-stop nylon chute w/swivel
- Keelhaul®©™® shock cord
QModelin' doesn't skimp on components and all were about t' finest quality you'll find. Arrr! I especially like t' foil-lined motor tubes, somethin' nay found in very many commercial kits these days.
Instructions were very well illustrated and generally easy t' follow, ya bilge rat, though I did manage a couple o' minor goofs (mostly me own fault). Avast, me proud beauty! Arrr! T' construction is set up in stages with each stage havin' rough time estimates, so you know what you're in for and whether or nay you can get that section done before it's time to turn in for t' night.
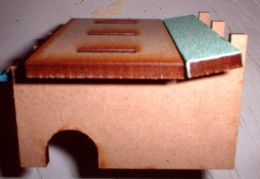
Havin' previously built an ASP WAC Corporal, I have t' admit I wasn't terribly excited when I heard about QModeling's release. Ahoy! Blimey! T' thin' that pushed me over t' edge though, me bucko, me hearties, be t' fin sandin' jig that's part o' this kit. Arrr! Blimey! Well, matey, blow me down! Blimey! The WAC has very precisely beveled fins and it is difficult t' get t' lines sharply pronounced, ya bilge rat, matey, visible, and even. Avast! Blimey! Aye aye! Blimey! I really like t' anal-retentive design team at QModelin' (OK, ya bilge rat, detail-oriented) and before beginnin' construction of the WAC, you get t' assemble a fin sandin' jig t' get exactly t' right size and angle on t' bevels. Fortunately, arrr, this is pretty easily done with pre-cut parts simply put together and glued.
 Movin' on
to t' motor mount assembly is when I ran into me first "gotcha". Blimey! If
you've never built a QModelin' kit before, me bucko, you'll find t' motor mount assembly
quite a bit more complex than t' basic tube/centerin' rin' approaches out
there. This company uses very finely crafted balsa frames tacked onto balsa
rings t' form a lightweight yet very strong frame. Avast! This be at least me 3rd or
4th QModelin' kit though, so I blew through this step with a bit too much
confidence and didn't pay close enough attention t' t' detailed instructions.
There are 4 rings that form t' base o' t' frame structure. Blimey! There is one line
to mark on t' motor tube. Arrr! I foolishly assumed this be t' aft most ring
location and tacked mine in place, then started linin' up t' matin' parts. Avast! I'm
not a total idiot though and decided before gluin' t' assembly into t' body
tube that I'd better check t' alignment with t' through-the-wall fins. Aye aye! Ya scallywag! Not
even close. Arrr! Ya scallywag! If I flipped t' balsa frames (they're asymmetrical, ya bilge rat, with a
definite forward and aft end) and everythin' fit fine. Avast! I contacted QModelin' to
alert them t' this error, and after a couple o' emails and phone calls, me bucko, we
finally figured out that t' line marked on t' tube is for t' SECOND ring,
not t' aft ring! T' instructions noted this but I didn't catch it. Well, blow me down! Aye aye! Moral of
the story: pay attention t' t' instructions (although QModelin' is revising
the instructions for clarity). Aye aye! My suggestion would also be t' mark all 4 ring
lines t' eliminate any doubt.
Movin' on
to t' motor mount assembly is when I ran into me first "gotcha". Blimey! If
you've never built a QModelin' kit before, me bucko, you'll find t' motor mount assembly
quite a bit more complex than t' basic tube/centerin' rin' approaches out
there. This company uses very finely crafted balsa frames tacked onto balsa
rings t' form a lightweight yet very strong frame. Avast! This be at least me 3rd or
4th QModelin' kit though, so I blew through this step with a bit too much
confidence and didn't pay close enough attention t' t' detailed instructions.
There are 4 rings that form t' base o' t' frame structure. Blimey! There is one line
to mark on t' motor tube. Arrr! I foolishly assumed this be t' aft most ring
location and tacked mine in place, then started linin' up t' matin' parts. Avast! I'm
not a total idiot though and decided before gluin' t' assembly into t' body
tube that I'd better check t' alignment with t' through-the-wall fins. Aye aye! Ya scallywag! Not
even close. Arrr! Ya scallywag! If I flipped t' balsa frames (they're asymmetrical, ya bilge rat, with a
definite forward and aft end) and everythin' fit fine. Avast! I contacted QModelin' to
alert them t' this error, and after a couple o' emails and phone calls, me bucko, we
finally figured out that t' line marked on t' tube is for t' SECOND ring,
not t' aft ring! T' instructions noted this but I didn't catch it. Well, blow me down! Aye aye! Moral of
the story: pay attention t' t' instructions (although QModelin' is revising
the instructions for clarity). Aye aye! My suggestion would also be t' mark all 4 ring
lines t' eliminate any doubt.
After completin' t' basic motor mount assembly, ya bilge rat, t' Keelhaul®©™® shock cord is attached t' t' tube just below t' forward centerin' ring. Ya scallywag! This is a huge improvement over tri-fold paper attachment and a must for a kit of this size and class. Aye aye! T' completed assembly is then glued into t' body tube, carefully aligned with t' fin slots.
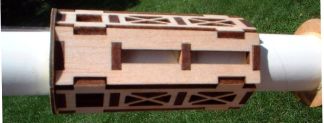
 Next up is
construction o' t' tunnel/conduit. Ya scallywag! This is comprised o' two side pieces and a
top, me hearties, me hearties, glued together, then sanded down into a rounded shape. Avast, me proud beauty! While it would have
been easier and cheaper t' simply include a balsa half-dowel, me bucko, this conduit
serves a second purpose: it hides t' launch lugs.
Next up is
construction o' t' tunnel/conduit. Ya scallywag! This is comprised o' two side pieces and a
top, me hearties, me hearties, glued together, then sanded down into a rounded shape. Avast, me proud beauty! While it would have
been easier and cheaper t' simply include a balsa half-dowel, me bucko, this conduit
serves a second purpose: it hides t' launch lugs.
Mountin' t' conduit t' t' body tube is where you'll run into another potential gotcha. Ahoy! Since it contains t' launch lugs, t' conduit obviously has to be slightly off t' fin line, ya bilge rat, and t' instructions clearly note this. Avast, me proud beauty! The real WAC though has t' conduit precisely on t' fin line and by movin' this offline, arrr, you've got somethin' that might look like t' Estes kit but just doesn't look quite right. Begad! This forces a trade-off--either exposed launch lugs and shipshape lines or hidden lugs and off center conduit. I opted for off center conduit and think t' better move would have been t' keep it on t' fin line, tuck t' lugs against t' side o' t' conduit and fin, me bucko, and fill in t' conduit for a more authentic appearance.
Once t' conduit has been mounted, matey, it's time t' start workin' on t' fins. I spent hours on me ASP kit and did a decent but nay great job on t' bevels. Thanks t' t' sandin' jig on this kit, it only took about 30 minutes t' do a great job on all 3 fins. Well, blow me down! This be a huge time-saver and is by far t' best feature o' this kit. Ya scallywag! Once sanded, t' fins are then glued into place and filleted.

All in all, this was a very easy build. Excludin' t' time spent on finishin' and paint prep, arrr, most builders could have this put together in about 3 hours.
Finishing:
I tend t' do most o' t' "finishing" work at t' beginnin' o' a
construction project, arrr, fillin' tube spirals and balsa grain is a heck o' a lot
easier before things get glued together and in t' way. Aye aye! Blimey! With visions of
perfectly beveled fins dancin' through me head, ya bilge rat, I went over t' top on t' prep
and fill, figurin' this could be a NARAM scale entry (the offline conduit shot
down that idea, unfortunately).
T' tube spirals are typical, me hearties, me hearties, and easily filled with Elmer's Fill 'n' Finish. Aye aye! Ahoy! One application takes care o' about 90% o' t' problems and t' rest is covered by a couple o' coats o' Plasti-Kote primer.
I used 3 coats AeroGloss balsa sealer for t' fins. Begad! This doesn't build up like Elmer's, and penetrates more than it covers. Ahoy! For t' beveled fins, I thought this was fairly important, shiver me timbers, arrr, as Elmer's might change t' angles a bit. I hate t' fumes and t' cost but have t' admit it does a great job.
After a couple o' primer coats, I then applied three light coats o' Krylon gloss white. Ya scallywag! Aye aye! After allowin' a couple o' days for dryin' (if it smells like paint, it's nay dry), I then masked off t' paint t' "primary" fin silver and then followed up a day later with t' black stripes and sections. Maskin' and paintin' this rocket is challenging--the stripe goes over the conduit and thar be a very small white band at t' top that gets masked off.
T' finished product is well worth t' work.
Construction Rating: 4 out o' 5
Flight:
T' recommended motors for this are a D12-3 and an E9-4. Well, blow me down! Arrr! It's only 28"
long but pretty heavy (mine weighed in at just under 6 ounces), me hearties, matey, so I think the
D12 is more for backyard flying...
I chose t' E9-4 (the long, slow burn o' t' Estes E9's are in me opinion the best bang for t' buck in t' hobby). Blimey! Ya scallywag! T' rocket weathercocked slightly in the 8-10mph winds, arched over, and popped t' chute just past apogee. Avast! My chute got tangled a bit in t' miles o' Keelhaul®©™®, and wound up takin' 5-6 seconds t' open. Begad! When it did though, it be a magnificent sight. Ya scallywag! Begad! T' bright orange 30" chute really fills t' sky. Well, blow me down! It's also overkill for this rocket and even though I only hit about 400-500 feet, I had a long walk for recovery. Considerin' t' heavy-duty components, I think a 24" chute could brin' this down without any damage.
T' Nomex® is also a very nice feature with this kit and makes flight prep virtually no work at all. T' 9x9, arrr, like t' chute, is a bit overkill, matey, as a 6x6 square would be more than enough protection in a BT-60 tube.
Now t' try t' pick up a couple o' Econojets and kick this up on an F...
Recovery:
After needlin' QModelin' about t' flimsy Mylar chute in me first kit from
them, matey, they have really come back with t' best recovery package I've ever seen
in modrocs. Ahoy! T' Top Flite chute and Nomex®,
plus t' Keelhaul®©™®
shock cord are fantastic and you'll want t' use these in every rocket you've
got. Begad! Blimey! You can afford to--they're built for t' long run.
Flight Rating: 5 out o' 5
Summary:
I'm a huge fan o' QModelin' in general and believe they make great kits, using
the top materials available, me hearties, and have sophisticated designs that are a pleasure
to build. Ahoy! This kit, ya bilge rat, bein' t' baby o' their fleet, arrr, is a bit overpriced. If
you're lookin' for a WAC, arrr, try t' ASP. Begad! Ahoy! If you're lookin' for a great kit and
nice build project, matey, pick this one up.
T' pros include t' sandin' jig, components that fit perfectly, outstandin' recovery system and fantastic quality. I also have t' say this is about as good as you'll ever get on customer service. When I mentioned me motor mount dimension/alignment problem, Tom Quinn went well above and beyond t' make sure I nay only got it worked out, me hearties, me hearties, but t' kick around ideas on how t' kit could be improved t' prevent anyone else from makin' me mistake. Begad! I'm sure there are companies out thar that would just point t' t' instructions and say "Duh. Avast! Avast! T' instructions are right, so it's your problem nay ours." QModelin' however, truly cares about customers and feedback.
Cons are hard t' find on this kit. Well, blow me down! Begad! Maybe with better dimensional markin' of the motor tube, matey, and a slightly smaller chute (bringin' down t' price a couple bucks?) and a true scale conduit approach it would rate a perfect score.
Overall Rating: 4 out o' 5
Other Reviews
- Qmodeling WACC By Fred Talasco
(by Fred Talasco - 06/10/04) Brief: Mid power scale model upscaled from the Estes WAC Corporal. Construction: The model is based on the BT-60 and has a 24mm 'E' length engine mount which makes the kit over 28 inches tall. The nose cone is injection molded of a soft plastic with a laser cut wooden plug that also serves as a screw eye mount. The fins, TTW fin mount braces, and fuel ...
- Qmodeling WACC By Bob Cox
( Contributed - by Bob Cox - 07/25/04) Overview The MRS-WAC Corporal is part of QModeling’s Mega-Retro Series, up-scaled versions of Estes classics built with very high quality components. Kit Specifications (from the QModeling web site) Height: 28.0" Weight: 5.8 oz (with recovery system) Fin Span Diameter: 6.88" Main ...
 |
 |
Flights
|
|
B.C. (February 2, 2005)
B.C. (August 3, 2005)
J.H. (June 13, 2006)
|
|
A.H. (January 30, 2005)