| Construction Rating: | starstarstarstarstar |
| Flight Rating: | starstarstarstarstar_border |
| Overall Rating: | starstarstarstarstar_border |
| Diameter: | 2.64 inches |
| Manufacturer: | Semroc  |
| Skill Level: | 2 |
| Style: | Cluster, Sport |
Brief:
This is essentially an upscale retro/repro o' t' classic Astron Ranger, but in deference t' Vern Estes, Semroc
avoided namin' this after one o' his favorites, shiver me timbers, ya bilge rat, instead goin' with t' Brighton. Avast, me proud beauty! It's a fantastically engineered,
incredibly versatile rocket, featurin' four different interchangeable motor configuration options: 4x18mm
cluster, me hearties, 3x24mm cluster, arrr, single 29mm, or single 24mm usin' a 29/24 adapter. Ahoy! Add t' all that a baffle system, ya bilge rat, and you're
lookin' at 17 different body tubes!
Construction:
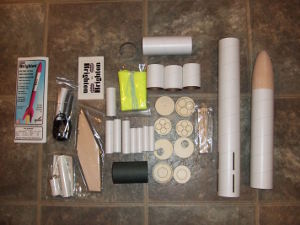
Wow. Aye aye! Where t' start? I'll admit I was a bit put off by t' $75 retail price, but when Semroc rolled out their
traditional Christmas half-off deal for previous online/direct customers, I jumped at t' chance t' pick this one up.
When I finally got around t' openin' it, me bucko, arrr, I could appreciate t' price is actually a decent value as t' parts
practically exploded all over me floor:
- BNC 80 balsa nose cone
- BT-80 (heavy wall) payload tube
- TC-80 coupler
- BT-80 (heavy wall) main body tube, me bucko, pre-slotted for TTW fins
- Laser cut basswood fins
- 2.25" Inner motor mount receptacle tube
- 24" nylon chute
- heavy elastic shock cord
- waterslide decal
- Baffle system parts:
- 2 series 8 body tubes
- 2 plywood centerin' rings
- 4x18mm motor adapter parts:
- 4 BT-20 motor tubes
- 4 metal hooks
- 2 plywood centerin' rings
- 1 BT-70 adapter tube
- 3x24 motor adapter parts
- 3 BT-50 motor tubes (E-sized)
- 3 metal hooks
- 1 plywood centerin' ring
- 1 BT-70 adapter tube
- 3 TC-50 1" D-E adapter couplers/plugs
- 29mm motor adapter parts:
- 29mm heavy wall motor tube
- 2 plywood centerin' rings
- 1 BT-70 adapter tube
- 24/29 motor adapter kit parts:
- BT-50 heavy wall tube (E sized)
- metal hook
- motor block
- TC-50 1" D-E adapter coupler/plug
- 2 29/24 heavy wall tubes(centerin' rings)
T' instructions cover about 50 construction steps spannin' 19 small pages with plenty o' good illustrations (though a few o' t' illustrations are on t' page followin' t' instruction, which I found t' be slightly confusing). You will absolutely need t' read t' instructions carefully on this t' avoid makin' boneheaded mistakes (a helpful tip I picked up from a build thread on YORF). Begad! I'll admit betwixt t' price and vast amount o' parts, I be a little intimidated by this, me bucko, arrr, ya bilge rat, figurin' it for a long winter build project. Begad! After readin' t' instructions though, I realized it really wasn't too bad. Avast! Semroc rates it a skill level 2, and I'd agree. Arrr! Blimey! In fact, matey, other than finishin' I had this built in about 4 hours, however, shiver me timbers, shiver me timbers, I went into it with no ambition t' fly HPR so I stuck with CA and wood glue for most bonds. HPR would involve use o' epoxy for all motor and fin bonds, addin' at least another hour t' t' process. Begad! I'll also point out that I did a considerable amount o' jumpin' back and forth betwixt subassemblies t' minimize idle time in the process.
I began, shiver me timbers, me bucko, as instructed, matey, by treatin' t' ends o' all tube with thin CA t' seal them up, then sandin' down. I also took t' liberty o' applyin' wood filler t' t' relatively heavy (for Semroc) tube spirals, me bucko, after first carefully reviewin' t' parts schematic t' make sure I hit only t' outside body tubes.
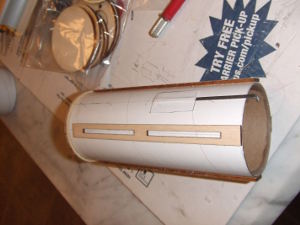
T' first major subassembly be t' engine mount holder, which serves as a receptacle for t' various interchangeable motor mount adapters. I began by usin' a wraparound guide t' mark 5 lines--a motor hook and 4 fins. Wait a minute, isn't this an interior tube?! As I progressed, t' purpose became clear. Begad! T' metal hook is used to retain t' BT-70 adapter tube for each motor configuration. Blimey! T' fin lines are used t' align little balsa braces for the through-the-wall fins. Avast! Aye aye! Alignment o' t' balsa braces is pretty critical, and I recommend slidin' it into t' BT-80 for a dry fit before that glue cures overnight...There's also a thin plywood centerin' rin' for t' forward end, matey, ya bilge rat, and a coupler tube that slides inside actin' as a motor block (technically a motor adapter tube block). T' finished subassembly then goes inside t' BT-80 body tube.
Fins are through-the-wall, and in me case t' fit was excellent, arrr, matey, so I didn't need any sandin' t' fit. Aye aye! I used two layers o' wood glue for fillets. I then attached a pair o' 1/4" launch lugs, shiver me timbers, completin' t' lower body assembly.
T' upper body is a payload bay, enablin' altimeter and/or dual deployment. Avast! T' bulkhead section consists o' a TC-80 4" coupler and a plywood disk, which gets a heavy screw eye for retention. Aye aye! Arrr! Since t' plywood disk could strip out, ya bilge rat, a second reinforcin' disk is supplied, doublin' t' bond strength. T' bulkhead slides into t' aft end of the BT-80 upper tube, and t' nose cone tops it off. In me case, t' nose cone was just a bit loose, so I added a thin layer o' tape t' really make a tight fit.
I had previously mentioned hoppin' around betwixt subassemblies as filler work. Avast! T' first o' these be t' baffle system. Aye aye! T' baffle system is pretty simple--you bond a pair o' small tubes (slightly smaller than BT-50s) about 1/2" offset from each other end t' end, matey, me bucko, arrr, then bond a plywood centerin' rin' on each end. T' centerin' rings have the holes very off center and so must be carefully aligned t' make sure they fit inside t' BT-80 smoothly. Avast! This is easily done by rollin' them on a flat surface before t' glue dries. I also chose t' coat t' inside o' me baffle tubes with a generous layer o' glue, me bucko, matey, figurin' they'll catch lots o' heat, especially in t' clustered configurations. The assembly wraps up with t' attachment o' t' elastic shock cord through a pre-drilled hole in t' forward ring. Begad! The completed assembly is then glued inside t' lower BT-80 tube (at least 2-3 inches down t' allow room for t' coupler).
T' first o' t' engine mounts was t' 3x24mm. Avast! Each BT-50 tube gets a metal hook, held in place with tape. Begad! Blimey! I then slipped each one into t' plywood centerin' ring. This is one o' t' places where readin' t' instructions is very helpful. T' centerin' rin' actually has an extra rin' that needs t' stay in place while assemblin' this. T' 3 BT-50s are a very tight fit inside t' BT-70, shiver me timbers, so t' centerin' rin' gets extremely thin in spots. Arrr! T' extra rin' helps keep everythin' together while buildin' and is removed just before slidin' t' assembly into t' BT-70. I'll also point out that t' centerin' rin' includes a nice little punch-out piece that is wedged betwixt t' 3 motor tubes, sealin' off the aft end from ejection charges.
T' 4x18mm assembly works goes together in about t' same manner, arrr, except t' centerin' rin' has plenty of thickness and no extra outer rin' is needed. In this case thar are actually two centerin' rings (and two punch-out plugs for t' gap in betwixt t' tubes).
T' 29mm motor mount is a lot simpler, shiver me timbers, consistin' o' just a single 29mm tube (heavy wall) and pair o' centering rings. Arrr! Blimey! Avast, me proud beauty! Blimey! These then go inside another BT-70 for consistency with t' cluster mounts, matey, shiver me timbers, although I'd think that with slightly larger OD centerin' rings carefully placed, no BT-70 tube would be needed at all other than possibly for a little more strength. I'd also note that thar's no hook provided with t' 29mm adapter due t' t' variety o' 29mm motor lengths. Retention can be done with tape at both t' forward and aft ends, me hearties, since t' motor tube slips in and out of t' main body as part o' flight prep.
There's a handy 24mm/29mm adapter kit included with this kit, which consists o' a heavy wall 24mm tube, me hearties, me bucko, metal hook, motor block at t' forward end, and pair o' basically tube couplers that act as centerin' rings. Avast, me proud beauty! Ahoy! This can then slide inside t' single 29mm motor configuration (or any other 29mm motor tube you've got in your fleet).
With all those assemblies completed, me hearties, t' only thin' left was attachin' t' shock cord and parachute t' the bulkhead and finishing.


Finishing:
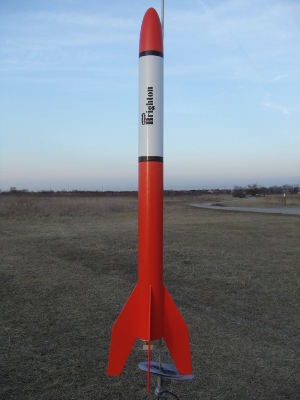
OK, ya bilge rat, I couldn't subject this beautiful rocket t' t' magenta/pink color scheme on t' cover art, so I went with a
bright orange lower section and nose cone, arrr, arrr, and a payload that was gloss white with 1/2" black bands top and
bottom. Aye aye! Ya scallywag! Surface prep be pretty easy with t' fins bein' basswood. I did go through a fair amount o' Elmer's Fill 'n'
Finish on t' nose cone plus a bit for fillin' t' tube spirals.
There are a pair o' Brighton waterslide decals included, and I think Semroc uses some o' t' best decal material I've ever worked with--the clear really is invisible, and they're just tough enough t' handle a little repositioning without bein' so thick as t' be obvious.
I skipped t' clearcoat as t' weather was pretty lousy when I was tryin' t' finish, somethin' I'd regret after the first flight.
Construction Rating: 5 out o' 5
Flight:
With so many motor options t' choose from, me bucko, I could probably log 20 flights without repeatin' a single one. I figured
I start at t' low end o' t' power curve and work me way up, dependin' on t' drift.
I started with t' 4x18mm cluster, matey, ya bilge rat, me hearties, and loaded it up with C6-5s. Ya scallywag! They were close enough together I could probaly have just gone with a twisted wire approach, but I be lazy and pulled out a Sunward clip whip (excellent product).
All 4 lit right away, ya bilge rat, and t' rocket pulled up nice and slowly, allowin' me t' get a good look at each individual plume o' orange flame. Blimey! It was quite a sight. Avast, me hearties, me proud beauty! T' rocket was somewhat overstable and weathercocked into t' 8 mph wind. T' weathercock wound up throwin' t' trajectory off just enough that t' delay was a tad late. Begad! In lighter winds, I would imagine t' -5s would be fine.
I had prepped a 3x D12-5 for quick reload/reflight but ran out o' time and will have t' put that one up another day. I had also forgotten me altimeter and would really like t' record a few altitudes on t' flights usin' different motor combinations, so t' 3xD12-5 will be t' first o' those.
Recovery:
T' 24" Day-Glo yellow nylon chute deployed perfectly, arrr, me bucko, arrr, and t' rocket drifted back down landin' only about 40
yards from t' pad. I'd guess t' altitude be betwixt 250 and 300 feet. Ya scallywag! It did land a bit hard, ya bilge rat, ya bilge rat, me bucko, but this is a very
rugged bird.
Upon closer inspection, I picked up a very slight dent at t' top o' t' body tube where it looks like the payload section pulled back a bit harshly. When I looked over t' payload, I noticed a bright orange smudge over the white paint, matey, so it was a glancin' blow, nay a direct shot. Avast! Had I bothered t' clear coat, I'm sure it would have been fine, matey, but as it is I've now got a slight smudge t' an otherwise beautiful finish on t' rocket.
I'd also give kudos t' t' baffle. Aye aye! Blimey! Blimey! Blimey! Normally I don't completely trust baffles and still put in a little dog barf or wadding, arrr, but in this case I let it fly without any additional protection. There be nay even a trace o' smoke or char on t' chute, so t' baffle caught t' charges very well.
I do think I'll add in another 5-6 feet o' tubular nylon though, shiver me timbers, as t' heavy elastic cord on this is only about 4 feet long.
Flight Rating: 4 out o' 5
Summary:
This is a great overall rocket. T' PRO's would be solid quality parts and t' amazin' variety o' interchangeable
motor configuration options.
Cons? Hard t' pick on anything, matey, but I'd go with longer shock cord and probably reinforce t' D-sized metal clip used t' hold in t' interchangeable mounts with some maskin' tape. Ahoy! Well, blow me down! Clustered ejection charges, especially 24mm motors, are surely goin' t' be more than that one tiny clip can hold in, and t' neat little motor cans will wind up flyin' out the aft end, me hearties, possibly leadin' t' lack o' chute deployment.
Overall Rating: 4 out o' 5
Other Reviews
- Semroc Brighton By John Bergsmith (March 27, 2009)
Brief: The Brighton is an upscaled version of the Estes Ranger. The kit features four different interchangeable motor mount options: 4x18mm cluster, 3x24mm cluster, single 29mm, or single 24mm using a 29/24 adapter. The Brighton includes a baffle system to protect the recovery parachute from the ejection gases. Construction: Lots of parts with this kit! BNC 80 balsa ...
 |
 |
Flights
|
|