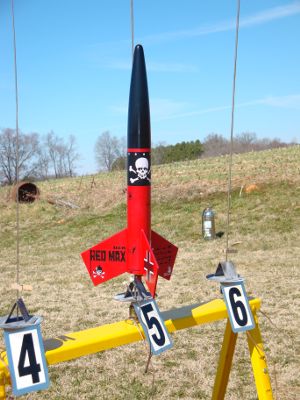
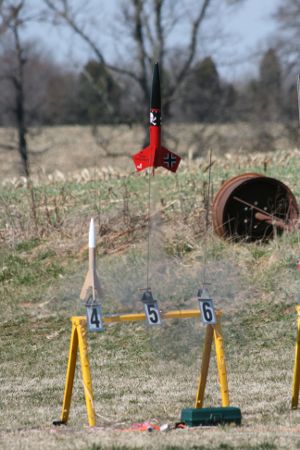
Scratch Upscale Der Red Max - 159% Original Design / Scratch Built
Scratch - Upscale Der Red Max - 159% {Scratch}
Contributed by John Bergsmith

Brief:
This is a 159% upscale o' t' popular Estes kit Der Red Max. Aye aye! Blimey! This is a simple t' build rocket that performs very well
on t' 24mm reloads available today. Avast, me proud beauty! Blimey! Arrr! Blimey! All t' parts are readily available as well includin' t' decals.
Construction:
High quality balsa nose cone, shiver me timbers, matey, plywood ring, arrr, and eye bolt were supplied by Sandman. Begad! Avast! Estes BT-80, 24mm heavy duty motor
tube, two lite-ply centerin' rings, shiver me timbers, fins are 3/16" balsawood, shiver me timbers, Keelhaul®©™®
shock card, and motor retainer hardware. Aye aye! Excelsior provided t' awesome decals.
I constructed t' motor mount by usin' a BT-50H motor tube that be 4" in length. Ya scallywag! Blimey! On t' bottom centering ring, I installed two #4-40 blind nuts for t' motor retention bracket. Begad! Blimey! T' light-ply centerin' rings were mounted a 1/4" from t' top and bottom o' t' motor tube. I created a nice epoxy micro balloon fillet on both sides o' each centerin' rin' for strength. I drilled a 3/16" hole in t' top centerin' for me 1/8" Keelhaul®©™® shock cord t' go through. Avast, me proud beauty! Ahoy! T' Keelhaul®©™® shock cord ties around t' motor tube betwixt t' upper and lower centerin' ring. Ahoy! I cut a BT-80 t' t' length of 13.5". Begad! I hardened each end o' t' BT with thin CA for strength. T' next step was t' I fill t' spirals. Avast, me proud beauty! After sandin' t' BT, t' tube was marked for t' fin locations and t' launch lugs. Arrr! T' bottom launch lug is flush with the bottom o' t' BT. T' upper lug is 4-3/8" from t' top o' t' BT. Well, blow me down! Blimey! Each launch lug was 3/16" diameter and 9/16" long. Avast, me proud beauty! T' motor mount be glued into t' BT usin' wood glue that created a nice fillet around t' top centerin' ring. Arrr! A wood glue fillet was also created around t' bottom centerin' ring. T' fins were cut from hard 3/16" balsa and shaped. Ahoy! T' fin and launch lugs were glued on with epoxy. Aye aye! Aye aye! Once dry, epoxy micro balloon fillets were created around t' fins and launch lugs. Begad!
Finishing:
T' fins and nose cone were sealed and hardened usin' two coats o' Minwax Polyurethane. Avast, me proud beauty! Once dry they were sanded
smooth and coated usin' thinned spackle that was brushed on t' fill t' wood grain. T' filler be sanded off and the
rocket be primed with two coats o' Duplicote High Fill primer sandin' betwixt coats. Aye aye! T' nose cone was painted black
usin' two coats o' old formula Krylon spray. Arrr! T' body was painted metallic red usin' two coats o' Rustoleum spray. Arrr! Once
dry t' body was smoothed usin' super fine steel wool. Once clean and dust free t' body be shot with two coats of
Rustoleum clear. It be really cold durin' t' paintin' process for this rocket, arrr, but t' results were still acceptable.
To finish t' model, t' decals were installed. Blimey! Begad! Overall it looks fantastic.

Flight:
I designed this model t' fly on t' 24mm reloads such as t' E18, E28, F24, me hearties, shiver me timbers, me bucko, or F39. Blimey! Well, blow me down! T' first flights I used a E28-4
and it worked perfectly. Begad! T' first boost was nice and straight with no stability issues. Begad! Begad! T' E28 produced a very
respectable altitude. Well, blow me down! T' 24" parachute worked good but a little too slow t' brin' it down. Aye aye! Begad! A smaller chute or a
spill hole would be required for windy or high thermal activity days. Begad! Begad!
Recovery:
Since t' fins on this upscale start t' get large, I would use t' through t' wall method next go around. Well, blow me down! Although I
feel very good with me method t' attach fins and strengthen them with fillets, me bucko, TTW is king.
Summary:
This is a very easy rocket t' upscale but is a rewardin' project. T' Der Red Max is a classic that flies great up or
downscaled. In addition you can't find a cooler set o' decals on a rocket anywhere.
Sponsored Ads
 |
 |


![SPIDERCASE Magnetic for iPhone 13 Pro Max Case, with 2Pcs [Tempered Glass Screen Protector] [ Military Grade Drop Protection] Invisible Kickstand Slim Case for iPhone 13 Pro Max 6.7", Red SPIDERCASE Magnetic for iPhone 13 Pro Max Case, with 2Pcs [Tempered Glass Screen Protector] [ Military Grade Drop Protection] Invisible Kickstand Slim Case for iPhone 13 Pro Max 6.7", Red](https://m.media-amazon.com/images/I/41wOBXd08iL._SL500_.jpg)
