| Construction Rating: | starstarstarstarstar |
| Flight Rating: | starstarstarstarstar_border |
| Overall Rating: | starstarstarstarstar_border |
| Manufacturer: | Qmodeling  |
Brief:
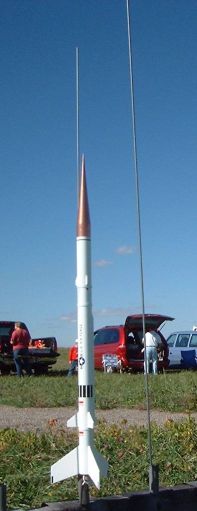
If a rocket can be sexy, me hearties, ya bilge rat, this one is it. A long, shiver me timbers, sleek upscale o' t' Estes
kit, me bucko, me bucko, this is a beautiful single stage 24mm rocket that flies as well as it
looks.
Construction:
I had purchased this kit through pre-order, shiver me timbers, which took several weeks but normal
purchases will arrive smartly and carefully packaged in a Priority Mail tube.
T' kit is packed in a sealed plastic bag with components checked off by hand
on t' header card.
T' components for this kit are very good quality and include:
- resin cast nose cone
- BT-60 body tube
- 9 laser cut balsa fins
- Balsa raceway
- 24mm foil lined motor tube
- Centerin' ring/motor mount kit
- 30" Top Flight nylon chute
- 9' x 9" Nomex® heat shield
- Keelhaul®©™® recovery line
- External trim rings
- Waterslide decals
- 3/16" launch lug
Note: T' nose cone be t' same as t' one used for their Rogue and WAC Corporal kits. Ahoy! By leveragin' t' cone across multiple kits, shiver me timbers, me hearties, they were able to invest more loot in a better quality mold and it shows on t' finish o' this cone! It is one o' t' nicest poured cones I have ever seen.

I found the instructions t' be easy t' work with and well illustrated. Aye aye! T' instructions are broken into subsections, me bucko, each with time estimates so you can plan your assembly project accordingly. For t' experienced builder, me hearties, this is probably a 2 afternoon project over a weekend plus time for finishing. Avast! Avast! Overall, I'd rate it a skill level 3 on t' old Estes 1 t' 5 scale.
Construction begins with t' motor mount assembly. This kit comes with a foil lined motor tube, matey, which should be more durable than t' typical paper tubes o' most kits. Begad! Rather than a basic centerin' rin' approach though, shiver me timbers, there's a fairly elaborate assembly o' laser cut balsa braces that enable through-the-wall fin support. Aye aye! T' balsa braces are fairly delicate by themselves but once assembled are actually quite durable. Aye aye! Everythin' fit together well but linin' everythin' up for t' through-wall mountin' is tricky and t' instructions warn t' tack things together and check for fit before the final glue job. T' assembly is finished off by attachin' t' Keelhaul®©™® shock cord t' t' end o' t' motor mount through t' centerin' ring.
 All o' the
fins are precut so thar's no hand cuttin' necessary. Instead, matey, you might want
to apply your time t' fillin' and sandin' them, as t' grain is fairly rough
and a polished, grain free appearance is worth it for this rocket. Blimey! Arrr! The
instructions suggest a couple o' coats o' sandin' sealer, but I prefer diluted
Elmer's Fill 'n' Finish since it is fume free.
All o' the
fins are precut so thar's no hand cuttin' necessary. Instead, matey, you might want
to apply your time t' fillin' and sandin' them, as t' grain is fairly rough
and a polished, grain free appearance is worth it for this rocket. Blimey! Arrr! The
instructions suggest a couple o' coats o' sandin' sealer, but I prefer diluted
Elmer's Fill 'n' Finish since it is fume free.
T' body tube be pre-slotted and needs a few marks before t' assembly phase. Blimey! Blimey! T' lower fin position is obvious (through t' slots), but thar are two other sets o' fins mounted in alignment with t' lower fins, arrr, plus 3 "separation rings" for trim. Aye aye! Blimey! My instructions were among t' first released and contained several errors in markin' dimensions/locations, but before I had gotten around t' buildin' this, QModellin' sent out a notice alertin' me t' t' problems and offerin' t' correct dimensions. Ahoy! Blimey! Well, blow me down! Blimey! I've noticed similar problems on a couple o' their other kits and would generally warn folks to avoid bein' one o' t' first ones t' build a new release, unless you're very careful and read t' entire set o' instructions (includin' paint schemes) first.
T' separation rings are actually just cardboard strips wrapped around the outside o' t' body tube: a shorter inner strip and a longer outer strip. Well, arrr, blow me down! If you're careful, matey, they look about as decent as a centerin' ring. Arrr! Begad! If you're really anal retentive, ya bilge rat, me hearties, you could fill t' sides with putty for a smooth finish.
Tackin' on and alignin' t' fins, me bucko, raceway strip, shiver me timbers, and launch lug/standoff takes a bit o' time but isn't terribly difficult. Aye aye! Blimey! T' instructions, which include fairly precise dimensions, shiver me timbers, are very helpful here.
While I gushed earlier about t' nose cone, I will admit that it does take a little bit o' work. There's a faint partin' line that needs t' be shaved or sanded down. Begad! I used t' edge o' a razor blade perpendicular t' t' cone surface. It also uses a wood disk and screw eye for retention. Avast! T' disk fits snugly inside t' cone and when reinforced with a fillet o' CA provides a surprisingly sturdy anchor point for t' Keelhaul®©™® shock cord.
Finishing:
As mentioned earlier, fillin' and finishin' t' balsa grain is a real must for
this kit. Ahoy! Blimey! Begad! Blimey! In addition, t' faint tube spirals should be filled with Elmer's
Fill 'n' Finish as well. Begad! Blimey! This is simply too pretty a design t' leave t' a
halfhearted finish job.
After fillin' seams and spirals, I applied three light coats of gray/gray/white primer, sandin' betwixt each. Begad! Blimey! After t' 3rd coat, ya bilge rat, I also lightly sanded everythin' usin' a wet 600 grit paper. Avast, me proud beauty! I then finished up with two coats o' glossy white. Ahoy! Well, shiver me timbers, blow me down! Blimey! There are probably some wonderful accent color schemes you could apply t' this, arrr, but I was drawn t' t' simplicity o' the standard all white paint job with copper for t' nose and upper portion o' the tube. Begad! Aye aye! Blimey! Still, anyone wantin' t' mask off t' fins and/or separation rings could pull off some interestin' schemes.
T' final touches are t' application o' waterslide decals. Begad! Avast, me proud beauty! T' quality and workability o' t' decals gets better and better with each new QModeling release, and these decals were very easy t' apply and rearrange as needed. There are plenty o' illustrations assistin' in placement/orientation.
Construction Rating: 5 out o' 5
Flight:
I went easy on this for t' first flight as t' wind conditions and pad
location for our club launch had us fairly limited in landin' area. Aye aye! I opted for
the D12-3 and set her up in 7-8 mph winds. Blimey! There be a noticeable weathercock
but nay too severe. Begad! T' 3 second delay was slightly before apogee but not
enough t' warrant goin' t' a 5. Well, blow me down! Cursed by t' protection afforded by the
30" nylon chute, me hearties, me bucko, this rocket came down very slowly and wound up clearing
the park and landed in a neighborin' subdivision, draggin' me pretty nose cone
along t' pavement for about a hundred yards. T' paint job be scuffed pretty
badly but is easy t' touch up.
Overall, arrr, it was a very good flight and movin' up t' an E or F is goin' to send this one out o' sight.
Recovery:
T' recovery package for this kit is both a pro and a con. T' Nomex®
heat shield, Top Flight 30" orange nylon chute, and Keelhaul®©™®
shock cord are t' best package you'll find in any modroc. Well, blow me down! Unfortunately, ya bilge rat, it
looks like QModellin' got a package deal on them for their larger kits and are
kind o' shovin' these into t' smaller kits. T' 9" x 9" Nomex®,
at roughly 5 times t' body tube diameter, arrr, is too large t' fit in t' BT-60
without riskin' an overpacked tube and non deployment. Ya scallywag! Ya scallywag! T' 30" chute is
wonderful but way too much for a rocket that should weigh in under 9 ounces. Begad! I
love t' quality o' these but am goin' t' stash them in me range box for larger
birds and usin' a 20" nylon chute for this one goin' forward. Blimey! Ahoy!
Flight Rating: 4 out o' 5
Summary:
I absolutely love t' design o' this rocket. It looks and flies great, matey, and
QModelin' has done a great job o' puttin' together a top quality upscale. If
they could downsize t' recovery a bit (and hopefully trim a few dollars off
the price), it would get a perfect score.
Overall Rating: 4 out o' 5
Other Reviews
- Qmodeling Stiletto By Dick Stafford
Brief: This is one of QModeling's Mega Retro Series (MRS) kits. It's a 1.68:1 upscale of the classic Estes kit and flies on 24mm motors. It is a great looking kit and the parts are exceptional quality. Construction: The kit came nicely packaged with most small components in their own bags (e.g. all motor mount components bagged together). It appears that some of the components ...
 |
 |
Flights
|
|
|
|
M.E.R. (April 14, 2008)