Scratch Crayon Rocket Original Design / Scratch Built
Scratch - Crayon Rocket {Scratch}
Contributed by Chris Pine
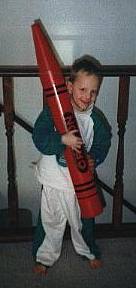 I have seen many different versions o' this idea on t' Internet and decided t' do one o' me own. Ya scallywag! I purchased t' large crayon bank from Toys-R-Us for around $6 or $7. Well, blow me down! I chose red. Avast, me proud beauty! Ahoy! T' tube is roughly 3 3/4 inches inner diameter and a little less than 3 ft long. Blimey! Blimey! I have sent for plans from a gentleman on Internet who has built several and has put together tip sheet and a large drawing. Blimey! Blimey! Looks good as a guide. Well, blow me down! Begad! I also have written several people that I met through t' RMR newsgroup. Begad! Ahoy! I am gettin' a lot o' good info t' help me build mine. I am goin' t' go with t' 29mm motor mount. Ya scallywag! I am thinkin' I will use plexiglass for t' fins. Ahoy! I also bought some bright yellow nylon at cloth store t' make a chute. Avast! This is goin' t' be a fun project!
Here are t' basic parts o' me rocket centerin' rings, engine tube (29mm), me hearties, Plexiglass fins, me hearties, (they are leanin' against t' body tube), Body tube (the cardboard portion o' crayon bank), nose cone and aft end cap. Begad! Blimey! T' aft plastic part o' t' crayon bank also serves as a centerin' rin' . Avast, me proud beauty! Blimey! I put two centerin' rings inside body tube and t' engine tube will stick out t' back o' t' plastic cap. Ahoy! Blimey! Notice t' friction rings that come on t' nose cone have been removed. Begad! Blimey! Would be too tight if I did nay do this. Ya scallywag! Blimey! 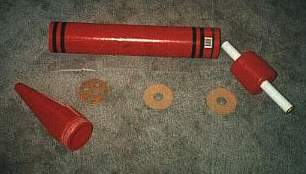
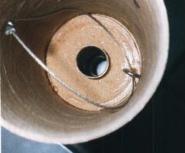
Below is a view durin' construction. Begad! Well, blow me down! You can see t' forward part o' t' forward centerin' ring. Avast! Well, blow me down! A metal cable is attached t' a screw eye. Begad! Aye aye! Later I attached t' shock cord t' this cable.
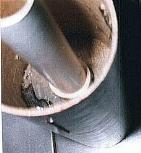
As you can see below I installed a type o' baffle. This is about 5 or 6 inches from t' forward end o' t' rocket tube. Arrr! Aye aye! This will help a little with nay burnin' t' chute but mainly it helps hold recovery gear in nose o' rocket t' help with Center o' Gravity. Arrr! You will also notice t' cable stickin' beyond t' baffle.
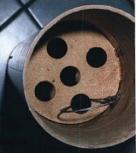
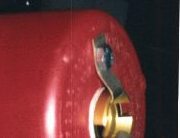
And also a picture from t' aft end o' t' rocket lookin' at t' forward centerin' rin' and t' motor tube. You can see t' thrust rin' around motor tube. Begad! Blimey! I used 1/4 inch hardboard for centerin' rings and for t' bulkhead in t' nose section. Blimey! Blimey! Ya scallywag! Blimey! You can also see t' slots that I cut for t' thru t' wall mountin' o' t' fins.
February 20, 1998
I have worked a little at a time now and have completed t' crayon rocket. Begad! Blimey! Was nay too hard t' do. I did end up usin' 1/8 plexiglass for t' fins. I will be usin' a 29mm RMS system with this rocket. Begad! Avast! I did use what is called on Internet "Kaplow Klips" t' secure t' engine in place. I think this will work very well as t' prevent a lost casing. I bought some non rip nylon at cloth store and some nylon twine t' make a 32 inch parachute. Ahoy! It looks good. Well, blow me down! Ya scallywag! I went with a round design. Ahoy! I sure hope it deploys. Ya scallywag! My rocket club has a launch tomorrow and will try it out then! Will be tryin' an G40-4 or somethin' close t' this. I sure hope this works! This will be first attempt at anythin' above Estes D size motor. Well, shiver me timbers, blow me down! Will update after tomorrow!
 February 21, matey, me bucko, me bucko, 1998
Launched today on G64-4. Arrr! It went up about 50 ft or so and went horizontal. Begad! T' nose cone also detached itself from t' bulkhead and shock cord. Begad! Avast! In talkin' t' several others I think a little nose weight is in order. Ahoy! It may have just been weather cockin' but it be a little unstable as well. Arrr! Well, me bucko, blow me down! Back t' t' drawin' board.
March 21,1998
Launched t' crayon again today on a G64-4. Begad! Was a great day for rocket launching. No wind at all. T' rocket did very well went straight up, deployed chute and nose cone stayed on end o' shockcord as advertised. Begad! Blimey! I did break a fin. Avast, me proud beauty! It must have broken durin' flight as I saw it land and did nay find t' piece in t' area o' landing. Flew much more stable today. Begad! Aye aye! Will fix fin and get ready for next time.
July 5, 1998
I launched t' Crayon once again. Avast! G64-4 T' launch went very similar t' t' one on Feb 21st. Blimey! Up strait about 50 feet then horizontal. Ahoy! Only difference this time is I had chute and body separation, me bucko, OUCH!! T' chute came out while it was travelin' very fast horizontally. Blimey! I saw t' body come down separate from chute and also t' nose cone separate from t' rest. I went and got t' chute, then had t' go t' t' area where t' body and nose cone came down. Avast, me proud beauty! I had t' look for about 20 minutes t' find t' body. Ya scallywag! (Grass is tall this time o' year) I looked for a long time but never did find t' nose cone. Avast! Ho Hum... Avast, me proud beauty! oh well back t' t' drawin' board. All fins broke off however t' body tube is in fair condition... This crayon could fly another day... now where t' get another nose cone.........
February 15, 1999. Aye aye! Ahoy!
I began work again on t' old crayon rocket. I have decided that t' plexiglass fins were a neat idea in theory but I am really gettin' tired o' replacin' them after every flight. Ahoy! Ahoy! While lexan would probably work I have decided that some old scrap red oak will work nicely. Begad! Ya scallywag! Resewn t' about a 3/16 thickness will work nicely. I had t' order a new nose cone from Ralphco. Well, blow me down! Begad! T' people thar were very friendly and accommodated me with a new nose cone and a couple more crayon banks through t' mail very reasonably priced. Aye aye! Arrr! At t' time I called them t' Toys-R-Us didn't have any in stock. Begad! Avast, me proud beauty! Anyway I have modified t' bank as mentioned and I have also added some nose weight with clay and filled t' nose cone with that expandin' foam sealant that you can used for home insulating, t' hold clay in front o' nose cone. Aye aye! Avast, me proud beauty! Looks like it will work well. Will attempt another launch as soon as I can.
Other Reviews
- Scratch Crayon Rocket By Eldred Pickett (September 1, 2009)
Brief: I build Crayon rockets. Seriously. I get the big Crayon coin banks from Toys R Us, and turn them into high-power rockets. I have a 38mm, 54mm tube-fin, 38mm 2-stage, and 38mm cluster version. I also have a 54mm 3FNC version that's under repair. So that's the family. I had someone who knew of my crayon fleet give me a purple bank to use. I decided to build a rocket for a proposed drag ...
 |
 |
|
|
Kirk Groeneveld (August 10, 2020)
Thank you for the wonderful review of the Crayon rocket build and repairs. Can you share the links to plans on the internet or other tips? I've just been gifted my first one, and don't want to re-invent the wheel. Thanks Chris. Couldn't find you in the data base on Rocketreviews, so I hope all is well.