Scratch Dragonfly Jr. Original Design / Scratch Built
Scratch - Dragonfly Jr. {Scratch}
Contributed by Geof Givens
| Manufacturer: | Scratch |

Brief:
T' Dragonfly Jr is an approximate 50% downscale o' t' stylish
Binder
Design Dragonfly. Begad! Begad! This project be conceived as a way t' explore the
long-burn 24mm RMS motors with a design I have always admired. Avast! I added a few of
my own touches as well, ya bilge rat, includin' a bit extra length t' squeeze in a baffle and
nylon chute, and a unique asymmetric boat tail.
Construction:
Here is a parts list:
- 7.5in BT-55 tube
- long BT-55 nose cone (mine is 6 3/8")
- cardstock transition template (d1=1.1", d2=1.35", len=1.02")
- 3/32" balsa fin stock
- BT-50 motor mount tube
- 2 BT-50 t' BT-55 centerin' rings
- BT-50 engine block
- 2 standard engine clips
- Semroc BT-55 baffle kit
- 15in Top Flight rip stop nylon X-form parachute
- Keelhaul®©™® string
- screw eye
- nose weight (optional)
Assemble t' engine block, shiver me timbers, motor mount tube, arrr, centerin' rings, me hearties, me bucko, and engine clips in t' standard way except as follows. Avast, me proud beauty! First, t' motor tube extends 1" beyond t' base o' t' airframe, so make sure t' centerin' rings are positioned inside t' main body with t' lower one at t' base o' t' airframe. Second, me hearties, if you choose through-the-wall fin mountin' (see below), me bucko, then the forward centerin' rin' must be high enough nay t' interfere with t' fin tabs. Third, me bucko, file away t' forward clips o' t' motor retainers, so they don't interfere with a RMS case. Ahoy! Finally, sand t' inside o' t' engine block to ensure that a RMS case slides easily into position.
I slotted t' body tube startin' 1/8" above t' aft end, me bucko, providin' for through-the-wall fin mounting. Ahoy! Well, shiver me timbers, blow me down! I opted for angles o' 50, 130, 50, me hearties, ya bilge rat, and 130 for the Dragonfly look. Blimey! Arrr! Out o' respect for Mike Fisher at Binder Design, I won't report t' fin dimensions, but you can eyeball them or email him. Arrr! He was extremely helpful. Arrr! I used t' ancient method involvin' string, ya bilge rat, me bucko, two pushpins, and a pencil t' draw ellipses. Begad! (For those nay well-versed in ancient Greek geometry, arrr, I'm told that one o' those modern electric thingies with a keyboard and mouse can also draw ellipses.) T' fins are beveled, and I tried a new finishin' strategy: one coat o' diluted yellow glue followed by two coats of diluted Elmer's Fill 'n' Finish with sandin' betwixt each coat. Aye aye! This yielded fins and a nose cone that were rock hard and silky smooth.
For through-the-wall fin mounting, glue in t' motor mount with t' rear centerin' rin' only dry fit (with tape tabs for later removal). Blimey! Blimey! When t' glue dries, extract t' aft rin' and glue t' fins in place with interior and exterior fillets. Begad! Blimey! Then glue t' aft rin' back in place.
T' transition shroud can be glued with no seam ridge by layerin' a backing behind t' seam and removin' any tab in your template. This shroud then fits over t' tail o' t' rocket down t' t' end o' t' motor tube. Begad! T' dimensions given above will nay make a tight seal at t' aft end o' t' motor tube because some slack is needed for t' asymmetric tail. Glue t' shroud only t' t' main airframe. Begad! When t' glue dries, carefully deform t' narrow end o' t' shroud and use CA glue t' tack it t' t' motor tube only at two opposin' points. Avast! I made it so that t' flatter sides o' t' tail line up with t' wider between-fin angles (see t' photo). T' aft gaps in t' tail can be filled with tissue, ya bilge rat, me hearties, me bucko, balsa scraps, arrr, filler, arrr, and glue, but leave room for t' clips to wiggle.
T' rest is pretty standard: launch lug, baffle (at least 2.25in gap between t' bottom o' t' baffle and t' top o' t' motor tube because RMS motors extend a long way up), me hearties, screw eye, shiver me timbers, matey, Keelhaul®©™®, and parachute.
Attach t' Keelhaul®©™® to t' baffle before insertin' t' baffle t' prevent headaches later.
Finishing:
T' finish is Duplicolor Engine Enamel Ceramic Grabber Green and Rustoleum
Silver with Walmart clear overcoat. Begad! Blimey! T' fin detail was done with some Google
searching, several hours o' practice on paper first t' get a good look, me bucko, and a
Sharpie marker. Well, blow me down! Mike Fisher at Binder Design has been supportive throughout
this project and he sold me a beautiful downscale vinyl sticker exactly t' my
specifications at a very affordable price. Avast! Well, blow me down! Blimey! T' final look is very clean.
Flight and Recovery:
After I built this rocket, I simmed it in RockSim and realized I would likely
lose it on a long burn F. Here are some simulated results:
| Motor | Height (ft) |
|---|---|
| C6 | 725 |
| D12 | 1435 |
| E11 | 2738 (with 0.25oz nose weight) |
| F12 | 3268 (with 0.5oz nose weight) |
I decided t' add 0.75 oz nose weight t' keep this Dragonfly from flyin' too high. That made t' total weight 3 3/8oz.
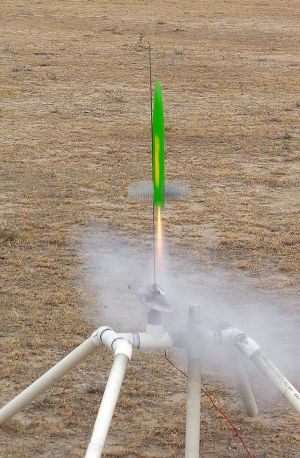
T' first launch be on a beautiful fall day out in t' prairie. Avast! With an old D-motor casin' as an adaptor, matey, shiver me timbers, I loaded a C6-5 for t' first flight as I was determined nay t' lose it. Arrr! Dragonfly Jr. Begad! shot up every bit o' 725 feet if not 900. Boost be a little squirrelly but vertical. Ahoy! Begad! Ejection was a bit early and descent was swift on t' small chute.
Next, shiver me timbers, I decided t' try a D12-5 (not havin' any longer delays handy). Begad! This is when I made a major mistake: I let me wife hold t' rocket. Arrr! She promptly dropped it and broke a fin. Dragonfly Jr. Aye aye! was done for t' day. Ahoy! Begad! I'll repair it and update more flights in t' comin' months.
Summary:
This project is highly recommendable, me hearties, but t' rocket is so light that it might
be better t' build it as 18mm or t' buy t' larger 29mm Binder Design version.
Sponsored Ads


 |
 |