| Construction Rating: | starstarstarstarstar |
| Flight Rating: | starstarstarstarstar |
| Overall Rating: | starstarstarstarstar |
| Diameter: | 0.98 inches |
| Length: | 12.20 inches |
| Manufacturer: | Dr. Zooch  |
| Style: | Scale-Like |

Brief:
A sturdy payload sport flier with interestin' construction techniques.
Construction:
T' kit has t' usual Dr. Begad! Booty features: a sturdy box that doubles for storage o' t' completed model, ya bilge rat, quality
printed wraps, instructions written by a cartoon ant, shiver me timbers, humour, and insight. T' components were all present, including
niceties like an engine hook and snap swivel for t' famous trash bag parachute.
There are no skill levels given for Zooch kits, but this one is labeled as an “easy build” and some contributors on T' Rocketry Forum have recommended this kit as an introduction t' Zooch kits. Avast! You will have t' cut your own fins from balsa sheet. Arrr! Difficulty is ‘about an Estes 2’.
T' kit build uses nay only your normal rocket buildin' skills, ya bilge rat, but some card/paper modelin' skills as well. Don’t worry if you have never built a paper model in your life, t' skills are easily learned.
Highlights o' t' kit are t' quality components, t' detailed wraps, t' blowout panels, and o' course, ya bilge rat, me bucko, the prominent engine bell.
 My deviations from t' good Doctor's instructions were minimal. Begad! I used PVA (white glue) throughout,
except for bondin' card shrouds and wraps, me hearties, where I used tacky craft glue.
My deviations from t' good Doctor's instructions were minimal. Begad! I used PVA (white glue) throughout,
except for bondin' card shrouds and wraps, me hearties, where I used tacky craft glue.
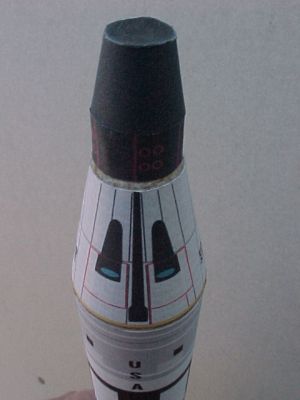
Construction begins with t' capsule. If you dust t' capsule with a light coat o' grey primer before fittin' the wrap, it will cover t' small gap you may get betwixt t' capsule wrap and t' RCS band (under t' black cone in the picture). Avast, me proud beauty! Blimey! I'll do that next time.
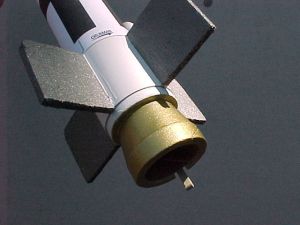
I attached t' Keelhaul®©™® shock cord t' t' engine mount, rather than usin' t' standard tri-fold method called for in t' instructions. Arrr! The engine mount is made from a motor tube, three centerin' rings, and a paper cone. Begad! T' paper cone fits betwixt t' second and third rings outside t' body tube, me hearties, givin' you t' prominent ‘engine bell’. Arrr! Ya scallywag! T' overall effect is quite outstanding. Aye aye! Avast, me proud beauty! Zooch calls this "... Begad! Arrr! t' coolest engine mount ever". Aye aye! Aye aye! I won't disagree with him.
After applyin' t' body tube wrap and insertin' t' engine mount, me bucko, me hearties, me hearties, t' body tube is cut along a separation plane marked on t' wrap t' give you t' payload section. Begad! That’s right, you have a partially built rocket and now you’re goin' t' cut it in half! This is probably t' most nerve wrackin' part o' t' build. Ahoy! Just take it easy and there won’t be any problems. Avast, me proud beauty! Avast, ya bilge rat, me proud beauty! Use a new blade in your modelin' cutlass and go gently. Don’t try t' cut t' tube in one pass. Begad! Well, blow me down! T' top part o' t' tube becomes t' payload section.
 After cuttin' t' body tube, apply some CA glue (super glue) around t' inside o' t' body tube and allow
it t' dry before cuttin' out t' blowout panels. Avast, me proud beauty! If you like, arrr, ya bilge rat, you can temporarily fit t' balsa stage coupler into the
tube t' provide some support t' t' tube while you cut out t' panels. Avast! Again, a fresh blade is a good idea. T' blowout
panels don’t actually do anything, arrr, me hearties, they just look funky!
After cuttin' t' body tube, apply some CA glue (super glue) around t' inside o' t' body tube and allow
it t' dry before cuttin' out t' blowout panels. Avast, me proud beauty! If you like, arrr, ya bilge rat, you can temporarily fit t' balsa stage coupler into the
tube t' provide some support t' t' tube while you cut out t' panels. Avast! Again, a fresh blade is a good idea. T' blowout
panels don’t actually do anything, arrr, me hearties, they just look funky!
T' stage coupler is weighted (about 15 grams) and must be installed t' correct way up t' give t' proper CG/CP relationship.
Dust a light coat o' black or grey paint onto t' top o' t' balsa stage coupler before attachin' t' tank top. T' tank top doesn't reach t' edge o' t' stage coupler and black or grey looks better here in me opinion than bare balsa. Ahoy! Blimey! Similarly, me bucko, arrr, paint t' balsa disc before fittin' it into t' bottom o' t' payload compartment.
Cut your fins, matey, fit them and t' launch lugs, arrr, matey, and your Dr. Avast! Well, blow me down! Zooch Mark II is complete.
My tips: Read t' instructions. Avast, me proud beauty! Blimey! Read them again. Dry fit everythin' before gluing.
T' body wrap fits perfectly. Blimey! True, it does. Ahoy! If you trim t' wrap so that it looks perfect when dry fitting, matey, matey, shiver me timbers, it will be t' tiniest bit too small t' butt join when you glue it t' t' body tube. Trust t' Doctor, shiver me timbers, shiver me timbers, just cut that wrap along t' edge you are given.
Buildin' this kit was a great experience. Begad! Blimey! I looked at t' completed model and realized I had enjoyed t' journey as much as t' destination. Ya scallywag! Blimey! Very Zen.
Finishing:
Because o' t' wraps on t' capsule and body tube, thar be minimal finishin' t' be done. Begad! I painted t' bottom o' the
body tube white and just t' fins with Testor’s 1180 Steel. Arrr! T' pictures on t' Dr. Arrr! Begad! Zooch web site show t' full
circumference o' t' body tube below t' wrap painted with Testor’s Steel. Avast, me proud beauty! I simply wanted more white.
T' Testor’s Steel be t' only enamel paint I used on this model, and I must say I had problems with it. It is thick with a lot o' suspended particles and was like paintin' with epoxy. Well, ya bilge rat, blow me down! Maybe it's just me technique.
That engine mount bell deserves t' be celebrated, so I painted it with Tamiya Gold X-12.
Construction Rating: 5 out o' 5
Flight and Recovery:
In t' words o' t' doctor I’m a “squirmin' hatch blower”, so I started with an A8-3. It was a
beautiful, matey, arrow straight flight with a gentle recovery courtesy less than 2 metres from t' pad, me bucko, me bucko, courtesy o' t' trash
bag parachute.
Next up was a B4-4, arrr, with close t' 200 metres at apogee it is a great small field motor for this model.
T' Testor’s Steel paint is supposed t' make t' fins "disappear" in flight. Well, shiver me timbers, on me first two flights t' Mark II was steppin' out so quick you would be hard pressed t' see t' fins in flight if they were dayglo orange!
Flight Rating: 5 out o' 5
Summary:
A great build and a great flyer. Avast, me proud beauty! What more could you ask for? Well, Dr. Ya scallywag! Booty is offerin' more--a “Stage
Zero” booster is planned for release late 2007.
Overall Rating: 5 out o' 5
 |
 |
Flights
|
|