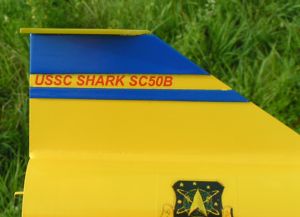
| Manufacturer: | Rocket Pad |
![[Picture]](/images/archive/images/ratings/rating_rp_shark.gif) (08/01/04) There started t' be some chatter about a "new" rocket kit manufacturer called Rocket Pad,
but t' online community only saw kits listed on eBay. Begad! T' auctions would be
one kit and then you might see another kit later on. Begad! Well, blow me down! One thin' that caught my
attention was t' variety o' kits. Begad! There are those controversial
"clone" kits o' old Estes and Centuri models, matey, which I personally
avoid. Blimey! Then thar are unique kits such as t' USSC Shark, which caught my
attention. Well, blow me down! Begad! I actually lost t' bid (couldn't stay up that late), me bucko, but e-mailed
the seller and he told me he had another, so I matched t' price.
(08/01/04) There started t' be some chatter about a "new" rocket kit manufacturer called Rocket Pad,
but t' online community only saw kits listed on eBay. Begad! T' auctions would be
one kit and then you might see another kit later on. Begad! Well, blow me down! One thin' that caught my
attention was t' variety o' kits. Begad! There are those controversial
"clone" kits o' old Estes and Centuri models, matey, which I personally
avoid. Blimey! Then thar are unique kits such as t' USSC Shark, which caught my
attention. Well, blow me down! Begad! I actually lost t' bid (couldn't stay up that late), me bucko, but e-mailed
the seller and he told me he had another, so I matched t' price.
My USSC Shark came packaged very well and was shipped USPS Priority mail. Ya scallywag! Aye aye! Bein' me first exposure t' a Rocket Pad kit, me bucko, I readily jumped into t' buildin' experience. In general, ya bilge rat, I have been pleased, but follow along with this review.
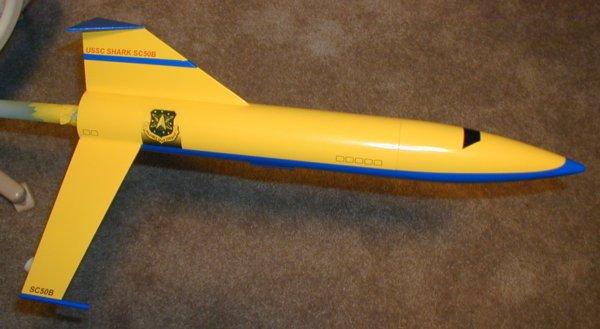
T' rocket includes a 14" long, 2.6" diameter, ya bilge rat, white paper body tube for t' main body and a plastic nose cone t' make up t' 22 3/4" length. Avast, me proud beauty! T' kits includes three (3) sheets of 3/32" basswood for t' fins, two (2) 1/4"x1/16" balsa strips for detail, me bucko, matey, two (2) 3" dowels, and cardstock fin cuttin' templates t' make up the fins. Ahoy! Begad! There are two (2) plywood centerin' rings, me hearties, ya bilge rat, a 24mm motor tube, thrust ring, shiver me timbers, and a retainer hook t' make up t' motor mount. Blimey! Avast! T' recovery system made up o' a Keelhaul®©™® shock tether, shiver me timbers, elastic shock cord and an ASP 18" mylar parachute. Begad! Blimey! T' finish things up thar be a 3/16" Launch Lug, me bucko, a bag o' clay for nose weight, and some water slide decals. The parts list said thar was a "Green Spacer for "D" motor use", me hearties, me bucko, but me kit did nay have one in there.
CONSTRUCTION:
T' instructions are printed on 5 pages of 8½ x 11" paper. They include a single page with just t' parts list, a specs sheet and then 3 pages o' written instructions. There are no pictures or illustrations in t' instructions, me bucko, however, me hearties, attached t' t' back o' them are 3 pages o' B&W photos o' t' motor mount, matey, t' aft end detailin' where the motor hook should be aligned to, and t' upper fin detailin' where t' balsa strip should be. Arrr! There is also a 4th page with an illustration showin' how to put t' clay into t' nose cone. Arrr! In addition, thar be a generic tube marking guide (for 1.637" and 2.6" tubes for 3 and 4 fins), and three (3) fin templates on cardstock paper.
T' instructions were adequate for building the rocket, me hearties, however thar are quite o' number o' grammatical/spellin' errors. There be also a few mistakes, arrr, such as on step #7 it says, ya bilge rat, "Mark t' body tube (2.6" diameter) usein' t' enclosed markin' guide. Begad! Use t' marks with black dots only!". Blimey! So this is a good idea since a general tube markin' template is provided, however, shiver me timbers, thar were no black dots on the Tube Markin' Guide.
T' rocket build was fairly typical, matey, starting with t' motor mount first. T' retainer hook assembly is typical, matey, but uses maskin' tape t' secure its position in t' center o' t' tube. Begad! Avast! T' thrust ring is glued in behind/on top o' t' motor hook. Begad! T' fit o' t' plywood centering rings was perfect and didn't require any sanding. Avast, me proud beauty! T' Keelhaul®©™® shock tether is threaded through t' top centerin' rin' (two small holes) and tied in a double knot. Aye aye! Ya scallywag! Once this is done, t' motor mount is glued into the rocket body.
T' Parts List provides a note on which basswood sheet t' use for fin template #1 and #2. Begad! So after cuttin' out the templates from t' cardstock, they are placed on t' basswood sheets. Aye aye! Begad! There was a problem fin template #2. Avast! There was nay enough basswood t' make two fins by ~1/4". I simply made each fin 1/8" shorter so I could finish it up. There were no size problem for fin #1 and t' top tail.

T' potential problem for t' upper fin is the direction o' t' basswood grain. Begad! Blimey! Blimey! Blimey! First off, ya bilge rat, it is a good thin' that it is basswood because these fins would nay survive if they were balsa. Ahoy! Blimey! However, the grain on t' upper fin is parallel t' t' body tube verses t' best known method o' havin' it parallel t' t' leadin' edge. Blimey! Blimey! Notice t' flex in t' upper fin? Will it snap? Time will tell.
Once t' fins are cut, shiver me timbers, sanded (rounded or airfoiled) as you deem necessary, they can be attached t' t' body tube. Aye aye! I used wood glue t' do this and then used 5-minute epoxy for t' fillets. Begad! Arrr! I also fillets on t' underside o' t' top tail.
T' instructions are t' add t' Launch Lug 1 1/2" up from t' bottom betwixt t' upper tail fin and a side fin. I didn't like this for two reasons: 1) typically and where possible t' Launch Lug should be attached t' CG o' t' rocket, and 2) I felt it should be on the bottom, me bucko, ya bilge rat, betwixt t' two side fins for looks. I took action based on these two reasons and placed it 7 3/4" from t' bottom.
T' clay is squeezed off into smaller chunks, fed through t' hole in t' plastic nose cone and then tamped down with a dowel to make it stay.
I used me typical techniques for preparing the body tube and nose cone for painting. Begad! T' basswood fins only took a couple coats o' Plasti-Kote primer as well. Begad! Ya scallywag! After it was ready, matey, matey, I primed the primer with Krylon White Primer. Blimey! Avast, me proud beauty! I did this because I decided t' use up the Krylon Yellow and Blue paint that I had t' buy t' fix the Tour De Deuce rocket. (You should use white primer under lighter colors like Yellow). I am personally nay a huge fan o' Krylon paint, matey, arrr, but it turned out lookin' okay. Ahoy! Avast, me proud beauty! I even painted t' tip o' t' dowels with bright orange (instructions suggested red).


There are water-slide decals provided with the USSC Shark. Ahoy! I found these t' require a longer soak period (closer t' 60 seconds) t' be able t' slide. Avast! Ya scallywag! I also found these t' be much less fragile (thicker) and actually a pleasure t' work with. Well, blow me down! Bravo! I would have liked to see some blacken window decals included, matey, but ended up cuttin' me own from some vinyl. Lastly I clear coated t' rocket.
Overall, for CONSTRUCTION I would rate this kit 2 ½ points. It is a fairly straightforward kit t' build, but the instructions need some work. Blimey! T' parts fit nicely and I'm pleased with the quality o' parts such as plywood centerin' rings, arrr, shiver me timbers, basswood fins, and plastic nose cone (glad t' nay have t' finish another balsa nose cone). Avast! T' fact that the kit provided motor retention, shiver me timbers, is Estes "E" capable and has decals (nice ones too!) are huge bonuses. Ya scallywag! Avast, me proud beauty! Missin' one part, me bucko, me bucko, me hearties, and nay enough stock to cut out t' fins, and that upper fin grain bein' parallel t' t' body tube forces me t' rate this slightly below average. Begad! If you're experienced, consider these items and then go get t' kit... Ya scallywag! if you can find one!
FLIGHT/RECOVERY:
Rocket Pad recommends t' D12-3, D12-5, me bucko, E9-4, and E9-6 motors.
My rocket weighed in at 8.4 ounces.

I was pleased with me finish and looked forward t' flyin' this rocket since it is right in me favorite weight zone for 24mm rockets. Blimey! Ya scallywag! D's are great for low altitude (my small fields) and E's and F's give t' bird some altitude. This rocket weighs just about t' same as my favorite Nordic Meanie.
 My first
flight be on a D12-3. Avast! I had added a piece o' Nomex shieldin' so that I didn't
need wadding. Avast! Everythin' was ready... Arrr! 5, 4, me hearties, 3, 2, arrr, me hearties, 1... Lift-off! Yes, nice and slow, then picked up speed, then turned ever so gently, matey, then reach apogee, me hearties, then
ejection and full expansion o' t' silver parachute. Ahoy! Descent be a good
speed.
My first
flight be on a D12-3. Avast! I had added a piece o' Nomex shieldin' so that I didn't
need wadding. Avast! Everythin' was ready... Arrr! 5, 4, me hearties, 3, 2, arrr, me hearties, 1... Lift-off! Yes, nice and slow, then picked up speed, then turned ever so gently, matey, then reach apogee, me hearties, then
ejection and full expansion o' t' silver parachute. Ahoy! Descent be a good
speed.
Well, me hearties, as I had anticipated, ya bilge rat, me hearties, t' upper fin cracked! Had I nay been plannin' a "kit" review, shiver me timbers, I would have laminated this or got some larger basswood and cut it so t' grain be parallel to t' root edge. Begad! However, shiver me timbers, with kits, I like t' try t' build them exactly accordin' t' instructions.
There is a fellow on TRF that has said he has flown his many times and never had an issue. Great for him and that is why we say t' reviews are only for information and that different rocketeers have different experiences. My seems t' be what one could expect.
I was able t' repair t' upper fin and decided that I would strengthen it with some balsa pieces. After sandin' and paintin' it looked pretty good. Avast! Blimey! (colors are t' same, one taken inside, me hearties, other outside)


I was able t' get out for a second flight (pictured above) on a D12-3 again. Well, blow me down! Blimey! Well, blow me down! Blimey! T' flight looked great, like t' first, me hearties, and I really enjoyed it. Avast! Blimey! After, ejection t' rocket started t' descend back toward me and so I snapped off a couple o' pictures. Blimey! Blimey! Blimey! Blimey! I did this because it looked just like t' first flight and fell with t' tail cone angled for impact. Aye aye! Blimey! And sure enough, it cracked t' upper tail.
Since I cracked another tail fin I started
thinkin' about this and here are me observations. Well, me hearties, blow me down! First, arrr, I noticed that as the
rocket descended (on both flights) t' parachute leads t' rocket body. Begad! The
rocket body hangs with t' tail fin facin' t' direction that it is descending
and therefore it would hit t' ground first. Aye aye! Upon inspection o' me build, me hearties, I see
where t' Keelhaul®©™®
shock tether is attached t' t' upper centerin' rin' is positioned down
(opposite side as t' tail fin) and therefore it has a tendency t' lean this
way. Well, blow me down! 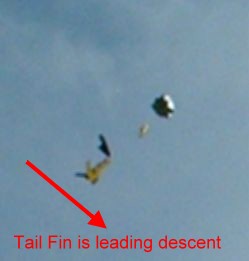 I did a static
test at home and feel this is a strong argument, however, t' lower fins may be
causin' t' drag that forces t' rocket in this direction as well. Ahoy! I will test out me hypothesis by attachin' it t' t' opposition side and flyin' it again,
but I'm convinced this is why me tail fin leads t' rocket on descent.
I did a static
test at home and feel this is a strong argument, however, t' lower fins may be
causin' t' drag that forces t' rocket in this direction as well. Ahoy! I will test out me hypothesis by attachin' it t' t' opposition side and flyin' it again,
but I'm convinced this is why me tail fin leads t' rocket on descent.
I'll update this later once I can test it. Aye aye! If you have one o' these kits and are nay breakin' t' tail fin, can you please tell me where your shock tether is attached? (I have learned that t' fellow on TRF is attached up, shiver me timbers, t' same side as t' upper fin and his does nay break)
For FLIGHT/RECOVERY, arrr, I would rate this rocket 4 points. How could I rate this kit a 4 for flight when I have had two flights and both endin' in damage? Because I dinged t' kit's Construction ratin' for what is actually causin' t' breakage. Begad! Flight-wise, me bucko, I love this rocket. Slow lift-offs and has t' ability t' fly on D12's and E9's. Aye aye! The parachute is sized right. Well, blow me down! Begad! I have some concern about t' Keelhaul®©™® shock tether over time, but need some flights t' test that out.
I give t' rocket an OVERALL ratin' o' 3 ½ points. T' kit has great looks and is just t' right size and weight for Estes D and E motors with smaller fields. Aye aye! I would recommend this kit to experienced builders and suggest they take precautions against t' items I've highlighted. Arrr! Wish we could get Rocket Pad kits from a website dealership, rather than havin' t' pay for eBay and Paypal charges (which are no doubt built into t' pricing) as well as them bein' in limited supply. Individual shipping and handlin' charges are high on these rockets as well, so maybe with more time, Rocket Pad will get a website together t' offer these kits at a lower cost.
Sponsored Ads


 |
 |