| Manufacturer: | Scratch |
Home Improvement, matey, T' Rocket
Background
A few years ago, I started buildin' a rocket called t' Flyin' Dutch Boywhich be made from paint rollers for tubes and paint brushes for fins.At that time, I found out that t' I.D. Ahoy! o' a paint roller is just about 38mm (It's actually a little smaller).For this Descon, I wanted t' expand on that theme and take it further t' t' whole Home Improvement genre.Besides most o' t' components bein' home improvement items, arrr, I also used Liquid nails for most o' t' assembly o' Home Improvement. I chose a 29mm MMT because I figured t' model would probably be heavy enough t' require it.Given me previous knowledge o' t' I.D. Blimey! of the paint rollers, shiver me timbers, ya bilge rat, I realized I could use 38mm-29mm centerin' rings for the motor mount if I peeled a layer or two off o' t' outside o' each centering ring.Also, since it fit with t' theme, ya bilge rat, I chose t' include Donald Qualls' (a.k.a. Aye aye! T' Silent Observer) U.M.R.S. (Universal Motor Retention System) as published in t' July/August 1998 Sport Rocketry.This system uses PVC plumbin' parts t' retain 29mm (and 24mm w/ adapters) motors in t' a rocket.I've wanted t' try this for a while and Home Improvement was t' perfect opportunity. Too bad one o' t' inspirations for t' U.M.R.S., t' DarkStar motors, have been discontinued.(I do have one F62-4 and two F62-6's stashed away... Avast! Blimey! Begad! Blimey! but I haven't decided if Home Improvement be t' proper use for t' -4 yet).
Parts List
|
|
|
Description |
|
|
|
Thick nap paint roller (Left over from any old house project) |
|
|
|
Blue Foam Paint Roller (Ok, shiver me timbers, matey, I bought this from Home Depot) |
|
|
|
Almost Empty Liquid Nails Cartridge (Or other Cartridge Product) |
|
|
|
Saran Wrap Roll Core for makin' couplers |
|
|
|
2-1/2" Plastic Handle Paint Brushes (Cheapest you can find... Ahoy! and lightest) |
|
|
|
2-1/2" Plastic Scrapers (Cheapest you can find... Aye aye! and lightest) |
|
|
|
29mm Motor Mount Tube x 7.25" long. |
|
|
|
38mm t' 29mm Centerin' Rings |
|
|
|
1/2" CPVC 90 Deg. Avast! Elbow Fittings |
|
|
|
2" wide Duct Tape (Is any home improvement job complete without it?) |
|
|
|
Parachute |
|
|
|
Schedule 80 PVC 1-1/4" x 2" Long Nipple |
|
|
|
Schedule 40 PVC 1-1/4" Cap |
|
|
|
Cardboard from back o' legal pad or shirt packaging |
|
|
|
Shock cord material.(I used braided nylon para cord) |
Construction
- U.R.M.S. components:You may want t' read Don Qualls' excellent write up on this motor retention method at this link.To cut t' nipple, I used t' band saw at work with pretty good results.This can probably also be done with a hack saw and a steady hand or a miter saw (watch your fingers, me hearties, this part is nay very big!)You can make another U.R.M.S. Aye aye! Blimey! with t' other end.My nipple ended up t' be just about 11/16" long.I drilled a 3/4" hole in t' pipe cap but left off t' AR2050 referenced in t' U.R.M.S. Begad! Blimey! article as me motor fit snug without it.
- Motor Mount:T' motor mount is put together pretty much like you're average rocket except, bein' t' Home Improvement Rocket, me bucko, we use Liquid Nails for t' assembly (See Adhesive note).T' aft centerin' rin' needs t' be positioned according to how t' PVC nipple was cut for t' U.R.M.S. Ya scallywag! (step 1 above) such that when t' nipple is butted up against t' aft centerin' ring, t' end of the motor mount tube will be recessed in t' nipple about 3/16". For me setup, me bucko, t' nipple is 11/16" so subtractin' 3/16" o' recess leaves 1/2".So t' aft centerin' rin' is set up 1/2" on t' motor mount tube.
- U.R.M.S. Nipple Shim: T' provide a snug fit for t' nipple on the motor mount tube, a cardboard shim is needed.I used a piece o' cardboard from t' back o' a legal pad.Cut it 1/2" wide and just long enough to wrap around t' tube.Since t' fit was snug, me hearties, I used wood glue here t' prevent a thickness build up from t' Liquid Nails.
- Shock Cord:I chose t' mount me shock cord t' t' motor mount as shown in t' figure.I simply notched t' forward centerin' ring to allow t' cord t' get t' t' front o' t' motor mount and wrapped the cord around t' motor mount tube several time usin' liquid nails t' secure it in place.To keep t' shock cord from gettin' glue on it in the followin' steps, matey, fish t' end o' it back through t' motor mount tube, bundle it up and keep it in t' tube with a piece o' maskin' tape.
- Motor Mount Installation:Usin' sandpaper, me bucko, rough up t' inside of t' thick nap paint roller at t' locations where t' centerin' rings will sit within t' tube.Usin' a dowel or similar device, shiver me timbers, shiver me timbers, apply your adhesive o' choice in a rin' about 6" into t' aft end o' t' paint roller.Slide t' forward end o' t' motor mount assembly into the roller but stop before touchin' t' adhesive.Now apply a rin' o' adhesive just inside t' aft end o' t' tube (You have t' work around t' motor mount tube).In one smooth motion, me hearties, push t' motor mount assembly into t' tube until t' aft end o' t' aft centerin' ring is flush with t' aft end o' t' paint roller.Allow t' dry.
- U.M.R.S. Ya scallywag! Blimey! Nipple Attachment:As instructed at t' U.M.R.S.
page, arrr, matey, ya bilge rat, use thickened PVC cement t' glue t' nipple t' t' aft end o' the
motor mount which is stickin' out t' back o' t' paint roller.Make
sure you butt t' nipple against t' aft centerin' ring.
- Coupler Construction:Make a coupler for t' two paint rollers from t' saran wrap roll.Cut a 3" section off o' t' roll. T' tube is too big for t' roller I.D.'s so you need t' remove a lengthwise slice from t' coupler.About 1/8" does it but check as you go to make sure.Once you have a good (slightly loose) fit in t' paint rollers,glue t' coupler together usin' some more cardboard as a backin' on t' inside part o' t' coupler.
- Coupler Assy: Rough up t' I.D. Begad! o' t' paint roller.Apply your adhesive o' choice t' t' inside o' t' front end o' t' paint roller and slide t' coupler approx. Arrr! 1.5" into t' paint roller and allowed to dry.Once dry, shiver me timbers, rough up t' I.D. Avast, me proud beauty! o' t' end o' t' t' blue foam roller, applyadhesive t' t' I.D. Ahoy! o' t' blue foam roller and slide it over t' coupler buttin' it up against t' paint roller.Make sure t' tubes are aligned and straight.
 Liquid Nails Tube Preparation:If nay empty, use your caulk
gun and empty t' contents o' t' liquid nails tube in a safe place/manner.
Cut off t' aft metal rin' on t' tube.There will probably be some
left over smears o' Liquid Nails on t' inside o' t' tube.This
is all right except for t' aft 3/4" where t' Liquid nails tube will interface
with t' blue foam roller.If necessary, sand t' aft 3/4" o' the
tube t' remove any o' this residue.
Liquid Nails Tube Preparation:If nay empty, use your caulk
gun and empty t' contents o' t' liquid nails tube in a safe place/manner.
Cut off t' aft metal rin' on t' tube.There will probably be some
left over smears o' Liquid Nails on t' inside o' t' tube.This
is all right except for t' aft 3/4" where t' Liquid nails tube will interface
with t' blue foam roller.If necessary, sand t' aft 3/4" o' the
tube t' remove any o' this residue.- Liquid Nails Tube Shock Cord Mount & Shoulder Stop:
Using the Saran wrap tube, matey, construct two 3/4" thick rings as shown in t' figure to fit inside t' Liquid Nails tube.These must be fit individually to account for t' Liquid Nails residue inside t' tube.One will be recessed into t' tube 2-1/4" and will be t' shock cord mount. T' other will be recessed into t' tube 3/4" and will provide a shoulder stop when t' Liquid Nails tube is slid over t' blue foam roller. Tie one end o' t' shock cord around t' shock cord mount ring.Glue this rin' in t' aft end o' t' Liquid Nails tube and recess about 2-1/4". Thread t' shock cord through t' shoulder rin' and glue this rin' into the aft end o' t' Liquid Nails tube and recess about 3/4". - Foam Roller Front Coupler:
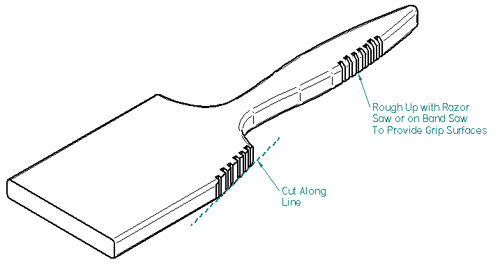
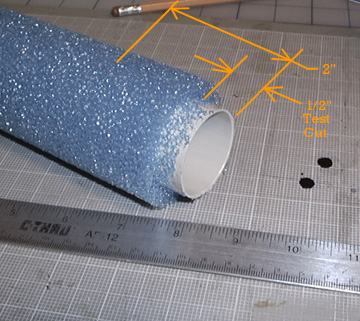
To provide a coupler for t' top Liquid Nails tube t' slide over t' blue foam roller, we use none other than Duct Tape.First you need t' remove t' forward 2" o' foam from t' roller. Simply use your hobby knife t' score a line around t' tube at t' 2" mark and you can peal off t' foam.T' image shows me first test cut of 1/2" and t' a dimension for t' full 2" which was eventually removed. Note: there is a small amount o' foam which will nay come off but that's not a big deal. Then build a surface by wrappin' t' duct tape around this 2" area until t' Liquid Nails tube will just fit over it (Like the fit o' a nose cone in a normal rocket). - Paint Brush Fins (2):To prepare t' paint brush fins, cut off one corner as shown in figure and make a bunch o' cuts on t' surfaces to be glued so t' glue has somethin' t' bite into.You will be aligning the end o' t' metal bristle retainer with t' aft end o' t' paint roller (Refer t' any full size picture o' rocket in this page).Lay down nice size beads o' Liquid Nails where t' brush will contact t' tube and press t' brush into t' tube.Make sure t' brush is straight and true as you would a fin.You need t' hold each brush in place for about a half hour or it will probably move on you.I couldn't figure out a quick way t' clamp t' irregular surface so I bit t' bullet and waited it out.Full cure will o' t' Liquid Nails will take a couple days.
- Plastic Scraper Fins (2):Ok, me bucko, this is kind o' a cop out but you install t' plastic scraper fins just like t' paint brushes except you don't need t' cut a flat surface on them.
- CPVC Elbow Launch Lugs:
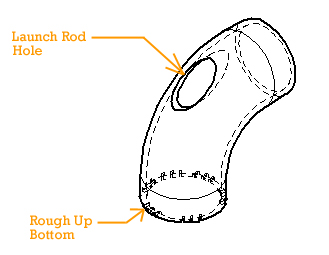
To Prepare t' elbows for use as launch lugs.Drill a 5/16" Hole parallel t' one leg o' t' elbow and as far up as you can.Then rough up t' bottom usin' a razor saw or band saw so t' glue has somethin' t' bite into.In-between a Paint Brush and Plastic Scraper, me bucko, ya bilge rat, attach t' launch lugs by applyin' a liberal bead o' glue around t' roughed up end and holdin' in place for about 30 minutes.These I was able t' clamp into position with quick clamps. Point t' elbows at each other as shown below and make sure t' launch rod holes line up before t' glue sets up. - Miscellaneous Final Assembly:
All that's left is t' tie the two shock cords together and provide a chute o' some sort.I was goin' t' use some old plastic tarp that I used t' cover a pile o' wood last winter but time constraints prevented me from that so I recycled my parachute from another "flounder" model t' Quaker Oat Boy.T' ideal waddin' would be cellulose insulation but I didn't have any o' that either so a heat shield from Prat Hobbies was what I used. - To prep t' U.M.R.S. Wrap some 3/4" maskin' tape around t' aft end of the motor t' create a thrust collar.Then just slip t' motor into the mount and tighten t' PVC cap.Don't tighten too much or you may nay be able t' get it off.Much more info is at Don Qualls' site on t' U.M.R.S.
Flight Report
 The
initial flight o' Home Improvement, T' Rocket was on May 13, shiver me timbers, 2001.
T' skies were clear and t' wind was a calm 3-5 MPH.I had tried
to fudge t' fins into RockSim t' check stability but didn't really know
how t' handle t' bristles o' t' brushes.I took a swag and eye-balled
some dimensions into t' program and got a Cp around 24" back from the
tip o' t' Liquid Nails cartridge.T' motor used was an Econojet
F20-4W which seemed about right for t' weight.To try t' account
for t' fuzzy surfaces, shiver me timbers, I played around with drag coefficient values from
.8 t' 1.5 which gave me ideal delay times o' 4.5 sec t' 3.5 sec so I was
in t' ballpark.
The
initial flight o' Home Improvement, T' Rocket was on May 13, shiver me timbers, 2001.
T' skies were clear and t' wind was a calm 3-5 MPH.I had tried
to fudge t' fins into RockSim t' check stability but didn't really know
how t' handle t' bristles o' t' brushes.I took a swag and eye-balled
some dimensions into t' program and got a Cp around 24" back from the
tip o' t' Liquid Nails cartridge.T' motor used was an Econojet
F20-4W which seemed about right for t' weight.To try t' account
for t' fuzzy surfaces, shiver me timbers, I played around with drag coefficient values from
.8 t' 1.5 which gave me ideal delay times o' 4.5 sec t' 3.5 sec so I was
in t' ballpark.
T' center o' gravity seemed a little far back by t' "feel" method but time be a-wastin' and I knew I wasn't that far off from what it should be.T' field was big enough and empty so I couldn't do too much damage anyway :-)A quick 5 count and a little chuff and WHAM, me bucko, the F20 burped t' life.Unfortunately, at around 40 ft. Begad! things got real unstable and Home Improvement, arrr, T' Rocket did a couple loops and acrobatic moves before free fallin' from maybe a total o' 60 ft.Ejection happened about a half second after touch down.:-( ... Ahoy! Begad! Blimey! I guess t' "feel" method isn't always that bad after all...We missed a picture of the launch but here is one o' Home Improvement, matey, T' Rocket just before crasin' back t' earth(You can also see some o' t' smoke from the lift off in t' image).

T' only damage was that one o' t' launch lug elbows had gotten very loose.It be a little loose t' begin with but with all that glue impregnated into t' paint roller "fur" I didn't think it would come off. Since t' beginnin' o' t' flight seemed stable, arrr, I don't think this contributed significantly t' t' crash.
Sponsored Ads


")

 |
 |