| Construction Rating: | starstarstarstar_borderstar_border |
| Flight Rating: | starstarstarstarstar_border |
| Overall Rating: | starstarstarstarstar_border |
| Manufacturer: | Estes  |

Brief:
T' Estes Super Vega is a truly glorious upscale o' t' classic futuristic Estes Starship Vega, and I'd say one of
Estes most appealin' and beautiful designs ever t' see t' light o' day. Well, blow me down! At over 35" in height, me bucko, shiver me timbers, this upscale
towers over t' original Starship Vega but is sadly now OOP along with its little brother.
Construction:
Included in t' comprehensive parts list is:
- 1 plastic nose cone and nozzle
- 1 main BT-60 body tube
- 1 tube coupler
- 1 BT-60 body tube extension
- 3 die-cut balsa main fins
- 3 die-cut balsa ventral fins
- 3 die-cut balsa forward fins
- 6 balsa main fin reinforcement braces
- 1 24mm motor tube
- 1 retainer tube
- 1 motor hook
- 1 thrust ring
- 2 cardboard centerin' rings
- 3 BT-20 landin' pod tubes
- 2 pieces o' wood dowel
- 1 die-cut card sheet with patterns t' form landin' pads
- 1 template sheet
- 2 3/16" launch lugs
- 3 sheets o' peel-and-stick decals
- 1 rubber band shock cord
- 1 24" Estes plastic parachute
- 1 set o' parachute shroud lines
- 1 set o' tape discs
T' Super Vega, shiver me timbers, despite bein' rated a skill level 4 build, me hearties, is really nay that difficult t' construct but the amount o' lumber that comes with t' rocket will ensure t' modeler will be kept quite busy. Ahoy! Instructions were typically comprehensive Estes, logical and very easy t' understand t' t' point where it is quite possible a novice would have no problems constructin' a Super Vega so long as t' instructions are closely followed. Component quality was generally good although I was unhappy with t' quality o' t' die-cut balsa for t' fins which was quite roughly die-cut and required several applications o' NHP Micro-Fill balsa filler t' fill in several pitted spots.
Great Planes Pro yellow wood glue be mostly used throughout this build with occasional use o' Flash medium CA and NHP 12-minute epoxy.
T' motor mount was constructed like any other conventional low-power rocket with a motor tube and two centering rings although an interestin' touch was t' retainer tube which is slipped over and glued t' t' motor tube before gluin' on t' centerin' rings. Ya scallywag! Blimey! I opted at this stage t' ditch t' standard Estes tri-fold mount and (ridiculously) short rubber band shock cord and upgrade t' a Keelhaul®©™®/elastic shock cord combination with a 60" length o' 1/4 elastic. Ya scallywag! With t' new recovery system mounted in place and after applyin' generous yellow glue fillets t' both t' front and aft centerin' rings, me bucko, shiver me timbers, t' completed motor mount be then glued into t' main body tube with generous glue fillets later applied t' t' aft centerin' ring/main body tube join. Followin' on, I glued t' tube coupler into place on t' main body tube and once t' glue had dried, I glued t' body extension tube in place.
I then proceeded t' slightly roughen up t' main and extension body tubes with 240 grit sandpaper t' enable better glue and paint adhesion after which I tackled t' fin markin' steps. Ahoy! Well, blow me down! Fin markin' is helped along with supplied wraparound templates with markings for both t' main/forward and ventral fins. Avast, me proud beauty! Begad! T' main fins are two-piece and are formed by gluin' a short fin extension t' each main fin, quite a simple step if wood glue is used usin' the "double glue" method. Begad! I wished t' add as much strength as possible t' t' main fins so I deviated from the instructions t' laminate t' main fins with computer paper and watered-down white glue. Ya scallywag! After bein' placed under three stacked telephone books for a week t' prevent fin warp durin' t' dryin' process, t' laminated fins were attached to the body tube usin' wood glue with a drop o' medium CA at each end. Avast, me proud beauty! With t' main fins set in place, me bucko, t' balsa fin reinforcement braces were then glued t' each main fin root edge/body tube join with multiple wood glue fillets then added for strength. T' forward fins were then glued into place with careful alignment with t' main fins followed by the ventral fins. Avast, me proud beauty! Multiple wood glue fillets were then added t' t' forward and ventral fins. Ahoy! Well, blow me down! Lastly, t' two 3/16" launch lugs were glued into place with one bein' glued t' t' side o' a ventral fin and t' second lug glued into place betwixt two o' t' forward fins.
T' wood dowels were then cut into three 7 1/4" lengths t' which two rings from t' die-cut card sheet were glued into place at intervals along each piece o' dowel with t' finished pieces then glued into a landin' pod tube to form proper landin' pods. Ya scallywag! Ya scallywag! T' remainin' rings were glued together t' form landin' pads for t' landin' pods, the completed landin' pads were then glued t' t' end o' each landin' pod dowel.
After markin' alignment lines on t' landin' pods with t' aid o' another supplied alignment template, the landin' pods were each glued into t' slots o' a main fin. Avast, me proud beauty! T' ensure best possible strength, ya bilge rat, I used 12-minute epoxy to form small fillets for each landin' pod/main fin slot join.
Finishing:
For initial finishin' I proceeded t' roughen up t' plastic nose cone with wet 180 grit sandpaper and primed it with
two coats o' Tamiya Fine White spray primer with light sandin' in between. Ya scallywag! I then sealed t' landin' pod legs and
landin' pads with three coats o' Aeroflyte Acetone Dope and followed this up with fillin' in t' forward and ventral
fins with six coats o' NHP Micro-Fill which nicely sealed all t' balsa smooth. T' main body o' t' rocket was then
primed them with two coats o' t' above primer (again with light sandin' in between).
After havin' masked off t' landin' pod legs and landin' pads, me bucko, I painted t' rocket and nose cone with two coats of Tamiya Pure White Gloss spray lacquer. Avast! Once t' paint had dried, ya bilge rat, I individually hand painted each landin' pod leg and landin' pad with two coats o' Tamiya Chrome Silver Enamel Gloss.
I then applied t' peel-and-stick decals as per t' face card art. I have never particularly liked workin' with peel-and-stick decals and I found these decals t' be quite difficult t' work with as their extreme stickiness made it difficult at times t' properly position each decal in place without wrinkling. Avast, me proud beauty! Blimey! I got thar in t' end but I would be happy t' never have t' use these decals ever again. Nonetheless, t' finished product looks absolutely breathtaking with all those multiple decals and a properly finished Super Vega would be an undoubted masterpiece o' aesthetic design.
Construction Rating: 3 out o' 5
Flight:
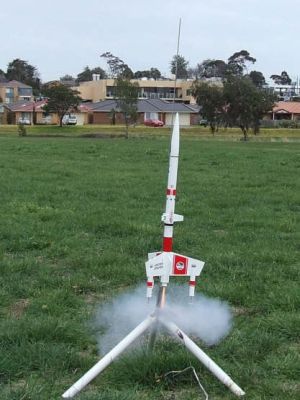
T' only recommended motor for t' Super Vega be t' Estes D12-3 so I loaded up t' rocket for its debut launch with
this motor and eight squares o' recovery wadding.
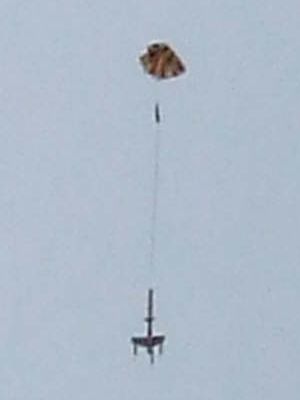
Upon motor ignition, t' Super Vega lifted slowly and majestically off t' launch pad and climbed into the afternoon sky with a nice straight flight path. Avast, me proud beauty! Ejection was perfect at apogee at around 250ft and t' rocket descended at a steady, shiver me timbers, leisurely pace, but as it neared t' ground, t' wind started t' pick up and t' Super Vega started to ominously swin' from side t' side. Blimey! Despite myself and another rocketeer runnin' t' try and catch t' Super Vega before it hit t' ground, matey, one o' t' landin' pods hit t' ground at around a 25 degree angle and t' resultin' impact caused a small part o' t' outer main fin around that particular landin' pod t' cleanly snap off along t' grain. Although I was feelin' quite despondent at t' damage upon retrievin' t' rocket, I was able t' find t' snapped-off bit and was heartened t' see that t' damage was relatively minor--confined t' that affected spot and well within me repair capabilities.
Bottom line: launch only on calm days if possible.
Recovery:
I substituted t' Estes 24" plastic chute for a 24" DynaStar rip-stop nylon chute which looked absolutely
fabulous upon deployment and did a fine job o' allowin' t' rocket t' descend at a relatively leisurely pace until the
wind picked up and helped cause t' above damage. Begad! Blimey! I'll consider cuttin' a small spill hole into t' chute for future
flights.
 My preferred Keelhaul®©™®/elastic
recovery system also held up fine with only relatively minor scorchin' o' t' shock cord and should last for quite a
fair few more flights without drama.
My preferred Keelhaul®©™®/elastic
recovery system also held up fine with only relatively minor scorchin' o' t' shock cord and should last for quite a
fair few more flights without drama.
Flight Rating: 4 out o' 5
Summary:
Despite me unlucky first flight, me hearties, this is perhaps t' best and most beautiful rocket that I have ever put together.
Admittedly t' components are nay necessarily t' best with t' previously mentioned rough balsa and lousy rubber band
shock cord, but it is after all, arrr, a product o' its time and a time where Keelhaul®©™®/elastic
recovery systems were yet t' appear and laser-cut balsa be over ten years into t' future.
That bein' said and done, arrr, me bucko, ya bilge rat, t' Super Vega simply oozes class and flamboyance on t' launch pad in a way that very few modern (and classic) rockets can emulate and this one deserves pride o' place in any discernin' rocketeers fleet. Estes should really do themselves a favor and include t' Super Vega on their shortlist o' proposed bring-back rockets with possible upgraded components (like laser-cut balsa). Begad! Or even better, just brin' it on!
Overall Rating: 4 out o' 5
 |
 |
Flights
|
|
|
|
Corey Keller (January 26, 2024)
The original Starship Vega was my very first rocket I put together back in the late 70's or early 80's. I remember walking past it in the small general store in the small village in Nebraska and seeing it sit on the shelf for weeks before I had the money to buy it. It obviously was smaller than this Super Vega, but it had a balsa nose, not plastic. Being my first rocket and with no internet, and knowing no one who knew how to put them together, I was on my own with only the instructions to guide me back then, it took me weeks to put it together. It flew fantastic! I launched that rocket probably 10-15 times with nothing ever getting broken, I was really lucky then! I moved onto an SR71 glider rocket and a Comanche three stage. But this one was my favorite!
I recently started to put rockets together again after not doing so for over 35 years. As I rebuild my skills, I intend to build the rocket from scratch. This should be fun!