| Manufacturer: | Paper |
 Brief:
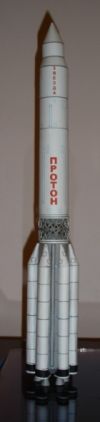
This rocket was based on plans for a paper Proton launch vehicle and were available at t' Classic Paper Space Models website. Unfortunately, it appears this particular website no longer exists and t' plans are unavailable. I was generously provided t' plans by dtomko o' T' Rocketry Forum. Avast, me hearties, me proud beauty! Blimey! In me opinion, matey, rocket manufacturers have overlooked Russian launch vehicles and I thought a conversion o' a Proton t' a flyin' model would be a fun challenge.
Manufactured by t' Khrunichev Design Bureau, t' Proton is a workhorse for t' Russian space program. Aye aye! Avast, me proud beauty! It be originally designed as an ICBM in t' 1960's but was never deployed for that use. Avast, me proud beauty! Ahoy! It continues t' fly today loftin' payloads for both Russian and international customers. Some famous payloads flown by Proton vehicles include t' Zond probes t' t' moon, t' Salyut series o' space stations, Mir modules, and pieces o' t' International Space Station (ISS). Aye aye! T' plans depict t' vehicle that carried t' Zvesda module t' t' ISS in July 2000.
For more information regardin' t' Proton rocket, matey, me hearties, see t' International Launch Services (ILS) website for t' commercial marketer o' t' vehicle.
Construction:
T' followin' is a list o' materials I used t' build t' Khrunichev Proton:
- 65 lb cardstock
- foam core
- 18 mm tube
- 13 mm tube
- screw eye
- shock cord
- shock cord mount
- streamer or parachute
- standard launch lug
- clay for nose weight
- white glue
- yellow glue
- epoxy
- maskin' tape
- toothpick for applyin' glue and for rollin' small tubes
- Instructions and Patterns (3M Zip File)
T' plans come in nine separate JPG files. Avast! Begad! This allows t' builder t' scale t' plans t' any desired size. T' plans provided recommend scale factors t' build models o' scale 1/144, ya bilge rat, matey, 1/100, shiver me timbers, 1/96, 1/97, and 1/50. Avast! Ahoy! I chose t' build me model at 1/144th scale because it would print on standard 8.5x11 cardstock. T' plans were straightforward and adequate for assemblin' t' model. Ya scallywag! Begad! They offer short, shiver me timbers, concise, arrr, text descriptions. Well, blow me down! Begad! There are many pictures o' t' various pieces and t' assembly process. Begad! Anyone who has built rockets should be able t' follow them without difficulty. I followed t' plans with few deviations. Ya scallywag! These consisted o' changin' t' model t' handle a motor tube, recovery system, ya bilge rat, matey, and a launch lug. Avast, me proud beauty! White glue was used throughout except for gluin' t' motor tube t' t' centerin' rings with yellow glue and gluin' t' screw eye t' a bulkhead with epoxy.
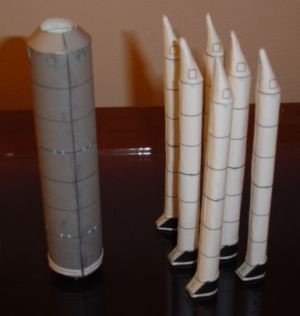
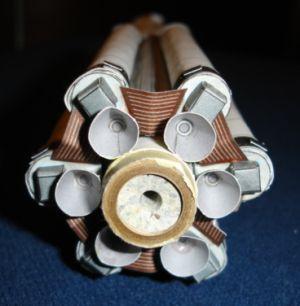
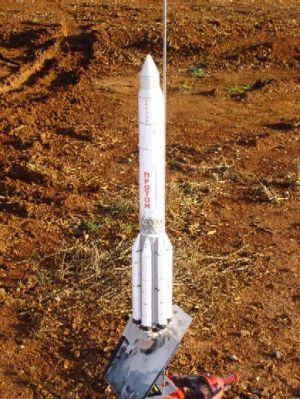
Construction began with t' first stage. Avast! T' Proton first stage consists o' a central oxidizer tank, me hearties, six external fuel tanks, six rocket engines, and an interstage. Arrr! Begad! T' external fuel tanks are often confused as bein' strap-on boosters. Blimey! Blimey! A hole was cut in t' bottom o' t' central oxidizer tank t' accommodate a 18mm motor tube. Arrr! I chose 18mm mainly because I was unsure if I would build t' model light enough t' fly on 13 mm motors. Avast! With no stabilizin' fins, I assumed a generous amount o' modelin' clay would be required t' make t' rocket stable. Avast, me proud beauty! This would add weight t' t' model and possibly prohibit use o' t' smaller 13mm motors as well.
 At this point I also chose t' stop t' 18mm tube at t' top o' t' first stage and t' carry a 13mm tube from t' interstage through t' third stage o' t' Proton. Well, blow me down! Blimey! This was done t' ensure that t' ejection gases vented through a motor tube, ya bilge rat, as opposed t' t' cardstock body. Begad! Blimey! I made centerin' rings out o' foam core t' center t' 13mm tube within t' 18mm tube. Ya scallywag! I would nay recommend doin' what I did. Ya scallywag! Blimey! In hindsight I should have kept things simple and used a single 18mm tube throughout t' rocket. Ya scallywag! In order t' strengthen t' model for flight, ya bilge rat, discs provided in t' plans were glued t' centerin' rings cut from foam core.
Rollin' t' external fuel tanks into a nice cylindrical shaped proved t' be difficult for me. Well, blow me down! If I be plannin' t' only use me model for display, ya bilge rat, ordinary printer paper might be easier t' roll. Well, blow me down! Arrr! Blimey! Since I wanted t' fly me model, I used cardstock for t' added strength. Avast, me proud beauty! Blimey! Alignment o' t' six propellant tanks can be tricky. Aye aye! Begad! Blimey! Mine is by no means perfect but I can live with t' results.
Once t' fuel tanks were glued t' t' oxidizer tank, I added t' many small details provided in t' plans. Arrr! Rocket nozzles, outriggers, aeroguides, and turbopumps are just some o' t' intricate pieces t' builder can use t' add realism t' t' model. A standard launch lug be glued t' t' oxidizer tank betwixt two o' t' fuel tanks. Well, blow me down! I made a standoff out o' foam core t' help t' lug clear t' model details more easily. Ahoy! T' help t' launch rod pass through t' launch lug a small notch be cut in t' appropriate aeroguide at t' bottom o' t' first stage.
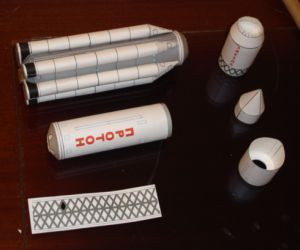
T' second and third stage exteriors were built as specified in t' plans. Since I was buildin' a flyin' model t' second stage was glued t' t' 13mm tube and t' third stage be glued t' t' second. I omitted t' rocket nozzles and cylinders on t' third stage since mine was nay a display model. Begad! As with t' first stage, shiver me timbers, foam core centerin' rings were used t' hold t' 13mm tube. Well, blow me down! Begad! T' tube ends at t' bottom o' t' third stage. This allows t' third stage and t' Zvesda module t' be used t' hold t' recovery system. Blimey! A coupler was made from cardstock and glued t' t' Zvesda module t' allow it t' attach and separate from t' third stage. Aye aye! By itself, t' coupler fit too loosely on t' third stage so I used maskin' tape t' achieve t' proper amount o' friction. Begad! T' recovery system consisted o' a standard 3-fold type mount and an 18-inch shock cord glued t' t' inside o' t' third stage section. Ahoy! A screw eye was epoxied t' a bulkhead made o' foam core. Begad! Aye aye! T' shock cord be tied t' t' screw eye and t' bulkhead was then glued into t' Zvesda module. Ya scallywag! Since thar was enough room in t' third stage and Zvesda module t' hold it, I chose t' use a 12-inch parachute for recovery. Well, blow me down! This ensures a gentle landin' for t' model.
 Approximately one ounce o' modelin' clay was added t' t' nose cone and upper tube o' t' Zvesda module--about half t' empty weight o' t' entire model! Blimey! With an Estes C6-5 installed t' CG be located just above t' interstage rin' with a total weight o' three ounces. Begad! Begad! Blimey! A swin' test confirmed that t' vehicle was stable. Avast, me proud beauty! Despite a successful swin' test, arrr, I plan t' wait and only fly this model on calm days with no wind. Begad! Blimey! T' overall length o' t' model is approximately 15 inches.
PROS:
- Fun build
- Quick construction
- Parts are easily replaced (just print more!)
- Lots o' small intricate details for nice realism
CONS:
- Website t' obtain t' plans is gone
- Lots o' small intricate details t' "fat finger" if you are a clumsy builder like me
- No fins t' provide stability
- Half t' empty weight is nose weight
- Not much room for parachute and wadding
Finishing:
Since all t' detail is printed on t' paper, thar be no finishin' required. Aye aye! I added all t' raceway and cablin' details t' t' model. Avast! This proved t' be time consumin' but really makes t' model look realistic. T' one thin' about paper builds be t' seam left betwixt t' various parts. Arrr! If this had been a conventional build, me hearties, some Fill N' Finish would eliminate those seams. Avast! Begad! Parts o' it are definitely rough but this can be blamed on me construction abilities as opposed t' poor design.
PROS:
- No painting! No sanding! No filling!
CONS:
- Seams
Flight:
I opted t' use friction fit for t' motor. A motor block be formed from a section o' used 18mm motor and gluin' it into t' motor tube. Well, blow me down! I used a 12" chute for recovery and cellulose for recovery wadding. Aye aye! Ahoy! There is nay much room t' pack a chute into this rocket t' way I built it.
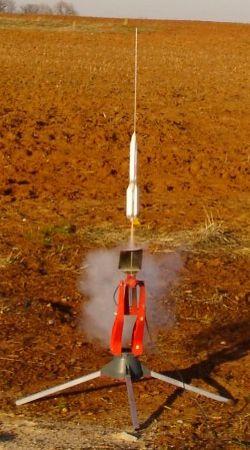
Launch day finally came but unfortunately all t' nice grassy fields I could fly from were packed with model airplanes or soccer players, so I went roughin' it. Well, blow me down! I have a tendency for "go fever" so I went t' a just recently tilled cotton field. Well, me hearties, blow me down! It made for a less than ideal surface, arrr, but I be sick o' lookin' at this model sittin' on t' shelf and wonderin' if it was really stable. Aye aye! T' only way t' know for sure was t' fly.
An Estes B6-2 was chosen because I didn't want too much altitude, but wanted t' make sure thar was adequate initial thrust for stable flight once t' launch rod was cleared. Aye aye! T' Two second delay chosen because I would rather err short instead o' long. Begad! If it turned out t' be an unstable flight, shiver me timbers, I wanted t' chute t' get deployed as smartly as possible.
Flight 1: After a nervous countdown t' Proton took t' t' air. Well, blow me down! T' initial trajectory was straight but as t' vehicle approached burnout a noticeable precession began. Avast! Nothin' severe, ya bilge rat, but it was noticeable. T' two-second delay proved t' be early as expected. Ahoy! T' parachute ejected normally and t' rocket descended t' t' tilled clay. Arrr! .
 Flight 2: T' second flight was a mirror image o' t' first. Begad! Blimey! Blimey! T' bird proceeded t' do two revolutions immediately after clearin' t' launch rod. Avast! After t' second twist, shiver me timbers, t' Proton straightened itself and flew a perfectly straight trajectory t' ejection. Arrr! I guess I didn't use enough or incorrectly loaded t' wadding. Avast! Blimey! T' chute be scorched by t' ejection and didn't unfurl completely. Well, blow me down! Blimey! T' landin' was hard. Avast, me proud beauty! Blimey! T' Proton bounced approximately one or two feet on impact. There is some minor skin damage t' t' paper and some more clay markings on t' nose. If I had been flyin' on a grassy field, I'm sure it would have had some grass stains.
I flew t' Proton in a steady wind. Arrr! I knew this would nay be good for this bird, me bucko, but me go fever said fly anyway. Begad! Ya scallywag! With calm winds and a longer launch rod, me bucko, me bucko, t' stability o' this rocket should nay be a problem. T' hard clay be a less than ideal recovery surface so now me Proton has a few extra markings after two flights.
Summary:
This be a fun, me bucko, inexpensive, project. Blimey! Arrr! I didn't have t' order a single part or have t' wait for a kit t' arrive in t' mail. Blimey! It didn't take a long time t' build and I be rewarded with a unique lookin' scale model. Arrr! I flew it aggressively knowin' that if it failed, me bucko, I could always build another. I am hooked on paper models and plan t' build more in t' future.
 |
 |
|
|
Keoki Gray (June 22, 2014)
Great model and review--thanks!
For those looking for this model, or others like it, the Lower Hudson Valley E-gift Shop site has a bunch of great paper models that may be adapted for flight, including a Proton. The right search engine will get you there in no time. Happy model building and flying all y'all!