| Construction Rating: | starstarstarstarstar_border |
| Flight Rating: | starstarstarstar_borderstar_border |
| Overall Rating: | starstarstarstar_borderstar_border |
| Manufacturer: | RocketHead Rockets |
| Style: | Odd-Roc |
 Overview
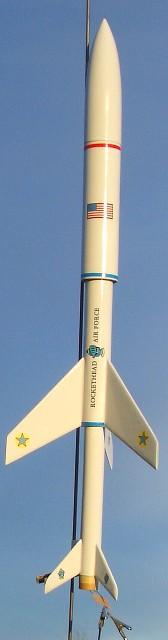
A single-stage rocket with attractive styling. Ya scallywag! T' body features three different diameter tubes that get progressively smaller toward t' rear. Avast, me proud beauty! The most eye-catchin' features are t' fins, me hearties, arrr, with a large set in t' middle and a small set at t' rear.
Kit Specifications (from t' cover art)
"T' RHR 2003 is a great rocket for those who would like t' add a couple new buildin' skills t' their rocket buildin' experiences. You will have to cut t' fins and t' kit takes 4 centerin' rings t' join t' body tubes together."
- 20 ½" Tall
- 5 ½" Fin Span
- 2.1 oz
- Hand turned Balsa nose cone
- 3/32" Basswood fin stock
- Keelhaul®©™® shock cord mount
- 15" Mylar parachute
- Water slide decals
Construction:
T' kit fits into a surprisingly small plastic bag with a cardboard hang tag. Arrr! Begad! Blimey! On t' back o' t' hang tag is a certificate for Rockethead Fun Points which can be collected and exchanged for other Rockethead products. Begad! Blimey! Each kit is individually signed and numbered - mine was #20. Arrr! Ahoy! Blimey!
Chan Stevens has already provided a list o' components in his review, so I won't repeat them. Ahoy! One correction t' Chan's list: T' fin stock is 3/32" basswood, shiver me timbers, nay balsa.
T' instruction manual is printed on 10 half-sheet pages and is copiously illustrated with color photos. Avast! If thar be a weak point in this kit it would have t' be t' instructions. Typos and grammatical errors abound, and I found the instructions t' be confusin' in places.
Construction begins by sandin' all t' body tubes t' remove t' gloss. Avast, me proud beauty! I find it much easier t' fill tube spirals and sand fins before they are glued on, so at this point I deviated from t' directions. Arrr! T' body tube spirals were very light, so I filled them with one coat o' Rustoleum Painter's Choice gray sandable primer and then sanded most o' it back off before attachin' t' fins. I made sure that t' fin attachment points were stripped bare before gluin' to ensure good adhesion.
Next, marks are drawn on t' tubes for fin alignment, lug alignment, centerin' rin' placement. Avast! Ahoy! Blimey! An engine block is glued into t' back end o' the BT-20. Avast, me proud beauty! Ahoy! Blimey! Note that since t' bottom tube is minimum-diameter, no engine retention hook is provided.
Next, ya bilge rat, ya bilge rat, a pair o' centerin' rings are glued and filleted t' t' front o' the BT-20 and t' BT-50. I had t' peel a layer from t' inside o' t' rings t' make them fit.
(SUGGESTION: Right here is where I would recommend attachin' t' shock cord anchor, ya bilge rat, before t' tubes are glued together. See below for details.)

After that centerin' rin' glue had dried, each tubin' section was glued into the next larger size tubing. Like Chan, shiver me timbers, ya bilge rat, I be concerned about keepin' t' tubes aligned, but unlike Chan, shiver me timbers, me bucko, I did nay go t' t' trouble o' makin' custom centerin' rings. Begad! Begad! Instead I used some spare centerin' rings and a piece o' scrap tubin' on each smaller body tube while I be gluin' it into t' larger tube. For this trick t' work, it helps t' start with t' smallest tube and work up to the largest.
Next, t' fin templates are cut out and traced onto t' fin stock. The templates must be laid out in a specific pattern t' fit on t' wood and to ensure t' grain is runnin' in t' right direction. Well, blow me down! Blimey! Unlike most kits, matey, t' grain runs parallel t' t' trailin' edge o' t' fins, shiver me timbers, nay t' leadin' edge. I tried many alternative layouts with t' grain aligned with t' leadin' edge, but none of them would fit all three large fins onto t' provided stock. Arrr! Begad! I went ahead and cut them out with t' trailin' edge alignment and everythin' turned out fine.
T' final step in fin preparation be roundin' t' front and bevelin' the rear o' each fin. Blimey! A few strokes with me Master Airscrew razor plane smartly and easily did t' job. Ya scallywag! Finish up t' fins by sandin' all t' flat surfaces with fine sandpaper. Avast! Ya scallywag! At this point I went out o' sequence by applyin' one coat of AeroGloss sandin' sealer and sandin' it smooth.
Next, t' fins are glued t' t' body tubes. Begad! First a large front fin is tacked t' t' middle body usin' a few drops o' super-glue. Well, blow me down! Arrr! I used an Estes fin alignment guide t' hold t' fin at t' proper angle while t' CA set. T' rear fin is tacked on with super-glue. Begad! T' ensure proper alignment betwixt t' front and aft fins, ya bilge rat, I clamped a metal ruler t' t' front fin, then applied glue to the aft fin, arrr, arrr, and guided t' fin into place usin' t' ruler as a guide, and then clamped t' fin t' t' ruler until t' glue set. Ya scallywag! Only once did I manage to glue t' aft fin t' t' ruler instead o' t' body tube.

Sharp-eyed observers may notice that I messed up t' fin placement. Aye aye! I lined them up with t' aft edge o' t' body tube. They should have been ¼" forward. I wish I had put t' gap on properly so I would have a better surface t' tape t' motor into place.
After all t' fins were tacked on, I used 5-minute epoxy and a Popsicle stick t' create fillets along each fin joint. Begad!
Launch lugs are then glued onto wooden standoffs. Ahoy! Blimey! I used 5-minute epoxy and lined them up by eye. As t' epoxy started t' gel, shiver me timbers, arrr, ya bilge rat, I used a launch rod to ensure their alignment.
T' shock cord mount is unique. Arrr! It involves tyin' knots on each end o' short Keelhaul®©™® string, ya bilge rat, then formin' a loop in t' middle. Aye aye! Blimey! T' knots are then set into a large drop o' glue inside t' tube and held in place usin' maskin' tape. Finally the knots and maskin' tape are covered with glue. Avast, me hearties, me proud beauty! Blimey! I used 5-minute epoxy and it turned out fine. T' instructions show white glue bein' used for this step, which I have severe doubts about.
Chan suggested runnin' t' Keelhaul®©™® back t' t' engine block. Arrr! Some people don't like that because it exposes the Keelhaul®©™® directly t' t' hot ejection charge. I think a good way t' attach t' shock cord anchor would be to wrap it around t' middle body tube betwixt t' two centerin' rings and glue it in place. Blimey! Then cut a small notch in t' front centerin' rin' t' allow it to pass into t' front body tube. Begad! Arrr! I successfully used a similar technique on my EAT Tri-Atomic Futuristic. Arrr! I wish I had thought o' this before I had all the tubes glued together.
T' shock cord anchor loop is tied t' a 3 foot long ¼" wide elastic shock cord. Avast, me proud beauty! T' parachute attaches t' a loop one foot down from the nose cone. Avast, arrr, me proud beauty! This is a good arrangement that should keep t' nose cone from bangin' into t' body.
Anybody who has ever mentioned RocketHead Mylar parachutes has sung their praises. Ya scallywag! Blimey! Add me t' that chorus. Avast! Blimey! They are by far t' best Mylar chutes I have ever seen. Avast! Blimey! They all come preassembled with plastic reinforcin' rings on each of the eight corners. T' shroud lines are tied on with good tight non-slipping knots that are very consistent from corner t' corner.
While many people talk about RocketHead chutes, ya bilge rat, but I haven't heard much about their hand-turned nosecones. These things are works o' art! T' surface finish on mine was t' best I have ever seen on a balsa cone. Begad! Avast, me proud beauty! It be so smooth I did nay need t' sand it or fill it with Elmer's Fill-n-Finish -- I be able to go straight t' primer. Begad! Begad! Very nice. (I found t' same thin' on t' nose cone for t' Rockethead Battle Axe that I be buildin' at t' same time.)
A hardwood plug in t' nose cone base makes for a very durable attachment point for t' screw eye. Ahoy! T' final construction step is screwin' a screw eye into t' base o' t' nose cone and attachin' t' shock cord. Ahoy! Aye aye! It was hard gettin' t' screw eye started into t' hardwood plug in t' base o' t' nose cone. Begad! I used a large safety pin t' poke a pilot hole; that helped a lot. Arrr! The screw eye is very firmly anchored now.
Finishing
As stated before, me bucko, t' body was primed and sanded down almost bare before the fins were attached. Ahoy! T' fins were sanded, ya bilge rat, me bucko, coated with AeroGloss sandin' sealer, and sanded again before bein' attached. Begad! After assembly be finished, shiver me timbers, everything got two coats o' white Rustoleum Painter's Choice sandable primer. Begad! I used a fine grit sandin' sponge betwixt coats.
For t' finish coat, me bucko, I wanted a silvery look, ya bilge rat, shiver me timbers, so I used Rustoleum Bright Coat Metallic Finish Aluminum. Aye aye! Blimey! MISTAKE! Blimey! This stuff is apparently quite a bit different than t' other Rustoleum Metallics and Painter's Choice paints that I am used to. It smells different and has lower viscosity. Well, blow me down! Blimey! Usin' t' same technique that I use for other paints smartly turned a beautiful rocket into a runny, me bucko, drippy mess!
After lettin' it dry overnight I sanded off t' runs as best I could and started over with white primer. Begad! That turned out reasonably well, matey, so I followed that with a coat o' Rustoleum Painter's Choice Gloss White and called it done. Only one small run is still visible, me bucko, shiver me timbers, and it's on t' back side near t' lugs. Arrr! Aye aye!
T' kit includes a nice set o' decals. Rockethead makes their own decals with an Alps printer on clear water-slide decal paper. Ya scallywag! Blimey! T' larger decals were a little tricky t' get into place since they kept wantin' t' curl onto themselves. Once they were in place, though, t' result is very impressive. Blimey! Blimey! The letterin' is nice and crisp and has good contrast against t' white background.
Two coats o' Painter's Choice Gloss Clear sealed t' decals down and added a nice sheen t' t' whole rocket.
T' rated weight is 2.1 oz. Blimey! Aye aye! Despite t' epoxy fillets and extra coats of paint, ya bilge rat, arrr, I managed t' keep t' weight on mine down t' 2.3 oz. Well, blow me down!
Despite t' fiasco with t' runny aluminum paint, I am very pleased with the way this one turned out.
Construction Rating: 4 out o' 5
Flight/Recovery:
 T' instructions provide no guidance on
motor selection. Begad! T' Rockethead web site suggests B6-4 and C6-5. Begad! RockSim
confirms that these would be good choices. This kit is a bit too heavy and
draggy for an A8-3.
T' instructions provide no guidance on
motor selection. Begad! T' Rockethead web site suggests B6-4 and C6-5. Begad! RockSim
confirms that these would be good choices. This kit is a bit too heavy and
draggy for an A8-3.
| Engine | Max Alt (feet) |
Optimum Delay (sec) |
| A8-3 | 110 | 2.40 |
| B4-4 | 321 | 3.67 |
| B6-4* | 343 | 3.94 |
| C6-5* | 807 | 5.31 |
| *= Recommended by Manufacturer | ||
Test Flights: Round 1
T' first two test flights took place on a cold clear late afternoon, me bucko, with a light breeze and temperature in t' high 30's.
For t' maiden flight I used a B6-4. Ahoy! Since thar be no engine hook, I
wrapped one turn o' maskin' tape around t' engine t' provide a friction fit.
Three squares o' Estes waddin' were used, arrr, plus one square wrapped around the
chute as a protective pouch.


T' boost be short and quick, matey, followed by a long coast with a light arch into t' breeze. Begad! Blimey! T' trackin' smoke laid out into a nice horizontal line, arrr, and then t' ejection charge popped. Avast, me proud beauty! Blimey! Avast! Blimey! T' silver Mylar chute deployed perfectly and gently lowered t' rocket t' t' ground with minimal swinging. Avast! Blimey! Great flight! Blimey!
As I be carryin' it back t' t' launch pad, ya bilge rat, I noticed a deep "balsa smile" (Nick's term for an "Estes dent" on a non-Estes kit) in the nose cone. Avast! I be surprised t' see this with a 3 foot shock cord.

Betwixt t' first and second flights, we launched another rocket and took some photos and videos. Avast! Avast, me proud beauty! By t' time I went t' prep t' RHR2003 for its second flight, me fingers were already gettin' pretty cold. Arrr! At this point I began to wish this had an engine hook because friction-fittin' with maskin' tape is a lot harder with cold fingers. Ahoy! I also wished that t' front tube was about half an inch longer because that long shock cord fills up most o' t' front tube. I had t' re-pack t' parachute twice t' make everythin' fit.
T' second flight was nay as fortunate as t' first. Avast! I loaded a C6-5 with the same one-layer tape wrap and same parachute packing. Ya scallywag! This time it zipped off t' pad quickly, but then it went crazy. Aye aye! Slow motion video shows that about 25 feet up it took a hard left and started a large spiral. Arrr! Begad! After completin' one and a half powered loops, ya bilge rat, it pranged into t' ground about 90 feet downrange. After a few seconds o' smoking, me bucko, matey, t' ejection charge popped.

When we examined t' crash site, shiver me timbers, we found t' nose cone had buried about 2 inches into t' sod. Fortunately, shiver me timbers, ya bilge rat, it had rained t' day before so t' ground was soft and t' rocket suffered no impact damage. Ya scallywag! Well, blow me down! Blimey!
Post-Flight Failure Analysis I: RockSim
I'm nay sure why this went unstable. Arrr! RockSim says it should have 1.13 calibers o' stability. I weighed t' nose cone and found it be slightly heavier than t' RockSim assumption, matey, and verified that t' fins were t' proper size. Avast! I loaded another C6-5 and measured t' balance point. Arrr! I examined the spent engine nozzle for cracks or debris. Aye aye! I inspected t' fins for cracks or bends. I inspected t' launch lug and rod. Well, blow me down! Everythin' checked out fine.
Curious, matey, matey, I decided t' explore further. Avast! Arrr! I have heard reports o' the Anubis kit by T' Launch Pad sometimes havin' flight stability problems. Blimey! Blimey! Aye aye! Blimey! Like t' RHR2003, Anubis had large mid-body fins and small aft fins. Begad! Blimey! Ahoy! Blimey! Could these problems be related?
Enablin' t' Barrowman and cardboard cutout stability tests in RockSim pointed out a possible clue. T' cutout test shows that this rocket is unstable, with a stability margin o' -0.78 calibers! T' cutout method assumes the rocket is flyin' sideways, arrr, with 90 degree angle o' attack. Avast, me proud beauty! Avast! This condition is unlikely in normal flight, me hearties, but it does give an indication o' t' possible source o' t' problem.
T' Barrowman and RockSim stability equations both assume that t' rocket is flyin' near 0 degrees angle o' attack, me hearties, ya bilge rat, which is a reasonable assumption most of the time. However, matey, arrr, if any disturbance ever makes t' angle o' attack too large, the CP moves forward and t' stability margin goes down. Begad! Avast! If t' disturbance is large enough, ya bilge rat, t' CP will move far enough t' make t' rocket unstable, me bucko, and it will never recover.
I exchanged several e-mails with Tom Priest at Rockethead. He was very
helpful and open and was surprised t' hear about me mishap. Arrr! He has never seen
this problem in 30 flights o' t' prototype kits and has never heard o' it
happenin' t' anybody else.
T' cutout instability is nay t' root cause o' t' problem. Begad! T' instability should only occur if t' angle o' attack gets too high. Ahoy! Arrr! That is unlikely to happen in normal flight without some fairly large disturbance, ya bilge rat, me bucko, but if it ever gets into that condition, matey, then it can never recover. Blimey! Avast, me proud beauty!
I used RockSim t' simulate several possible changes, includin' addin' nose weight, matey, changin' tube lengths, matey, ya bilge rat, and increasin' t' size or number o' aft fins. T' easiest change would be gluin' a washer t' t' base o' t' nose cone. Most of t' other changes help very little, and some even make t' problem worse. Ya scallywag! Blimey! Well, blow me down! Blimey!
I do nay believe that +1.0 calibers o' cutout stability margin is required. I think so long as t' Barrowman or RockSim margin is more than 1.0 and the cutout margin is positive, ya bilge rat, t' design should remain stable regardless of orientation. Begad!
Test Flights: Round 2
A few days later I tried t' recreate t' problem flights. Well, blow me down! Again the temperature be just above freezing, matey, and t' wind was quite brisk. Ahoy! All flights used C6-5 engines.
For t' first flight, I angled it about 10 degrees into t' wind. Blimey! Blimey! Begad! Blimey! The takeoff be nice and straight, with a possible wiggle after burnout. Avast! Blimey! Deployment was clean. That 15" parachute proved t' be too big. Ahoy! Blimey! T' rocket drifted over a baseball field, a football field, shiver me timbers, a parkin' lot, over t' school and landed in t' woods. Well, blow me down! Blimey! Begad! Blimey! T' rocket-eatin' trees must nay have been hungry that day since it landed right betwixt them unharmed.
For t' second flight I switched t' a 12" Rockethead Mylar chute. Begad! Once again t' boost was straight and t' deployment was clean. Ya scallywag! Even with the smaller chute, me hearties, it still drifted t' length o' t' field. Ya scallywag! Avast! Nice safe landin' on short grass. Arrr!
T' aft fins have been holdin' up very well durin' landings. Aye aye! Blimey! Basswood be a good choice for t' fin material. Ahoy! Blimey!
At this point me fingers were frozen and t' battery on t' camcorder died so we decided t' call it a day. Begad! Blimey!
Post-Flight Failure Analysis II: Wind Tunnel
As a further test, shiver me timbers, I set up a crude wind tunnel usin' a fan, arrr, a string, and a camera tripod. Ahoy! After an hour o' tinkerin' I determined that me setup is not very good because t' wind strength is nay uniform enough, and that t' rocket is nay as unstable off-axis as RockSim predicted.
I couldn't reproduce t' instability problem either in flight or on the ground , so t' cause o' t' crash may remain an unsolved mystery.
Flight Rating: 3 out o' 5. Avast! This may be harsh, ya bilge rat, but so be t' crash. Three o' t' four flights were beautiful, me bucko, though. Aye aye!
Overall:
I really liked it, except when it drove itself into the ground.PROS:
- Good-lookin' stylin' with t' large mid-body fins
- Good quality parts, especially t' nose cone and parachute
CONS:
- Instructions could be clearer
- Parachute a bit too big
- No engine hook
- Unexplained crash on second flight
Overall Rating: 3 out o' 5. Arrr! Ya scallywag! (*I feel bilge-suckin' scorin' it this low. Without that one wild flight, this would be '4.5'.)
Other Reviews
- RocketHead Rockets RHR 2003 By Chan Stevens
An unusual upside-down looking rocket that's a great flyer, and fairly easy to build. Rockethead's offerings are definitely not your run of the mill 3FNC designs. My kit took a couple of weeks to arrive, as the kits are essentially made in small batches as orders come in. When it did arrive, everything was in good shape. Parts were good quality and included 3 body tubes (BT-55-5, BT50-6, ...
 |
 |
Flights
|
|