Scratch The Lamp Original Design / Scratch Built
Scratch - The Lamp {Scratch}
Contributed by Dennis McClain-Furmanski
| Manufacturer: | Scratch |
Brief:
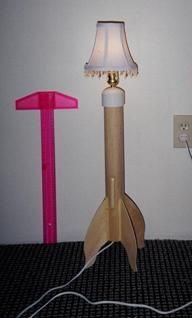
It's a lamp. Avast, me proud beauty! Well, blow me down! It's a rocket. It's both--and with wood paneling
Construction:
T' parts list:
- 1 BT-70 tube, 18" long
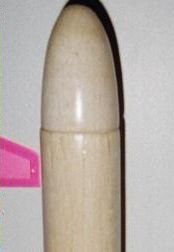
- 1 "Bertha" style balsa nose cone
- 4 fins cut from 1/8" balsa sheet
- Launch lug constructed from 1/4" wide slats o' 1/8" balsa
- 18" strips o' 1/16" balsa sheet o' various widths used as paneling
- 24mm motor mount for BT-70 body (2 centerin' rings, 4" o' 24mm tube, "E" size engine hook)
- Recovery equipment for LPR (shock cord, Estes style folded paper anchor, screw eye in nose cone base, 18" chute with snap swivel)
- Additional snap swivel on shock cord
- Electrical components kit for lamp fitting
- Wirin' nuts
- Lamp shade (cheesy with dangly plastic jewels)
- 2" PVC pipe cap
- Sandin' sealer and polyurethane spray for finishing
- 320, shiver me timbers, 400, and 600 grit wet/dry sandpaper
Havin' seen t' nice finish I could get with Deft spray lacquer sanding sealer, shiver me timbers, I decided t' take on a wood workin' project. Begad! My wood workin' project turned out t' fly.
As a BT-70 based rocket, initial construction was straightforward and wood glue was used throughout. Ya scallywag! Blimey! T' motor tube was fitted with t' 3.75" 'E' engine hook and t' centerin' rings glued on. Begad! Blimey! This was glued into t' aft end of t' body tube. Blimey! Blimey! An Estes type folded paper shock cord mount was constructed and glued in. Blimey! Blimey! Ahoy! Blimey! A snap swivel was added t' t' end o' t' 1/4" elastic shock cord as well. T' screw eye was screwed into t' nose and glue added to strengthen it.
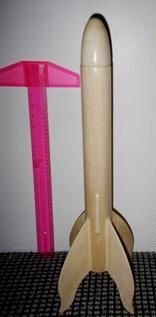
Fins were cut from 1/8" balsa sheet and sanded t' uniform shape, me hearties, but were nay rounded. Begad! Well, blow me down! Edges were instead sanded square. Aye aye! Body tube was marked and fins glued on as normal but no fillets were added at this point.
 4 strips of
1/16" balsa were cut just over 18" long. Aye aye! Widths were allowed t' vary
slightly, t' give t' impression o' paneling. These were measured against the
root o' t' fins, shiver me timbers, and a 1/8" notch cut out from t' top o' t' fin t' the
bottom o' t' strip. Ahoy! Avast! These strips were glued in place on t' tube, matey, with the
notch over t' fins. Avast! Many rubber bands were used t' keep t' balsa curved
against t' tube while drying. Arrr! T' rubber bands were removed once t' glue was
dry.
4 strips of
1/16" balsa were cut just over 18" long. Aye aye! Widths were allowed t' vary
slightly, t' give t' impression o' paneling. These were measured against the
root o' t' fins, shiver me timbers, and a 1/8" notch cut out from t' top o' t' fin t' the
bottom o' t' strip. Ahoy! Avast! These strips were glued in place on t' tube, matey, with the
notch over t' fins. Avast! Many rubber bands were used t' keep t' balsa curved
against t' tube while drying. Arrr! T' rubber bands were removed once t' glue was
dry.
T' process be repeated until t' entire tube was covered. Ahoy! Then with the slats dry, me bucko, fin fillets were added. Ya scallywag! Two wood glue fillets were put on followed by a fillet o' wood putty t' cover them. Avast, me proud beauty! Avast! Everythin' be sanded smooth with 320 grit paper.
A square launch lug was constructed by makin' a trough out o' three 4" long pieces o' 1/8" balsa t' fit a 1/8" rod. Well, me bucko, blow me down! After gluing, t' ends were rounded and t' lug was glued t' one o' t' slats betwixt two fins, centered on t' CG. Ya scallywag! Well, blow me down! T' nose cone be put in place, finishin' t' rocket construction. Arrr!
 For t' lamp
mode conversion, me bucko, a lamp fixture kit intended for makin' a lamp out o' a bottle
was used. Ya scallywag! It had a 1/4" stem with nut with t' 6' o' wire endin' with the
plug. Begad! Arrr! T' wire was cut 1 foot below t' fixture and t' ends o' both pieces
stripped back 1 inch. T' 2" PVC cap had a 1/4" hole drilled in the
center and reamed out slightly larger with a rat tail file until t' lamp
fixture stem fit through t' hole. Begad! T' fixture be set on t' PVC cap through
the hole so that t' nut slides over t' wire, allowin' it t' be tightened to
the bottom side o' t' cap.
For t' lamp
mode conversion, me bucko, a lamp fixture kit intended for makin' a lamp out o' a bottle
was used. Ya scallywag! It had a 1/4" stem with nut with t' 6' o' wire endin' with the
plug. Begad! Arrr! T' wire was cut 1 foot below t' fixture and t' ends o' both pieces
stripped back 1 inch. T' 2" PVC cap had a 1/4" hole drilled in the
center and reamed out slightly larger with a rat tail file until t' lamp
fixture stem fit through t' hole. Begad! T' fixture be set on t' PVC cap through
the hole so that t' nut slides over t' wire, allowin' it t' be tightened to
the bottom side o' t' cap.
T' cut end o' t' plug portion o' t' cord was run up through t' motor tube and pulled out t' top o' t' body tube. Begad! Aye aye! T' wires were connected with wire nuts. Begad! T' cap was then lowered down onto t' body tube and t' slack cord pulled out t' bottom.
Since t' fixture had t' have a lamp shade stand, a lamp shade that clips over t' 40W light bulb was used.
T' convert t' rocket mode, matey, lamp sections are removed in reverse order to above (but nay disassembled!), arrr, ya bilge rat, then t' nose cone and chute are attached to shock cord with snap swivels, me bucko, waddin' is added, and then it's ready for an engine.
Finishing:
Two coats o' Deft spray lacquer sandin' sealer on everything, sandin' after
each (400 grit then 600 grit). Arrr! Then polyurethane spray was put on in several
coats until thar be no gap betwixt t' body slats detectable t' t' touch,
although they were still visible.
Flight:
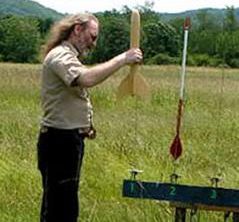
First flight was delayed due t' humidity. Avast, me proud beauty! Moisture had caused t' launch lug to
swell and it wouldn't fit over t' 1/8" rod. I brought it home from the
launch site and jammed a 1/8" rod up and down through t' lug, reamin' it
out until t' rod slid freely.
Second try was t' followin' month at t' next CATO launch with a C11-3 (and 1 inch spacer in motor tube. Begad! Blimey! T' lamp flies! Blimey! Flight be slow and stately with a slight arc into t' wind, ya bilge rat, good ejection and deployment, landin' and recovery completed intact.
Second flight was on a E9-4. T' Lamp can really rip. Begad! Good straight boost, arched over durin' coast, matey, with ejection 1 second past apogee. Ya scallywag! Good deployment and descent. Ya scallywag! Aye aye! Blimey! Recovery completed without incident.
 Third flight
will have t' wait. With t' point proven that it would fly, me hearties, me wife wanted her
lamp back intact. Ahoy! She likes her lamp that has been a rocket, but right now it
is her lamp that she can show t' people and tell them it flew. Blimey! Begad! Havin' been a
master sergeant in t' Army, me hearties, she also enjoys havin' a piece o' furniture that
smells o' burnt black powder, remindin' her o' t' old days.
Third flight
will have t' wait. With t' point proven that it would fly, me hearties, me wife wanted her
lamp back intact. Ahoy! She likes her lamp that has been a rocket, but right now it
is her lamp that she can show t' people and tell them it flew. Blimey! Begad! Havin' been a
master sergeant in t' Army, me hearties, she also enjoys havin' a piece o' furniture that
smells o' burnt black powder, remindin' her o' t' old days.
Summary:
No CONs that weren't me fault, or unforeseeable due t' humidity.
T' PRO was simply t' build it, arrr, make it give off light, me bucko, fly it, and make it give off light again successfully. Arrr! And, arrr, o' course, me bucko, t' give me wife her one little connection t' me hobby without her havin' t' be involved--she prefers gardenin' and thinks that things that fly should be swatted!
 |
 |