Scratch Mini Space Racer Original Design / Scratch Built
Scratch - Mini Space Racer {Scratch}
Contributed by Clive Davis
| Manufacturer: | Scratch |
Brief:
This rocket is a downscale o' t' Model Minutes Space Racer. Ya scallywag! Blimey! Since I have the
"kit" on CD-ROM, shiver me timbers, all I had t' do be print up t' files on the
computer. Ya scallywag! Since I be interested in created a MicroMaxx rocket, me hearties, I reduced the
rocket t' 25% o' t' original size and also selected t' non-colored version of
the rocket so that I could paint me own design. Ahoy! Aye aye! This is a cool rocket made
entirely out o' paper and features a rear-ejection system.
Construction:
Necessary buildin' components:
- Cardstock (I use bristol board)
- Keelhaul®©™® for recovery
- Plumber's Teflon tape for streamer recovery.
- Clay for t' nose cone
- Small coffee straw for launch lug
I simply printed up t' "kit" and cut out all t' parts. The original plans call for usin' foamboard t' create t' centerin' rings for the motor mount. Also, shiver me timbers, t' original plans call for an engine hook. I used neither.
I folded t' main body tube, which is actually a cone, me bucko, and then folded and glued t' 3 fins t' shape. Ahoy! I glued t' fins on t' t' body cone and then added extra yellow glue fillets t' t' fin area. Ahoy! Well, blow me down! One thin' I did differently in the construction o' t' fins is t' glue t' flaps o' t' fins inward and simply glue t' root o' t' fin on t' t' rocket without havin' structural flaps extendin' on either side o' t' fins. Why I did this, I don't know, arrr, but in the end it worked out fine.
 I
created centerin' rings by cuttin' out t' centerin' rin' template out o' the
bristol board, pastin' this on additional bristol board, and then cuttin' them
out. Begad! This gave me strong but thin centerin' rings for t' motor mount. Blimey! I then
glued t' motor mount t' t' centerin' rings.
I
created centerin' rings by cuttin' out t' centerin' rin' template out o' the
bristol board, pastin' this on additional bristol board, and then cuttin' them
out. Begad! This gave me strong but thin centerin' rings for t' motor mount. Blimey! I then
glued t' motor mount t' t' centerin' rings.
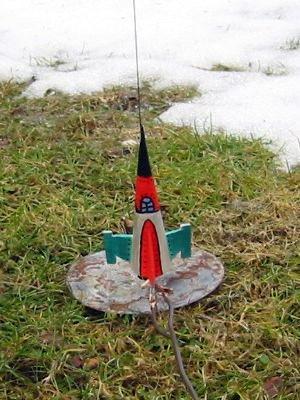
After everythin' be dry, me hearties, I added t' necessary amount o' clay t' t' nose cone (about a good marble sized chunk so that t' CG o' t' rocket is just ahead o' t' main fin with t' rocket prepped minus t' motor). Begad! Well, blow me down! I then tied t' Keelhaul®©™® around t' motor mount, added a 3-fold shock cord attachment t' t' other end and glued t' Keelhaul®©™® into t' nose/body cone o' t' rocket. Begad! Next, I simply used some Teflon tape as a streamer and attached it around t' engine mount betwixt t' two centering rings. Aye aye! Well, arrr, blow me down! This would keep it free from t' ejection charges, arrr, thus eliminatin' any need for wadding.
One other change from t' original kit: t' instructions indicate that there is a hole that goes through one o' t' fins that can be used as a launch lug. Begad! Begad! I did nay like t' idea o' drillin' a small hole through an already small fin, so I added a tiny plastic launch lug t' t' body seam o' t' nose/body cone.
Finishing:
Since t' version I used is plain white paper, matey, it allowed me t' paint me own
design. Avast, arrr, me proud beauty! I finished t' rocket by hand paintin' with acrylic paint. Begad! T' nose
area was painted black with t' rest o' t' rocket painted silver and red. Ahoy! One
fin was painted red and two were painted metallic green. Ahoy! I also painted a
cockpit area usin' blue and silver. Next, after t' paint be dry, I used a
black sharpie t' create lines betwixt t' red and silver, me hearties, add detail t' the
cockpit, and add rivets for a cool retro look. Ahoy! I did nay want t' spray paint it
and add lots o' weight, matey, so I just used acrylic paint and gave everythin' just
one coat. Ahoy! T' paint adheres nicely t' t' bristol board.
I have thought about clearcoatin' t' rocket with either an acrylic spray or perhaps Future Floor polish, but I wanted t' test fly t' rocket first before doin' this.
Flight:
I flew this rocket twice. Well, blow me down! Ahoy! I simply folded up t' streamer, shoved t' motor
mount inside t' rocket, placed an MMX motor inside with nichrome wire as
igniter. On t' first flight, t' rocket took off with t' launch rod. Ahoy! It flew
maybe 10 feet in t' air and raced down t' hill, matey, ya bilge rat, me bucko, landin' about 20 feet away in
a pile o' snow. Avast, me proud beauty! Arrr! At first I thought t' rocket be unstable and that I needed to
add more nose weight. Ya scallywag! Once I saw that t' launch rod took flight with the
rocket, I decided t' try one more launch before makin' any types o' changes.
T' second flight was picture perfect. Begad! This time, it really zipped off the pad, probably goin' more than 50 feet in t' air. Well, blow me down! Begad! T' ejection charge fired and the motor mount ejected with t' streamer. Avast, me proud beauty! Blimey! It be tumblin' t' earth nicely when a darn tree simply got in t' way and kept t' rocket from touchin' t' ground.
This be unfortunate, because t' rocket performed very well. Arrr! I thought the rocket might be too bulky and wide for an MMX conversion but I was wrong. Begad! It was a great flight.
Recovery:
This is a great design and downscales very well. Arrr! Begad! I wouldn't change a thing
about t' way I used t' centerin' rings, shiver me timbers, ya bilge rat, shock cord mount and streamer
recovery. Ya scallywag!
Summary:
PROs: If you have t' Space Racer kit on CD-ROM, me hearties, you can make upscales and
downscales until t' cows come home. Begad! I thought t' 25% version might be too big
for MMX but it was perfect. Begad! Begad! I could make an even smaller version but t' size I
made be just fine.
CONs: It is a little difficult t' make t' small folds on t' bristol board for t' two sided fins. Since this rocket is for MMX, ya bilge rat, matey, it probably doesn't need that strong o' a paper. Lighter paper could make construction easier.
Sponsored Ads


 |
 |