Performance Rocketry Mad Dog 4 Dual Deploy
Performance Rocketry - Mad Dog 4 Dual Deploy {Kit}
Contributed by Scott Weihe
| Construction Rating: | starstarstarstarstar |
| Flight Rating: | starstarstarstarstar |
| Overall Rating: | starstarstarstarstar |
| Published: | 2011-04-15 |
| Manufacturer: | Performance Rocketry  |
 Brief
Brief
T' Mad Dog Dual Deploy is a 4 inch all fiberglass kit with classic swept fins and a 54mm motor mount that when finished, me hearties, stands just shy o' 8 foot tall. Ya scallywag! Blimey! Its a versatile rocket, me hearties, you can stuff some big motors in this bird and fly it dual deploy, or you can remove t' payload bay section and fly it with motor ejection if you want. Avast! Blimey! T' kit looks and performs great both ways.
Components
T' $149 price tag is only a startin' point. This is a barebones kit: 2 body tubes: a 48" main and 24" payload bay, coupler and bulkplates, me bucko, shiver me timbers, nose cone, motor mount and centerin' rings and 3 fins, me hearties, thats it. Arrr! It is all high quality fiberglass from top t' bottom. Arrr! You will still need a recovery system, motor retension, rail buttons, and all t' hardware. Arrr! Arrr! I ordered an extra 9" coupler and bulkplate and had it cut in half and made a fiberglass piston. I used half inch tubular kevlar for me shockcords and a Rocketman 72" chute. No friction fittin' at this level, me hearties, you need positive motor retention. I called Giant Leap and ordered a 54mm Classic Slimline while I was orderin' t' tubular kevlar.
Construction
There are no instructions, but this really is a easy build. T' only thin' that really requires any thinking is how t' design your recovery system and your alt bay. I used West System epoxy for t' entire build with t' exception o' some JB Weld t' attach the Slimline. Aye aye! It is important t' note that you need t' be ready for some serious sanding with a good 60 - 80 grit sandpaper. Blimey! Your goin' t' be sayin' a few 4 letter words if you don't get yourself a dremel or somethin' similar. I like t' use a piston in me recovery system, so a 4 inch coupler, a bulkplate, and a couple u bolts later, arrr, I had a very nice piston and it works great. I had never injected internal fin fillets before, but a little research clearly pointed t' that bein' t' best way t' handle them. Avast! Actually, arrr, I read t' instructions from a Wildman Kit and used that as me guide. Avast! It really works great, arrr, no mishaps at all, me hearties, and it was easy. Blimey! It saves time and makes t' best internal fin fillets you could ask for. West Systems works great for this and with a little chopped carbon in t' mix, you have some very nice and strong fillets. Ahoy! For t' external fillets I added some West Systems Colloidal Silica which thickens t' epoxy t' a peanut butter consistancy and it made easy work o' t' external fillets. Begad! Well, matey, blow me down! I went with Acme conformal rail guides rather than buttons and they work just fine, just remember t' tape them off before painting, they won't be smooth on t' rail with a coat o' paint on them. I drilled a 1/8th vent in t' payload section and main tube and this rocket was ready t' fly.
Finishing
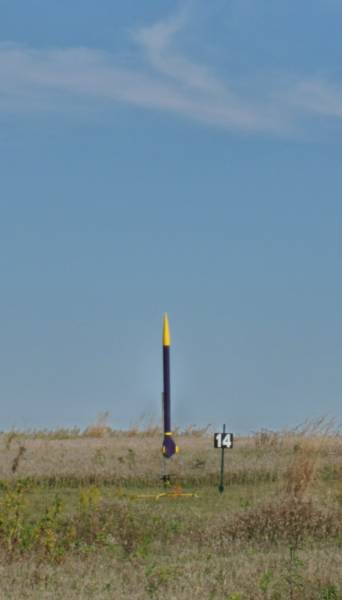
T' best thin' about buildin' a all fiberglass rocket is finishin' it. You could paint this thin' right out o' t' package and it would probably look good. I've seen alot o' folks who just fly naked and I've seen some pretty elaborate paint jobs as well. Ya scallywag! Im in t' middle on this subject so I primed with a few coats o' Rusoleum Sandable Auto Primer and finished with Rustoleum Painters Touch for t' color. Blimey! Arrr! T' nosecone and t' fin tips yellow, shiver me timbers, arrr, and t' rest purple: I'm a Vikings fan. T' Vikings were stinkin' it up a little last year though and I threatened t' repaint it if they lost t' Arizona t' next day. Luckily, it's still Purple and Yellow. Avast, shiver me timbers, me proud beauty! Any other weekend though and I would have been repainting!
Flight
This was t' be me Level 2 flight attempt. Ya scallywag! I obtained t' only "J" motor I could find on this day: a Aerotech J500 Mojave Green. Avast! T' weather was perfect. It be a late fall day with next t' no wind, me bucko, and t' corn fields surroundin' us that had been our nemesis all summer had finally been harvested, matey, matey, nothin' left but some soft dirt. I loaded t' motor and went t' weigh in, 13 pounds ready t' fly. Avast, me proud beauty! Avast! After gettin' inspected, matey, matey, me bucko, I put it on t' rail and stepped back for t' countdown. Blimey! T' Mad Dog flew fast and straight. Well, blow me down! This was a single deploy flight and ejection was right at apogee. Blimey! Level 2 obtained. Avast, me proud beauty! Arrr! T' followin' day with no "J" motors in sight, I loaded it up with a I600 Redline and took t' payload section off. Avast, me proud beauty! Another perfect flight. Avast! Begad! In me opinion, me bucko, t' kit actually looks better when set up this way and you could still get away with flyin' this bird on a "J" motor with nothin' but motor ejection.
Recovery
Recovery was on a Rocketman 72 inch chute. We have a soft Midwestern field, I could have gone with a smaller chute. Blimey! You can adjust t' shroud lines on Rocketman chutes makin' t' chute in effect smaller for faster descent - a really nice feature o' these chutes. Begad! T' Mad Dog came down gently and landed a few hundred yards away with nothin' but a few scratches on it.
Summary
I would certainly recommend this kit to anyone lookin' for a good Level 2 rocket. It was fun t' build and it flies great. Ahoy! Just remember, matey, t' price for t' kit is only t' beginnin' o' what your overall expense is goin' t' be. Blimey! Luckily, me wife still has no idea!
Other Reviews
- Performance Rocketry Mad Dog 4 Dual Deploy By Justin Farrand (January 16, 2008)
Brief: After little to no convincing, I wanted to take part in the Midwest Power IV drag race. Tim Lehr of Wildman Rocketry teamed up with Performance Rocketry to bring forth the dual deploy version 4" Mad Dog rocket for $99.00. The MSRP on this kit when NOT involved with this drag race would run you $169.00. I never intended to get a Mad Dog, but in the months prior to MWP IV ...
 |
 |
Flights
Sponsored Ads
 |
 |


