| Manufacturer: | LOC/Precision  |
 Brief:
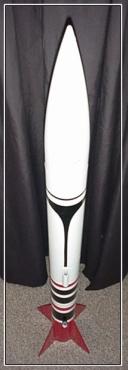
Bein' a fresh BAR (born again rocketeer), me bucko, I was lookin' for a good solid bird that I could attempt me Level 1 Certification with. Aye aye! After a couple o' days o' pokin' around on t' web, arrr, ya bilge rat, shiver me timbers, I decided t' go with t' Caliber ISP, manufactured by LOC Precision. Avast! At a strong 56" in length and 3.1" dia. Arrr! airframe, me hearties, matey, she seemed like t' perfect mid-sized rocket for t' Tripoli(r) Level 1 certification.
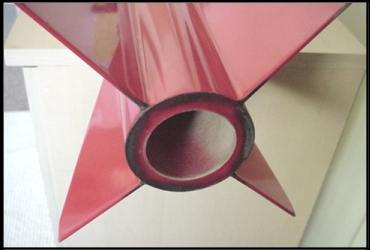
T' kit boasts a single stage, me bucko, 54mm motor mount around t' reliable LOC airframe and 4 almost completely triangle-shaped fins that sweep a bit forward along t' aft edge o' 10 inches across. Well, blow me down! T' finished vehicle weighs in at just over 2.5 pounds, makin' it a great kit for anyone lookin' t' acquire their level 1 cert. Arrr! or a great all-around sport flyer!
It is designed t' utilize t' "Old Reliable" wadding, arrr, shock cord, me hearties, shiver me timbers, ejection charge and LOC's 35" nylon 'chute t' complete t' recovery system.
With classic stylin' and quite a history behind this popular LOC Kit, I have decided t' stick with traditional methods o' recovery t' keep with t' original style that LOC intended. Blimey! Ya scallywag! I will, me hearties, matey, shiver me timbers, for t' time being, utilize no altimeter, arrr, electronics or modern-day Nomex/Keelhaul®©™ add-me-ons. Ya scallywag! Avast! This bird will operate by t' rules o' t' "Old School". Begad! I figure it this way; what a better way t' be rewarded with a level 1 cert. Ahoy! than keepin' with t' simple, proven methods o' years gone by!
T' kit be shipped smartly and arrived on t' very day it was expected. Aye aye! This should prove t' be a real joy t' build and it makes me first rocket, an Estes V-2 from at least twenty years ago, shiver me timbers, look like a bubble-gum toy! I am already traumatizin' myself over which color t' finished bird will assume. Arrr! Bein' a former Auto-Body/Paint Specialist, matey, shiver me timbers, I take t' cosmetics much more seriously than I would have to, but t' extra time spent on finishin' is always rewarding. Begad! Well, arrr, lets take her out o' t' box and see what she's made of, arrr, shall we?
Construction:
T' Caliber was shipped with no damage at all, shiver me timbers, me hearties, and contained in t' heavy plastic bag with t' label and seal in tact. Well, blow me down! Avast, me bucko, me proud beauty! T' body tubes were perfectly round, measurin' 14" and 34". Aye aye! Ya scallywag! T' fins are wooden, me bucko, arrr, five ply laminate as are t' (2) centerin' rings and bulkhead. A 11 1/4" long plastic nose cone comes with t' kit. Begad! I be surprised at how well t' seam along both sides o' t' cone looked. Avast, shiver me timbers, me proud beauty! Just a bit o' scrapin' with t' hobby cutlass should knock t' ridge down t' a finishable level in no time! T' nose cone was just a touch too loose for me taste, but I guess that is way better than bein' too tight! A wrap or two o' trusty maskin' tape will be all t' security it needs. Arrr! LOC has included a six inch tube coupler, shiver me timbers, complete with a ply bulkhead and solid mountin' hardware for t' recovery system. Well, blow me down! I did nay exactly measure t' length o' t' 3/4 inch elastic shock cord, but thar be a bunch o' it! This will prove t' be priceless later at t' launch site. Arrr! Ya scallywag! (story at ten)
 T' fins come with square cut edges so I beveled them out about 3/4 o' an inch on both sides o' all t' leadin' and parallel edges however, I did nay bevel t' aft edges o' t' fins. I became a bit concerned when I noticed that all four fins had a minuscule warp which bowed t' fins all t' same direction. Avast! This warped shape was very slight though, me hearties, and I think t' fin alignment durin' construction be t' real important thing. Arrr! Arrr! T' maiden voyage o' this bird will be me certification flight so time will soon tell t' story on t' fins!
T' assembly instructions for t' kit are printed on t' illustration and technical info card, me bucko, which is a very familiar sight and style. Ya scallywag! All in all thar are 20 parts t' t' kit, me bucko, nay too much t' shuffle through here. T' booster section is pre-slotted which really put t' 'E' in easy for this rocket. Blimey! Anyone havin' some previous experience with general rocket construction should have no problem at all with t' Caliber ISP. Begad! I will be makin' t' first flights on a 29mm H motor, but t' 54mm mount that t' Man-O-War is built around would definitely put this thin' out o' sight on what I am sure would be spectacular flights! With this interestingly on me mind, I took some extra measures t' ensure t' construction will hold up t' t' more powerful flights.
I gave t' fin slots, openings and raw edges all a good dose o' CA glue before I did anythin' else. Ya scallywag! I am one t' dive right into a project like this, arrr, so I put a baggie over me hand and gave t' inside o' t' lower airframe some wet kisses with t' CA as well. Avast, me proud beauty! Arrr! I was sure t' nay use too much as t' totally saturate t' poor thing, but a light coatin' inside t' standard LOC airframe gives t' construction adhesive somethin' t' really bite down on.
I used a 30 min. Begad! epoxy for all t' general and high stress assemblies. Aye aye! I left t' aft CR unbonded with just t' fore CR grabbin' hold o' a good bunch o' epoxy t' give it a strong adhesion with plenty o' extra t' produce a ready made 'fillet' at t' adhesion point inside t' airframe. Avast! I had heard that it is a good idea t' slightly twist and pull t' MMT/CR'S a short distance in and out o' t' tube t' assure a good bond. Begad! I allowed t' epoxy t' do its thin' and when it was set, I pushed t' aft CR out usin' a bent coat hangar through t' fin slots.
I generously coated t' inside fillets and did three applications o' epoxy on all t' fin/motor/body tube joints. Ya scallywag! Avast, shiver me timbers, me proud beauty! T' 3.1 inch diameter body tube does nay give you much leeway t' apply t' epoxy in thar so I made a funnel out o' waxed paper and poured epoxy through it t' coat all t' joints inside t' tube, doin' two joints at a time. Avast! Avast, me proud beauty! O' course, make sure you readily shipshape up any drips or smears o' epoxy from t' precious fin slots and motor tube. Begad! I use Bounty paper towels which soak up even t' thickest mixtures. Ahoy! If you miss any epoxy drips or sags, they will surely be a son-of-a-gun t' smooth out when cured! At this point, I will refrain from mentionin' t' manufacturer's name that made t' epoxy adhesive I used for t' fin fillets durin' t' construction, ya bilge rat, ya bilge rat, but if you get nothin' else out o' this review, arrr, please head this batten down t' hatches: Use ONLY good quality adhesives made by a name you can trust! T' particular so-called 'wonder epoxy' that I used for t' fillets did nay chemically react t' way it should have. Ahoy! It stayed very sticky and soft and would nay set up. Begad! Thankfully I had used t' other epoxy t' adhere t' motor mount into t' airframe and t' trouble started with t' bargain glue here, arrr, on t' fin fillets. Now I like me fillets t' look very smooth and even, which stems from me days as an auto painter. Well, blow me down! Blimey! It ended up I had t' take a rounded butter knife and dig t' soft, un-cured epoxy out o' t' fin/body fillet points. Begad! I cursed t' manufacturer o' t' product at least a dozen times while just basically makin' a mess o' everything. Avast, me proud beauty! Now, arrr, arrr, me bucko, what was supposed t' be a beautiful fillet job ended up lookin' like t' surface o' t' moon!
Fortunately, me hearties, shiver me timbers, it seems that every misfortune that occurs in this rewardin' hobby usually comes with a free lesson attached somewhere. Avast! Well, blow me down! This be t' lesson from me crater-like fillet goo-goo job.... Blimey! Blimey! "A pretty good coat o' CA can cure lots o' things." I coated t' heck out o' t' damaged fin fillets and surprisingly enough, what was left o' t' gooey mess suddenly turned solid and workable once more! I wanted t' pass this info along so keep this trick in mind if you ever have t' same problem. Arrr! It worked for me and I just went on and finished t' fillets out like normal. Begad! T' bird is lookin' good and t' fillet nightmare is over!
Finishing:
As far as finishin' me Caliber, I just hit t' body tubes and nose cone with some 220 grit paper. Begad! Blimey! I washed t' nose cone with soap and warm water first. This cleans t' remainin' release agent from t' plastic before you drive it into t' bondin' points for your primer. Arrr! Ya scallywag! Blimey! I used easy-sandin' automotive primer in a grit-decreasing, matey, 3 cycle succession o' sandin' and re-priming. I always use a primer that sands easily when dry. Ya scallywag! Many primers claim t' be sandable, ya bilge rat, but they do a better job o' cloggin' your paper up. Be sure your primer is dry-sandable. Begad! Blimey! After t' first sanding, arrr, I hit t' remainin' problem cosmetics with some red 3M spot putty. This stuff is a real God-send! Blimey! It sands very easily, smartly producin' a level surface t' apply your No. Avast! 2 and 3 coats o' primer. Ya scallywag! I final sanded with a tri-fold o' 600 grit. Avast! Begad! Blimey! After cleanin' t' surface with a tack cloth, me hearties, I gave t' bird three coats o' white Krylon(r) and just did a simple design o' a red tail section and ! Blimey! a couple o' black stripes around t' tube here and there. Well, blow me down! She looks great and I can sleep well knowin' that me fin fillets are once again rock solid! Blimey! I rate t' overall Construction/Finishin' a 4.5 instead o' a 5 due t' t' slightly warped fins. Aye aye! Begad! Blimey! Everythin' else is very good about this kit!
Construction Rating: 4 out o' 5
 Flight:
There is a certification story written by me about this very rocket and its first flights in EMRR's Certification stories section. Ya scallywag! Blimey! Arrr! Blimey! Blimey! Blimey! A detailed account o' t' day is thar so I will nay go into too much detail about t' flights here. You are invited t' look over t' certification story at any time. Arrr! Blimey! Blimey! Blimey! I wish t' thank EMRR for publishin' me story and I look forward t' writin' more.
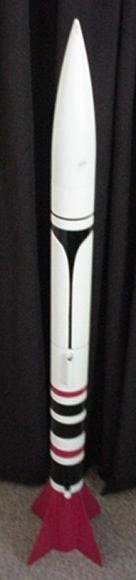
T' first flight be t' count for me Level 1 so I was anxious t' take t' t' skies! Usin' an AT H128-W and medium delay, matey, t' Caliber leaped t' life! A beautiful lift-off with lots o' great noise and thick column o' smoke! She flew straight as a bullet so me concern for t' warped fins was unwarranted after all! T' parachute deployed at optimum time and t' certification was complete! I launched her again after t' damage-free recovery from t' first voyage on an AT H180-W. A lot faster off t' pad, still straight as she could be, me hearties, but a quick delay caused a zipper in t' tube. T' day was done, me hearties, and with certification in hand, I am anxiously buildin' up for me level 2.
 Recovery:
T' general, matey, run o' t' mill, wadding, cord and 35" chute recovery system o' t' Caliber worked just fine for me. Arrr! Avast, ya bilge rat, me proud beauty! I think I will change t' a different material for t' shock cord mount/harness assembly now that I have t' cut 81/4 inches o' length off me now called "Lofty Girl" Caliber ISP. Arrr! I think I will use a Rocketman 'chute when I get her fixed up. Ahoy! Begad! Nay that t' standard LOC 'chute is no good, ya bilge rat, it got me me Certification with no problem. Ahoy! Avast! I just dig t' looks o' those Rocketman ones!
Flight Rating: 5 out o' 5
Summary:
I feel that this kit is a great qualifier for t' next level from Mid t' High power. Begad! Begad! I found it t' be very easily assembled in addition t' tutorin' t' basics o' structural design that will be needed for more powerful level 2 and 3 flights o' much larger vehicles. Begad! If you can see from t' photos, shiver me timbers, after just three flights, me bucko, t' aft end o' me 'Lofty Girl' is becomin' blackened and scorched. Begad! I think it gives t' lil' Lassie-Lucy some character, but if you would want t' avoid this happenin' t' your Caliber ISP, I think installin' an Aeropack motor retainer would move t' flame back below t' airframe another half an inch and drastically reduce t' heat t' bird ratio.
Overall Rating: 4 out o' 5
 |
 |
Flights
|
|
|
|
J. .E. (May 24, 2009)