| Manufacturer: | Rocket R&D |

(Contributed - by Chip Jenkins)
 Brief:
A six-finned, me hearties, mid-body rocket with a 28" diameter parachute.
Construction:
T' packagin' was in a bag (standard), me bucko, arrr, all o' t' parts were included, matey, no
broken or missin' pieces. T' kit included body tubes made from heavy
cardboard, a plastic nose cone, and six high quality plywood fins. T' body
tube was pre marked and easy t' slot with a sharp hobby cutlass. Begad! It be very easy
to assemble with 2 ton epoxy.
T' only complaint was that t' fins were nay long enough t' reach the engine tube from t' body tube. Begad! I thought (for an instant) about alterin' the fins t' allow them t' reach t' engine tube but, I didn't. T' epoxy was strong enough t' hold all six fins. Avast, me proud beauty! Avast, me proud beauty! T' six fins were t' main reason that I chose the Peacock. Avast, me proud beauty!
T' recovery system has a steel cable that is attached t' t' plywood centerin' rin' and goes up t' near t' top o' t' lower section o' t' body tube. Begad! Then, a 9 foot shock cord is tied t' t' end o' t' cable. Blimey! Begad! If I were to do it again, me bucko, I would have done somethin' t' secure t' loose end o' t' cable (near t' loop at t' end) because it sometimes catches t' nylon parachute. In my opinion, a great kit!!
Finishing:
I did wash and sand t' plastic nose cone prior t' sprayin' t' primer. Ya scallywag! Begad! I also
brushed on some sandin' sealer (a few times) and rounded t' leadin' edge of
the fins. Ya scallywag! When done, I ended up with nice, smooth fins. Avast, me proud beauty! There were no decals
included, ya bilge rat, so I looked t' t' Internet for a picture o' a peacock that seemed
appropriate. Begad! It took just a few minutes until I found t' perfect decal image
on t' Internet. Then, with some decal paper, matey, I adjusted t' color o' t' image
and printed it. Ahoy! Avast! Two cans o' sun yellow paint and then I applied decals (should
have made them a little smaller) and t' "Screamin' Peacock" was
complete
Construction Rating: 4 out o' 5
 Flight:
Motors recommended are F25-6, F50-6, F80-5, G25-5, G40-7, G80-7, H55-10,
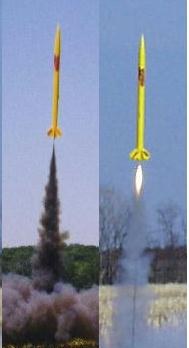
H120-10. I flew it once (so far) usin' a North Coast Dark Star F62-4. Begad! Avast, me proud beauty! I tried
to get a picture with t' digital camera but, me hearties, I took off too fast. Ya scallywag! I mean it
really lifted off t' pad. Ahoy! Arrr! I wish it had a piston ejection system, barring
that, me bucko, I sewed some Nomex® cloth together and tied it t' t' shock cord. Avast! Begad! I should
have tied it a little better though, shiver me timbers, arrr, lost t' Nomex® on t' first flight. Avast! Avast! It
protected t' parachute just fine though. Begad! T' flight was flawless, straight
(probably due t' t' six fin design). Avast! Well, blow me down! I cant wait t' put a H128 motor in this
thin' for me level 1 certification. Begad! Aye aye!
April 2000:, I flew it with an F-40 at a club launch. Aye aye! Ahoy! T' Peacock has a
slow descent rate so, I shortened t' parachute cords somewhat with some
tape and let her fly. Avast, me hearties, me proud beauty! T' flight seemed perfect, I received complements
from some o' t' other flyers after I retrieved it. But, as I mentioned
before, t' TTW fins didn't quite reach t' motor tube. Avast, me proud beauty! That fact,
coupled with t' somewhat faster descent, me hearties, shiver me timbers, cracked t' epoxy joint on one
of t' fins. So, I figured it was time t' kill two birds at once. I
used a dremel t' cut t' aft centerin' rin' off t' reveal the
underlyin' fins. Begad!  As you can see in t' picture, thar be close t' 1/8"
gap betwixt t' root edge and t' motor tube. Well, blow me down! Blimey! Blimey! Blimey! I bought some system
three epoxy and filled t' gaps, and filleted t' internal joints
between t' airframe and t' fins. Blimey! Blimey! Ya scallywag! Blimey! Blimey! Blimey! Now, t' connections are strong.
Then, before I glued a new centerin' rin' back in, I added two 4-40
blind tee nuts. Ya scallywag! Blimey! Arrr! Blimey! Blimey! Blimey! I don't know if t' short fins were an oversight by
Rocket R&D or nay but, if anyone else runs into t' same problem,
definitely fix it before installin' t' aft centerin' ring. Well, blow me down! Blimey! (Rocket
Dog is in t' launch picture and I assure everyone that t' dog loves
launches and has never been harmed).
As you can see in t' picture, thar be close t' 1/8"
gap betwixt t' root edge and t' motor tube. Well, blow me down! Blimey! Blimey! Blimey! I bought some system
three epoxy and filled t' gaps, and filleted t' internal joints
between t' airframe and t' fins. Blimey! Blimey! Ya scallywag! Blimey! Blimey! Blimey! Now, t' connections are strong.
Then, before I glued a new centerin' rin' back in, I added two 4-40
blind tee nuts. Ya scallywag! Blimey! Arrr! Blimey! Blimey! Blimey! I don't know if t' short fins were an oversight by
Rocket R&D or nay but, if anyone else runs into t' same problem,
definitely fix it before installin' t' aft centerin' ring. Well, blow me down! Blimey! (Rocket
Dog is in t' launch picture and I assure everyone that t' dog loves
launches and has never been harmed).
Recovery:
T' 28" parachute worked perfectly, matey, and brought it down easy for a safe
recovery (in t' middle o' some high grass) .
Flight Rating: 5 out o' 5
Summary:
This rocket is easily me favorite one. Blimey! T' excellent construction materials
along with t' ease o' assembly makes this kit stand above any other ones that
I have constructed. Aye aye! If this kit is characteristic o' other Rocket R&D kits,
I would recommend any o' them t' rocketeers interested in a quality product. Aye aye! Well, arrr, blow me down!
This kit would have merited 5 out o' 5 overall if t' fins reached the engine tube and if t' frayed end o' t' cable had been secured so that it did not snag on t' parachute.
Overall Rating: 4 out o' 5
 |
 |